Change your service
Change my existing service
Introduction
This user guide will show you the steps to make a change to an existing service – including changes such as:
- Changing a parameter
- Adding or removing a feature
- Upgrading or downgrading a service
- Adding another voice or toll-free line
Some examples include:
- A site with a 50Mb Private IP port needs to be upgraded to 100Mb
- Change the calling plan for a long-distance service
- Change the VPN name on the Private IP service
- Add another business line
All locations globally
Requests for orders can be made for any location globally for users who have a user role eligible for placing orders. Inventory display will be dependent on the accounts in your user profile. If some inventory does not appear, an account may be missing from your user profile. Your account manager can assist in updating your profile.
Get started
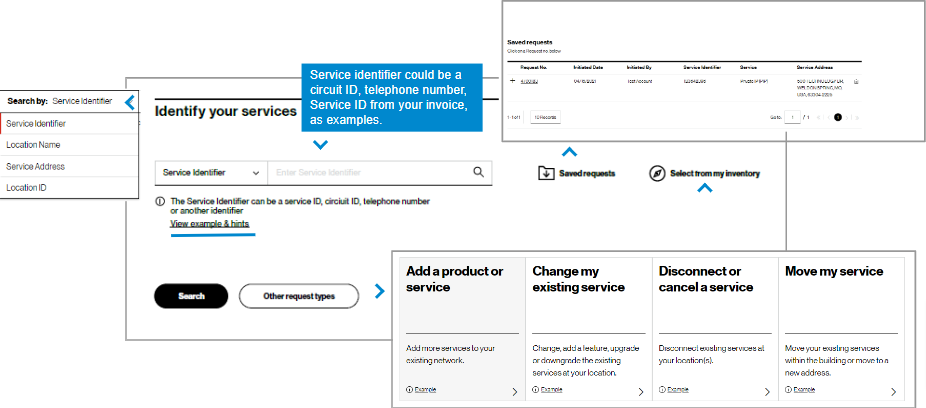
3. To start, you first identify the service(s) to be changed.
In Identify your service, search for the service to work with by entering an existing service identifier, location name, service address, or location ID, which can be found on your invoice and then click Search. Examples of service identifier are found in View examples & hints. Or you may click Select from inventory to route to a full listing of all inventory in your profile.
Requests previously saved, but not submitted, can be found by clicking on Saved requests next to the search bar.
Note: the info icon indicates helpful information.

4. If no service details are found for the entered value, verify the information entered and correct it as necessary. If entered correctly, check I entered the Service Identifier correctly. This will display fields to complete so that a Verizon representative can validate the information and fulfill your request.
Note: If the service identifier is not found, its associated billing account number may be missing from your user profile. Please contact your Verizon representative or company point of contact to add these accounts to your profile to support future requests.
Service details

5. The service details will display according to the search parameter used. Select the service you would like to include in the change order request. To include all, check the box at the top.
Note: The chain link icon ![]() . shows these services are tied together in a grouping. The Association field explains how they are connected.
. shows these services are tied together in a grouping. The Association field explains how they are connected.
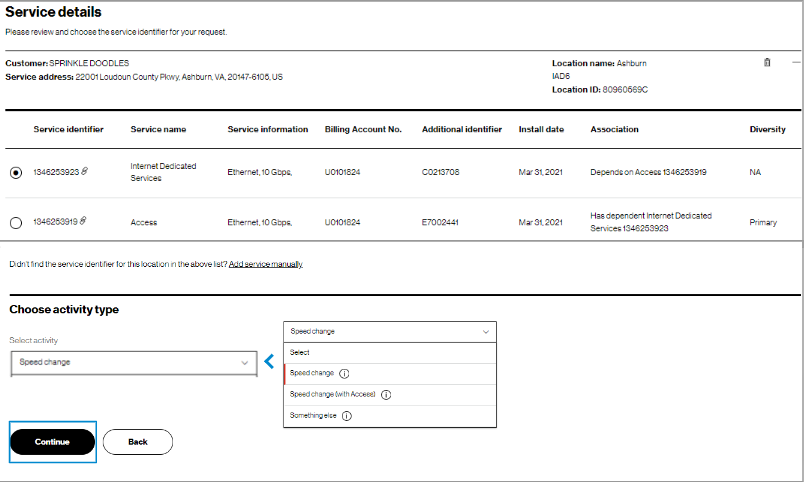
6. Next, choose the activity type based on the service name selected. Upon selection of the activity, choose Continue to complete request details.
Request details
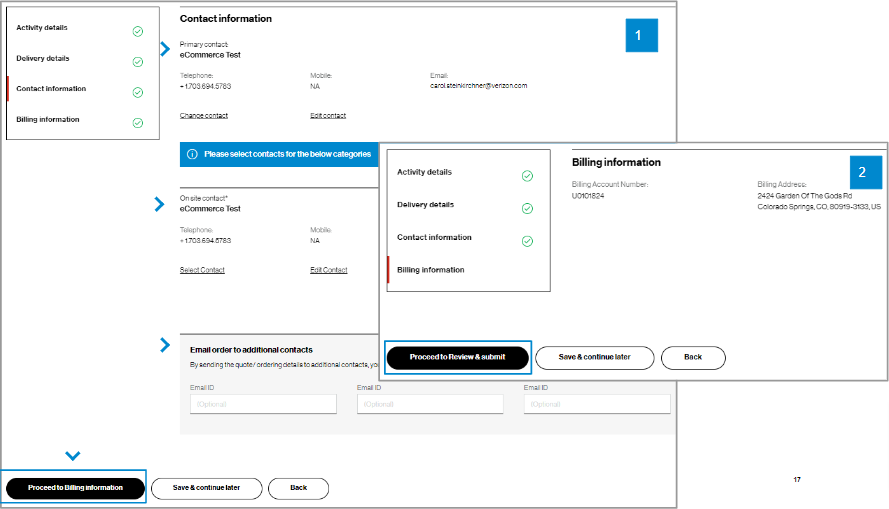
9. For Contact information, you will be the primary contact since you are placing the order. You can edit your contact information if needed, add an On site contact, and enter up to three additional email addresses to receive the order confirmation. (image 1) Then click Proceed to billing information.
10. In Billing information details, you can view the billing account number and billing address for the service being changed. (image 2) You cannot edit this field. Click Proceed to review & submit.
Review and submit
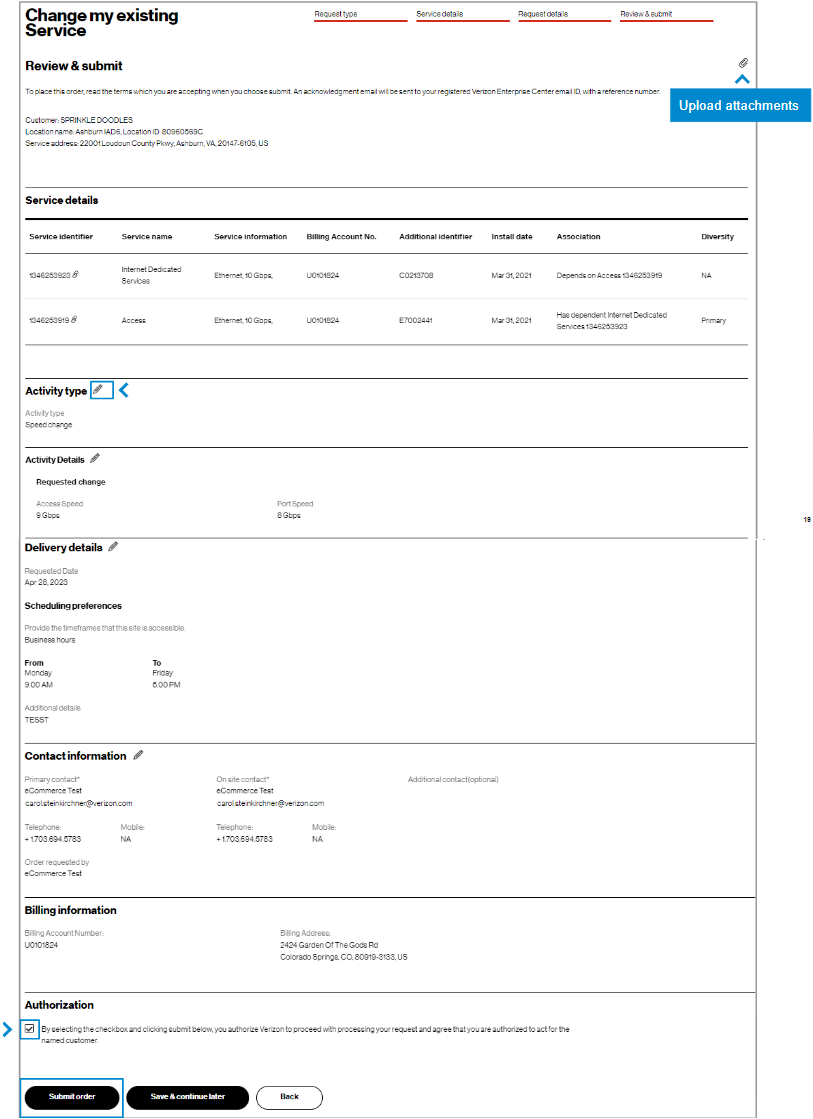
11. In Review & submit, scroll down the page to review all the order request information. Click on the pencil icon to edit a field. At the bottom of the Review & submit page, click on Submit order to place your order request. Once submitted, you can track your order online by hovering on Orders and click on Pending orders under Status.
Track the request
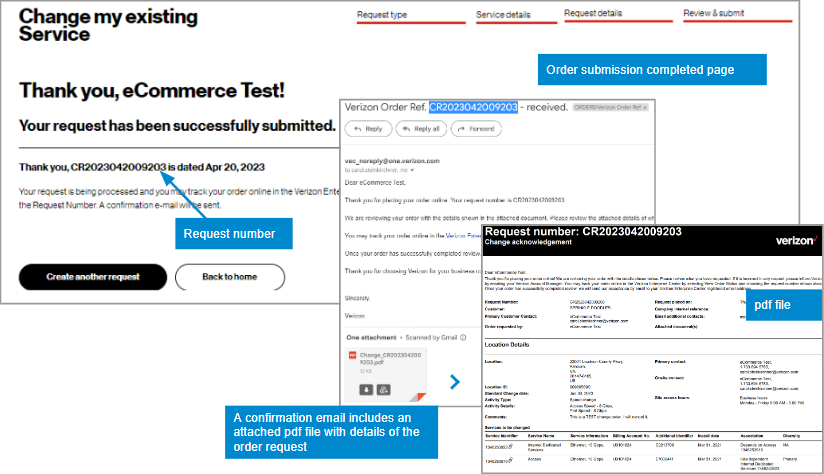
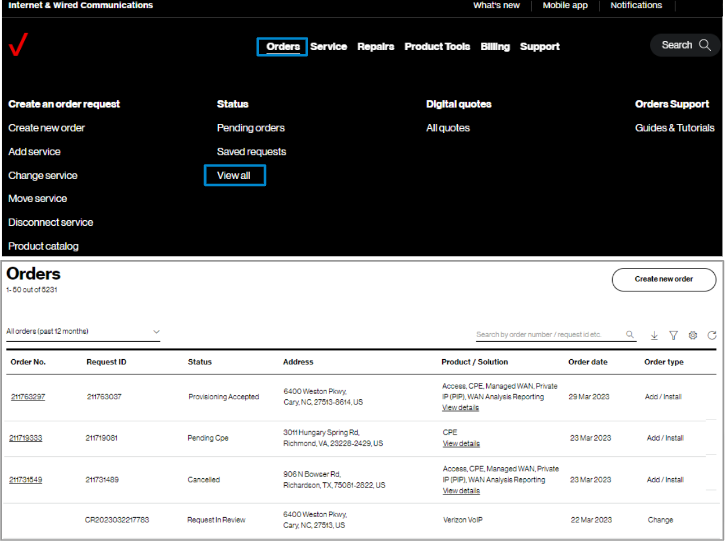
13. Track orders online by hovering over Orders and click on View all under Status. A support guide is available to learn more about using View order status.
View the quote
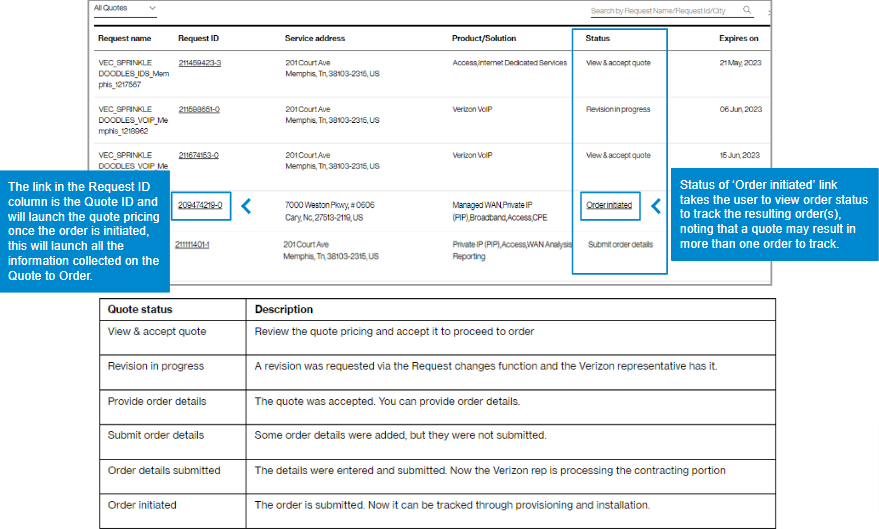
14. Some change orders require a price change, and when this occurs, a quote will be visible in digital quotes. You can view your quote online by hovering over Orders and clicking on All quotes under Digital quotes. You can click on the Request ID to view the quote. While your quote is in progress, there are status phrases to direct your actions online, as shown below under Status. Once the quote becomes an order, the status changes to ‘Order initiated” and you can click on it to view your order status. You will receive an email with your quote.
Notes: Click here to view guide for Check your order status,
Click here to view guide for View and accept your online quote.
Tips and troubleshooting
|
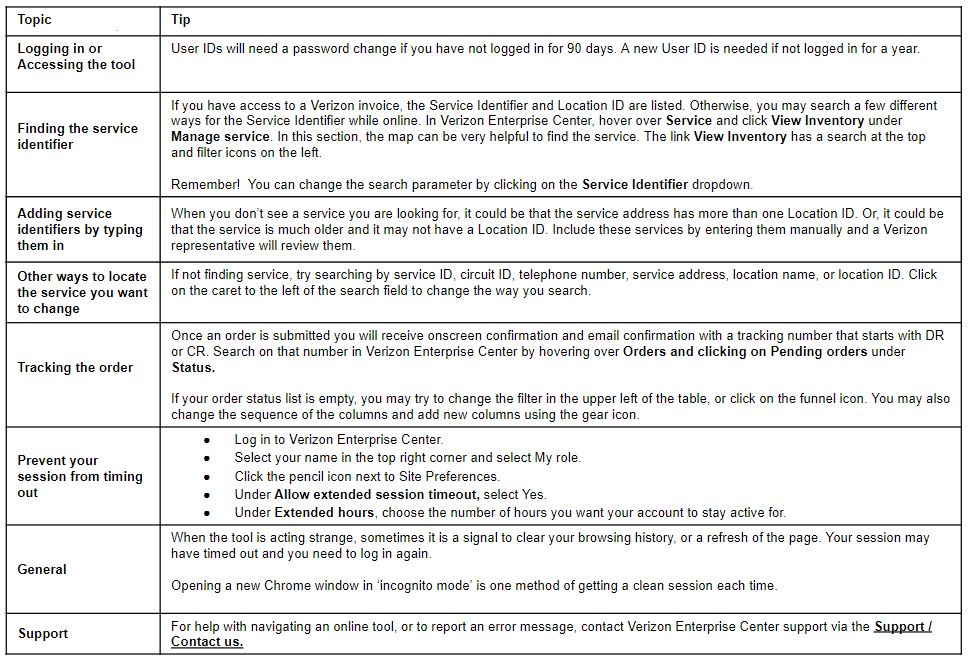
Topic |
Tip |
|
Logging in or Accessing the tool |
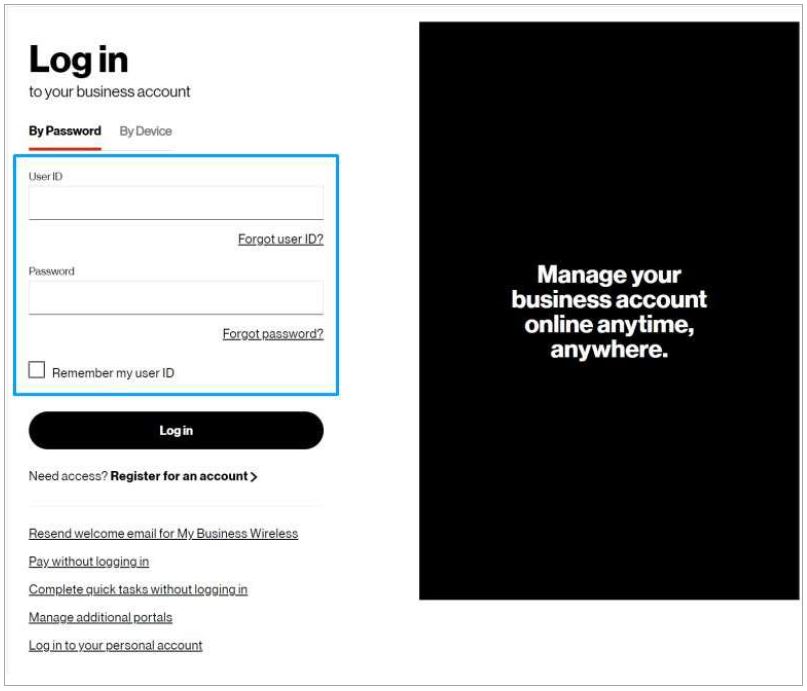
User IDs will need a password change if you have not logged in for 90 days. A new User ID is needed if not logged in for a year. |
|
Finding the service identifier |
If you have access to a Verizon invoice, the Service Identifier and Location ID are listed. Otherwise, you may search a few different ways for the Service Identifier while online. In Verizon Enterprise Center, hover over Service and click View Inventory under Manage service. In this section, the map can be very helpful to find the service. The link View Inventory has a at the top and filter icons on the left.
Remember! You can change the search parameter by clicking on the Service Identifier dropdown. |
|
Adding service identifiers by typing them in |
When you don’t see a service you are looking for, it could be that the service address has more than one Location ID, or that the service is a much older service and it may not have a Location ID. Include these services by entering them manually and a Verizon representative will review. |
|
Other ways to locate the service you want to change |
If not finding service, try searching by service ID, circuit ID, telephone number, service address, location name, or location ID. Click on the caret to the left of the search field to change the way you search. |
|
Tracking the order |
Once an order is submitted you will receive onscreen confirmation and email confirmation with a tracking number that starts with DR or CR. Search on that number in Verizon Enterprise Center by hovering over Orders and clicking on Pending orders under Status.
If your order status list is empty, you may try to change the filter in the upper left of the table, or click the filter icon |
|
General |
When the tool is acting strange, sometimes it is a signal to clear your browsing history or refresh the page. Your session may have timed out and you need to log in again.
Opening a new Chrome window in ‘incognito mode’ is one method of getting a clean session each time. |
|
Support | For help with navigating an online tool, or to report an error message, contact Verizon Enterprise Center support via Support / Contact us. |
Add or remove Verizon VoIP concurrent calls
For Verizon VoIP services, you can add concurrent call paths as needed to allow a greater number of calls through your network. Examples of when you might want to add concurrent call paths include situations such as responding to:
- A seasonal increase in call volume
- A special event or weather event that will temporarily generate a higher call volume
- A permanent increase in call volume as your business grows
Depending on your situation, you can add or remove concurrent call paths as needed. Add or Remove Concurrent Calls orders have a target delivery date of one business day, but the change to number of call paths is often completed sooner than that—within hours.
Create order
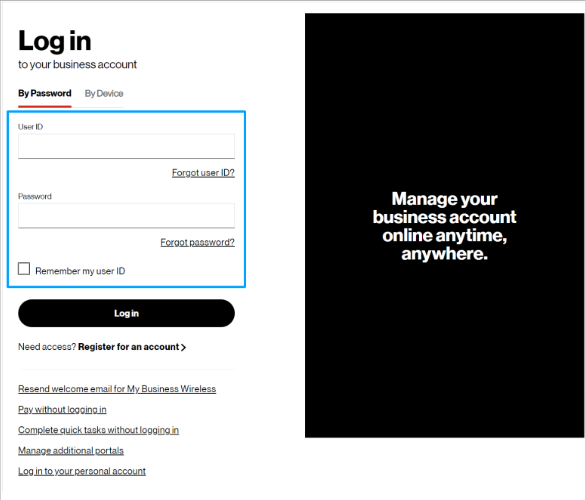
1. Log in to Verizon Enterprise Center
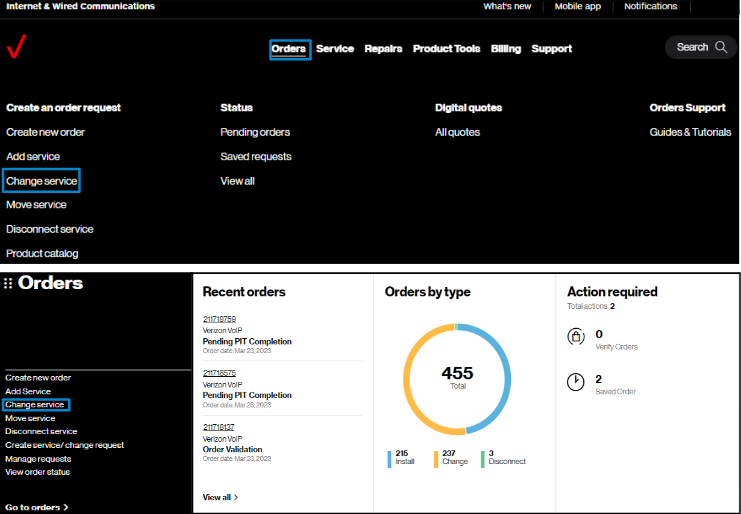
2. Select Orders > Create new order. On the Verizon Enterprise Center home page, you can also click on Order new service in the black Orders pod for the same option to create an order
3. On the Verizon VoIP pod, click Change below the Add another location button to see the change menu
4. Select Add Concurrent Call or Remove Concurrent Call. This guide shows an Add Concurrent Call order as an example
Change request
Your order has four steps:
- Change request
- Configure & pricing
- Checkout
- Review & submit
5. In the change request step, select your Customer Contracting Legal Entity (CLE) and Verizon VoIP enterprise name. Input the number of concurrent calls you want to add. If you only have one CLE, it will pre-populate
Configure & pricing
6. Review your pricing and click Continue to checkout
Your contractual pricing is provided for the additional concurrent calls you are ordering, as well as any other line items that changed with this transaction.
Checkout
7. Review your contact information, edit it if needed, and click Proceed to delivery details
8. View the order target delivery date and click Proceed to billing details
9. View your Billing Account Number and click Proceed to review & submit
Review & submit
10. Scroll down the page to review all your information. Click to edit a field
11. At the top of the page, there are icons to download, email, and print the completed order. When you submit the order, you will receive an email with a PDF of your order information, but you can also download the PDF from this page
12. Select Submit order to place your order. You can also save the order and return to it if you choose to. Return to your saved order by selecting Go to orders in the Orders pod on your home page and selecting the Saved Orders filter.
13. Select Orders > View all to track your order status
Move to a new address or within your building
Introduction
This user guide will show you the steps to request the move of your services to a new location – including changes such as:
- Moving within the same building at the same address
- Moving to a new address
Some examples include:
- "We need to relocate our office and move all of our services from Cupertino to San Jose"
- "I am moving to a new suite within the same building at my Dallas address"
- "We are upgrading to a new server room and need to move all of our CPE"
All locations globally
Requests for orders can be made for any location globally for users who have a user role eligible for placing orders. Inventory display will be dependent on the accounts in your user profile. If some inventory does not appear, an account may be missing from your user profile. Your account manager can assist in updating your profile.
Get started
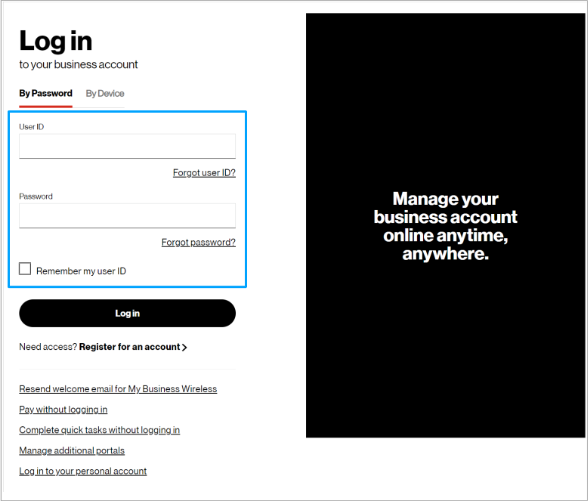
1. Log in to the Verizon Enterprise Center with your user ID and password.
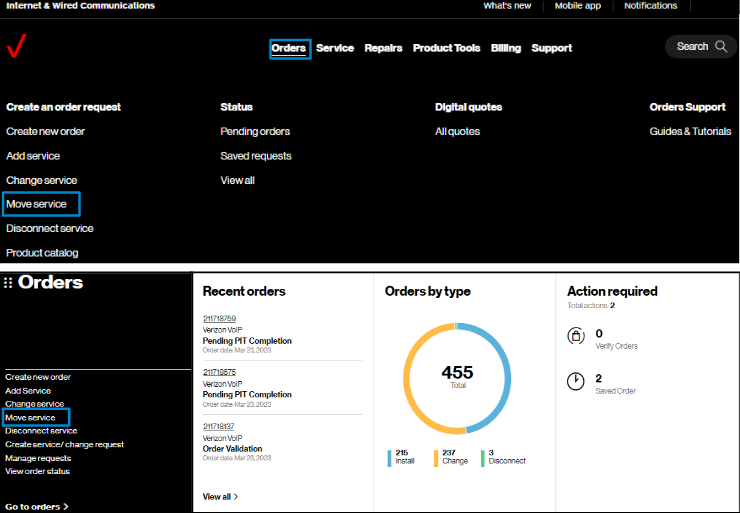
2. Hover over Orders and click on Move service under Create an order request.. On the Verizon Enterprise Center home page, you can also click on Move service in the Orders pod for the same option to create an order.
Identify service

3. To start, you first identify the service(s) to be moved.
In Identify your service, search for the service to work with by entering a existing service identifier, location name, service address, or location ID, which can be found on your invoice and then click Search. Examples for service identifier are found in View examples & hints. Or you may choose Select from inventory to route to a full listing of all inventory in your profile.
Requests previously saved, but not submitted can be found in Saved requests.
Note: The info icon ⓘ indicates helpful information.
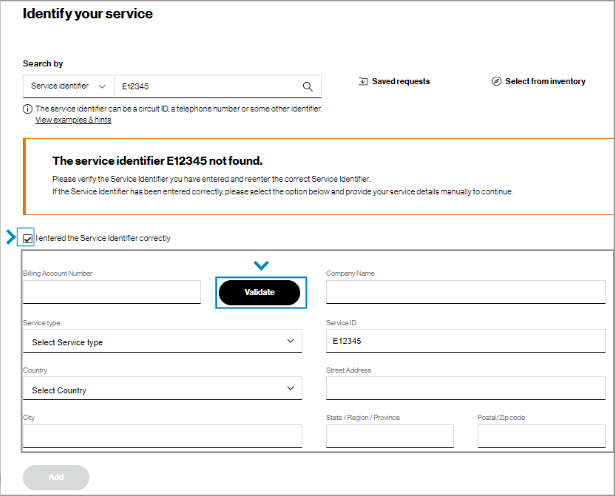
4. If no service details are found for the entered value, verify the information entered and correct as necessary. If entered correctly, check I entered the Service Identifier correctly. This will display fields to complete so that a Verizon representative can validate the information and fulfill your request.
Note: If the service identifier is not found, its associated billing account number may be missing from your user profile. Please contact your Verizon representative or company point of contact to add these accounts to your profile to support future requests.
Service details
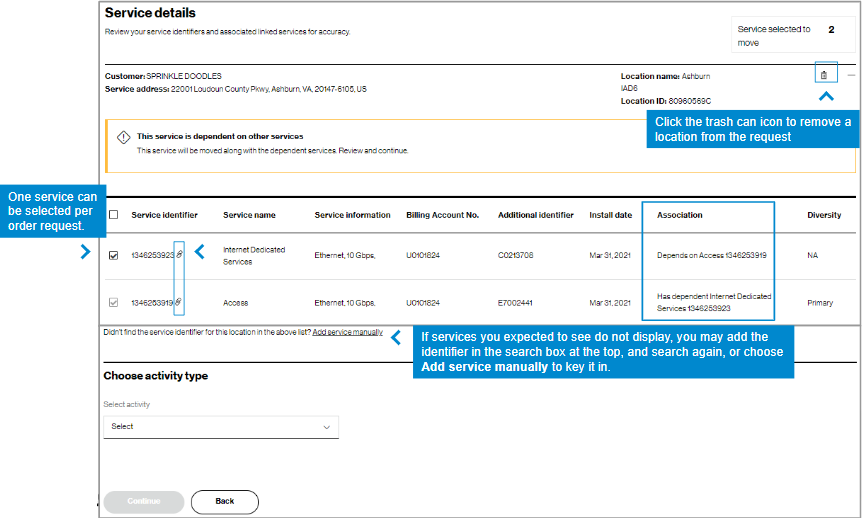
5. The service details will display according to the search parameter used. Select the service you would like to include in the move order request. To include all, check the box at the top.
Note: The chain link icon ![]() shows these services are tied together in a grouping. The Association field explains how they are connected.
shows these services are tied together in a grouping. The Association field explains how they are connected.
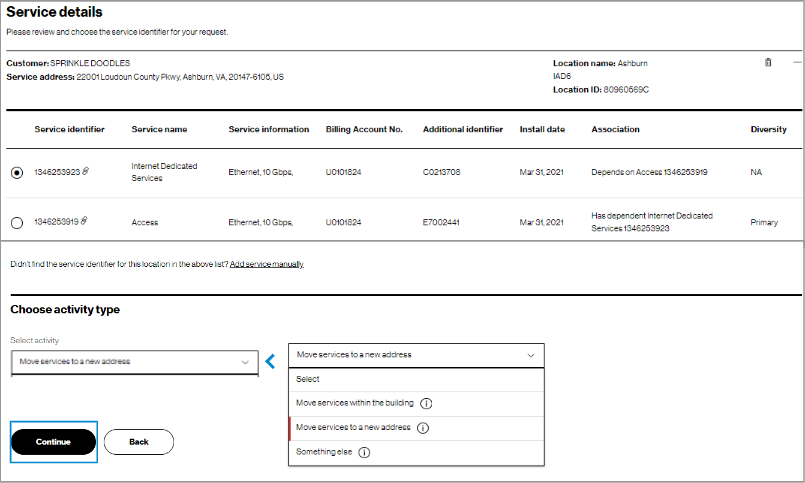
6. Move requests will prompt a choice of the action below the inventory selected. Choose the most relevant: Moving the service within the same building,.to a new address, or something else. Upon selection of the activity, choose Continue to complete request details.
Request details

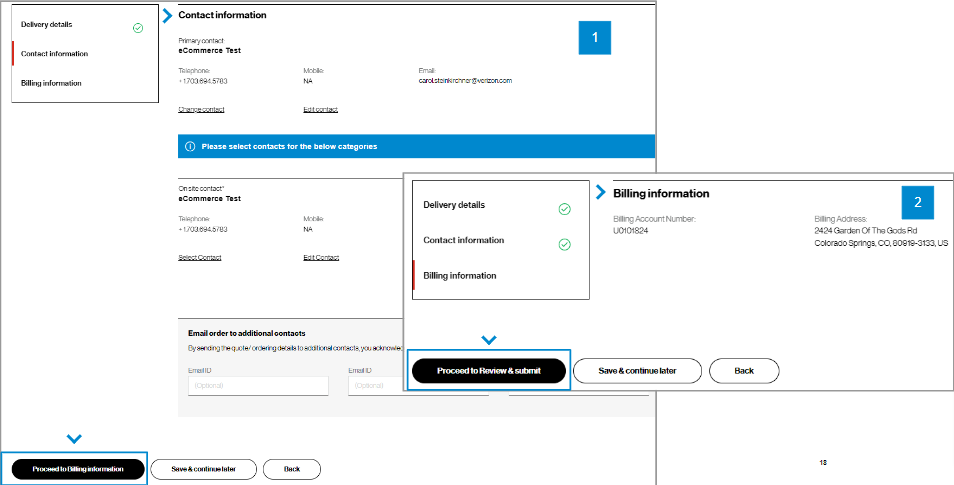
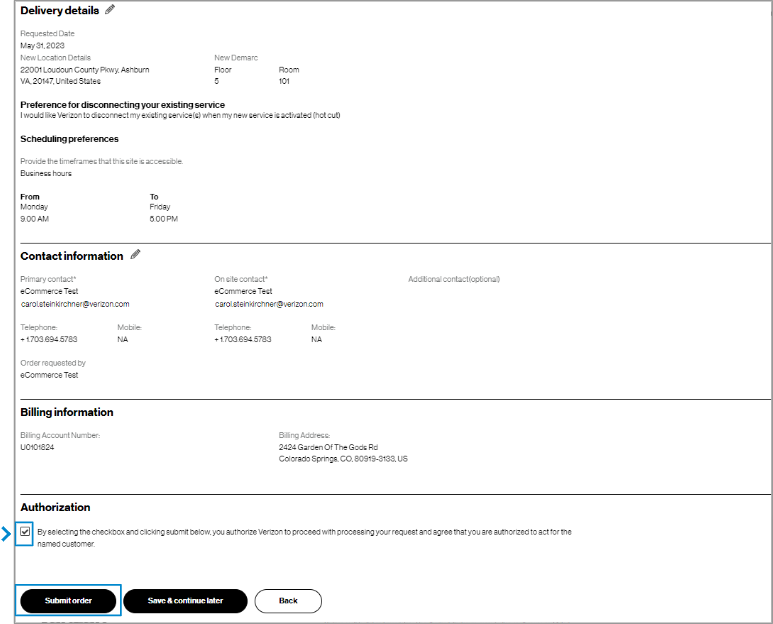
8. For Contact Information, you will be the primary contact since you are placing the order. If needed, you can edit your contact information, add an Onsite Contact, and enter up to three additional email addresses to receive the order confirmation. Then click Proceed to Billing information.
9. In Billing information, you can view the billing account number and billing address for the service being changed. You cannot edit this field. Click Proceed to review & submit.
Review & submit
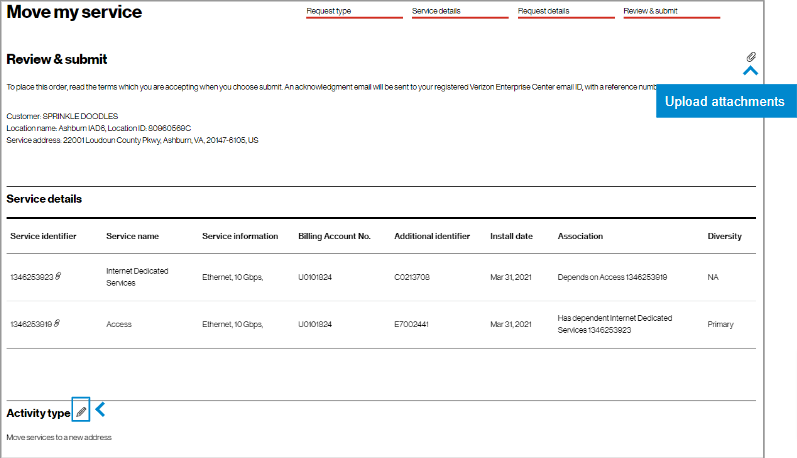
10. In Review & submit, scroll down the page to review all the order request information. Click on the pencil icon ![]() to edit a field. At the bottom of the Review & submit page, click on Submit order to place your order request. Once submitted, you can track your order in Verizon Enterprise Center by hovering over Orders > Pending Orders.
to edit a field. At the bottom of the Review & submit page, click on Submit order to place your order request. Once submitted, you can track your order in Verizon Enterprise Center by hovering over Orders > Pending Orders.
Track the request
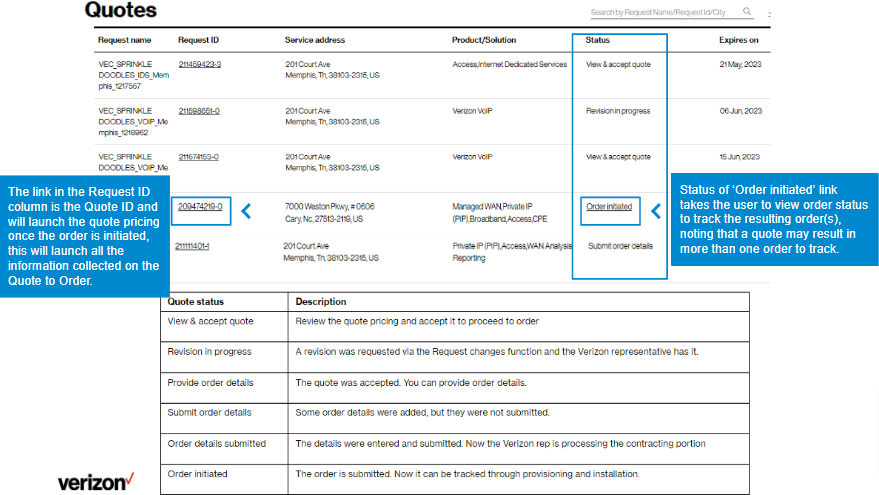
13. If you request to move service to a new address, a quote will be required. When ready, you can view your quote online by hovering over Orders and clicking on All quotes under Digital quotes. You can click on the Request ID to view the quote. While your quote is in progress, there are status phrases to direct your actions online, as shown below under Status. Once the quote becomes an order, the status changes to ‘Order initiated” and you can click on it to view your order status. You will also receive an email with your quote.
Note: Click here to view guide for Check your order status, Click here to view guide for View and accept your online quote
Tips and troubleshooting
Topic | Tip |
Logging in or Accessing the tool | User IDs will need a password change if you have not logged in for 90 days. A new User ID is needed if not logged in for a year. |
Finding the service identifier | If you have access to a Verizon invoice, the Service Identifier and Location ID are listed. Otherwise, you may search a few different ways for the Service Identifier while online. Go to Service > Map View. The map can be very helpful to find the service. The Inventory tab has a search at the top and filter icons Remember: You can change the search parameter by selecting on the Service Identifier dropdown.
|
Adding service identifiers by typing them in | When you don’t see a service you are looking for, it could be that the service address has more than one Location ID, or that the service is a much older service and it may not have a Location ID. Include these services by entering them manually and a Verizon representative will review. |
Tracking the order | Once an order is submitted you will receive on-screen confirmation and email confirmation with a tracking number that starts with DR or CR. Search on that number in View Order Status to track your order. If a price change is required, you may also receive a Quote ID in addition.
If your order status list is empty, you may try to change the filter in the upper left of the table, or click the filter icon |
General | When the tool is acting strange, sometimes it is a signal to clear your browsing history or refresh the page. Your session may have timed out and you need to log in again.
Opening a new Chrome window in ‘incognito mode’ is one method of getting a clean session each time. |
Support | For help with navigating an online tool, or to report an error message, contact Verizon Enterprise Center support via Support / Contact us. |
Remove Verizon VoIP Telephone Numbers
Introduction
This user guide shows you the steps to remove VoIP telephone numbers. Those numbers will then fully be disconnected and no longer part of your Enterprise and Location configuration.
All locations globally
Requests for changes can be made for any location globally for users who have a user role that is eligible for placing change requests.
Get started
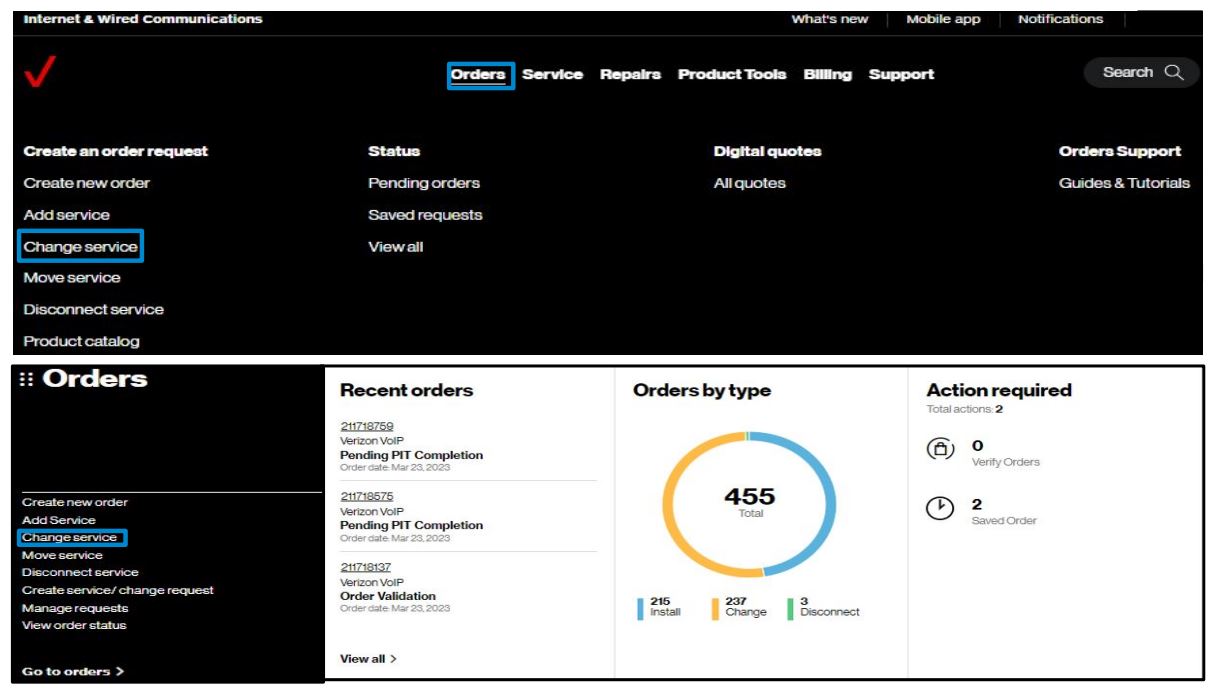
2. Hover on Orders and click on Change service under Create an order request.. On the Verizon Enterprise Center home page, you can also click on Change service in the Orders pod for the same option to create an order.
Identify service
3. To start, you first identify the service(s) to be changed.
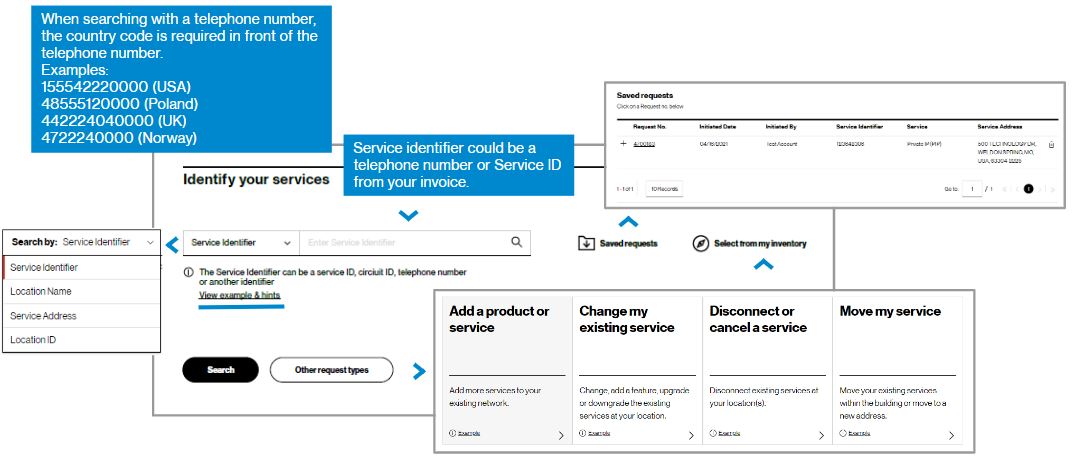
In Identify your services, search for the service to work with by entering an existing service identifier, telephone number, location name, service address, or location ID, which can be found on your invoice and then click Search. Examples of service identifier are found in View examples & hints. Or you may click Select from inventory to route to a full listing of all inventory in your profile.
Requests previously saved, but not submitted, can be found by clicking on Saved requests next to the search bar.
Note: the info icon indicates helpful information
Service details
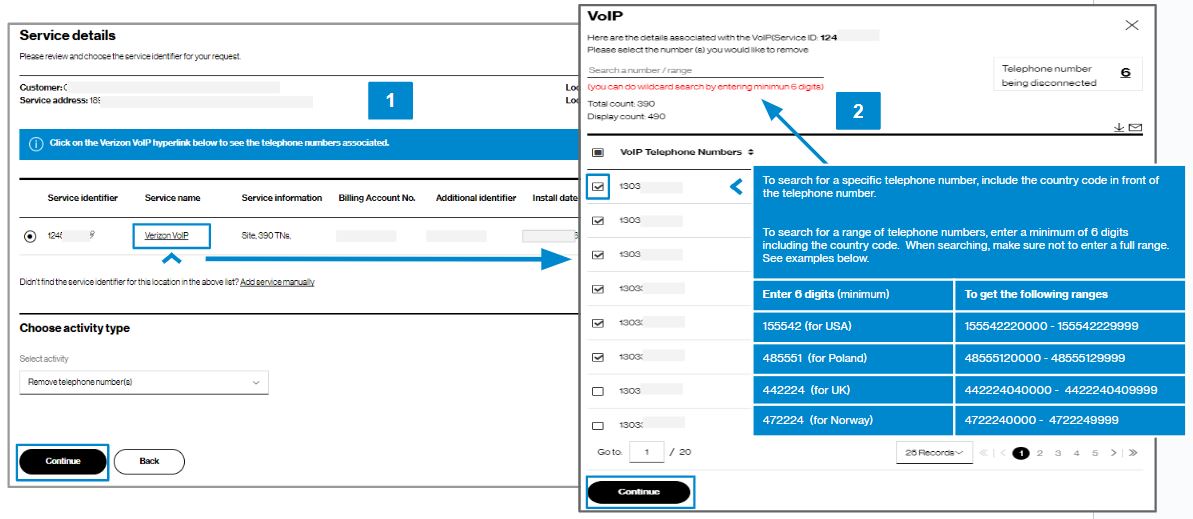
4. Click on the Verizon VoIP hyperlink (image 1) to see the associated telephone numbers. Select the number(s) you would like to remove (image 2) and click continue. The activity type will automatically default to Remove telephone numbers.
Click continue to complete request details.
Request details
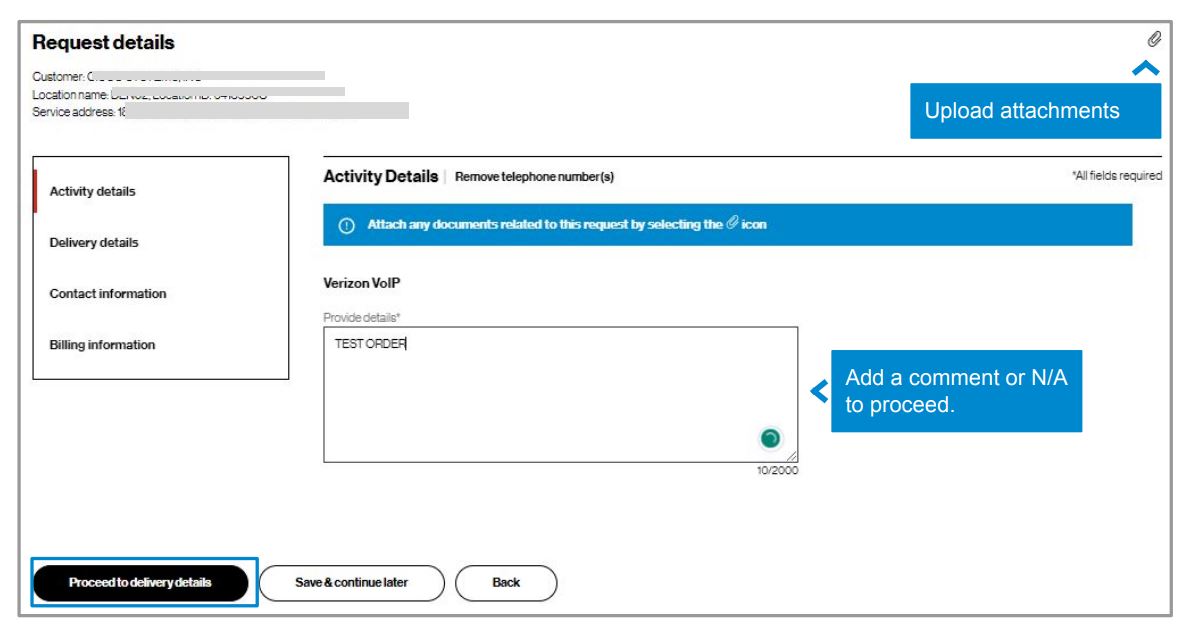
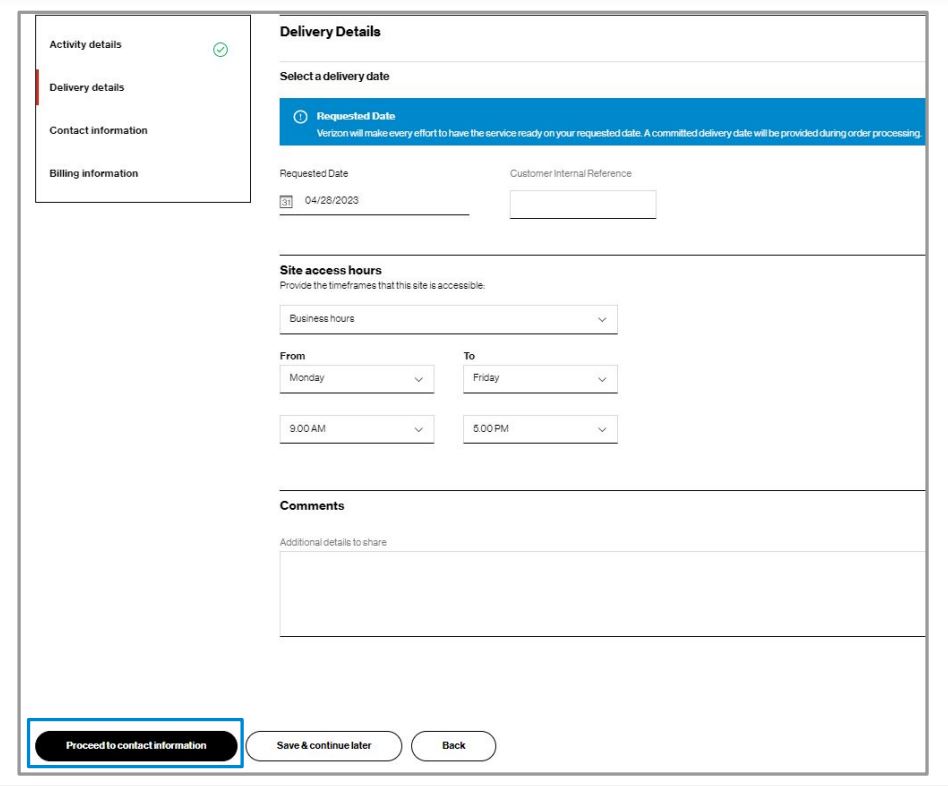
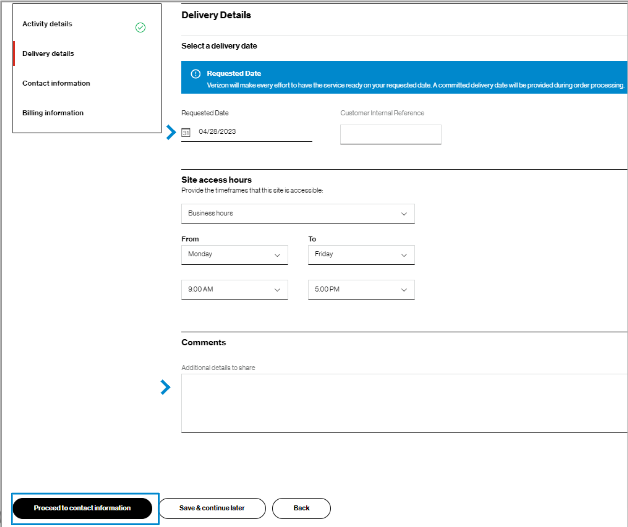
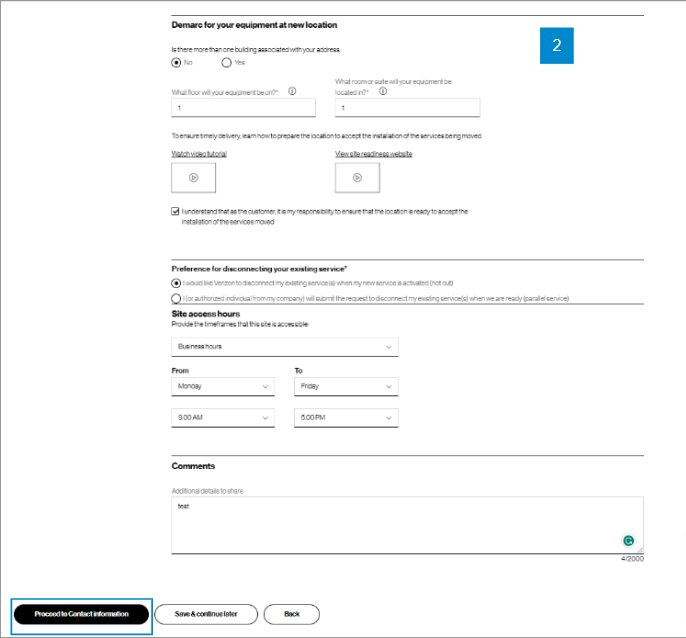
6. Enter Delivery Details. Verizon will make every effort to have the service ready on your requested date. A committed delivery date will be provided during order processing. At the end of the details, click Proceed to contact information. You can also save the change request and return to it later. To return to saved request, click on Change Service and under the Identify Service screen click Saved requests.
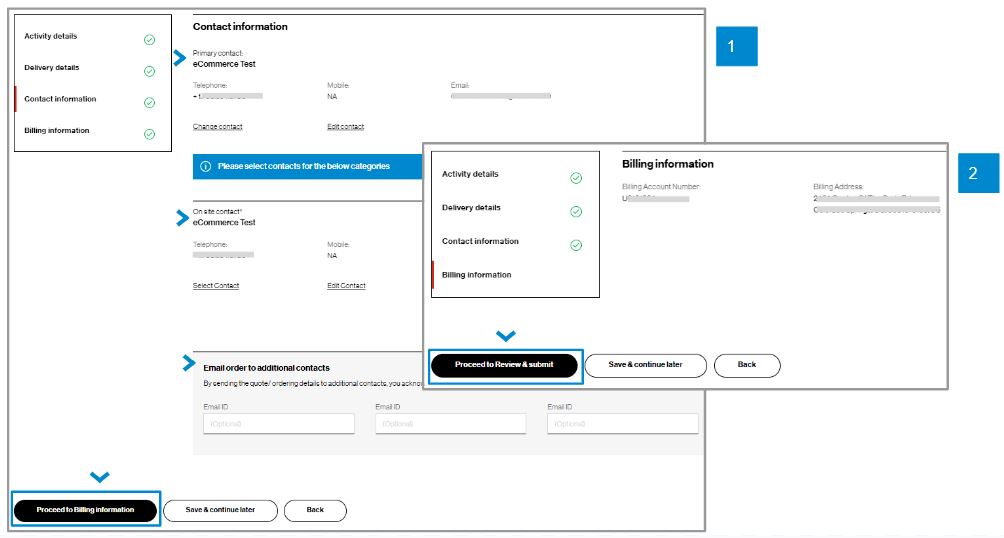
7. For Contact information, you will be the primary contact since you are placing the change request. If needed, you can edit your contact information by adding an On site contact and/or entering up to three additional email addresses to receive the change request confirmation. (image 1) Then click Proceed to billing information.
8. In Billing information details, you can view the billing account number and billing address for the service being changed. (image 2) You cannot edit this field. Click Proceed to review & submit.
Review and submit

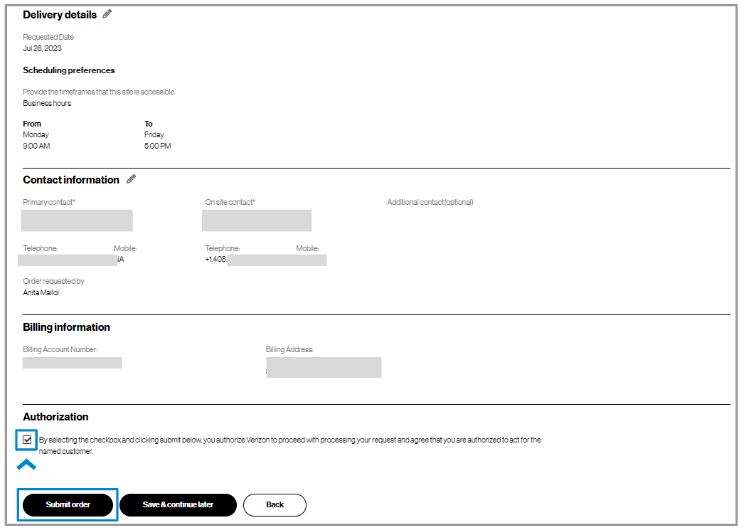
10. At the bottom of the Review & submit page, click on Submit order to place your change request. Once submitted, you can track your change request online by hovering on Orders and click on Pending orders under Status.
Track the request
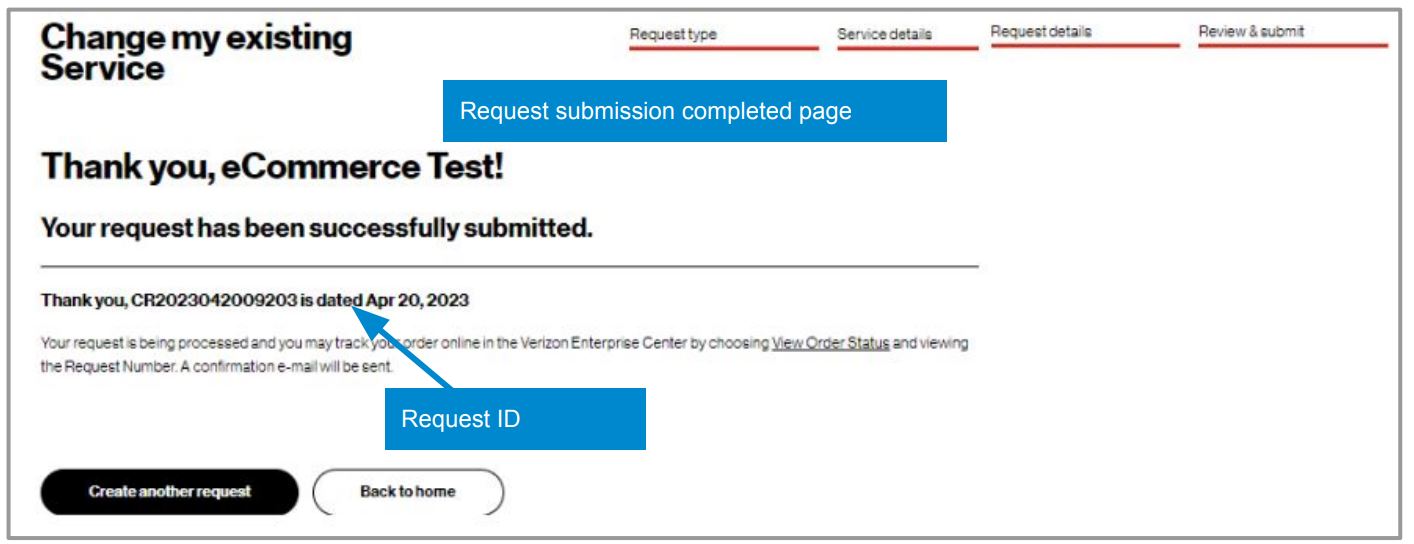
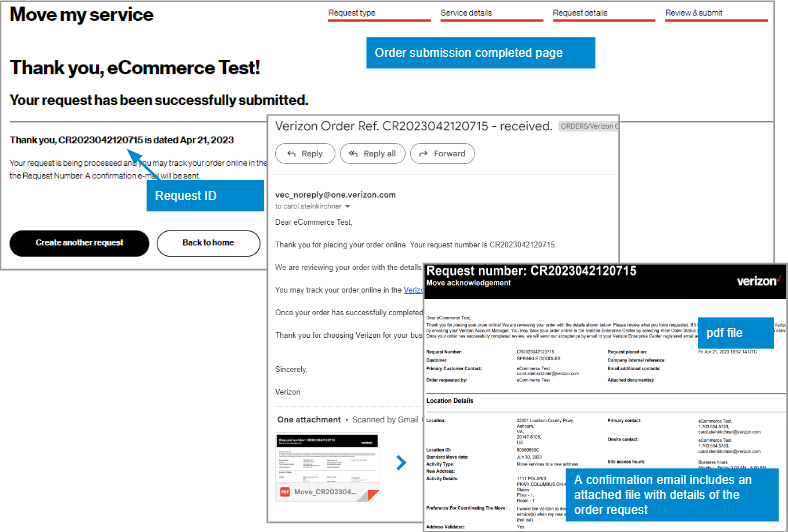
11. After you click Submit, you will see a message that gives your request ID.
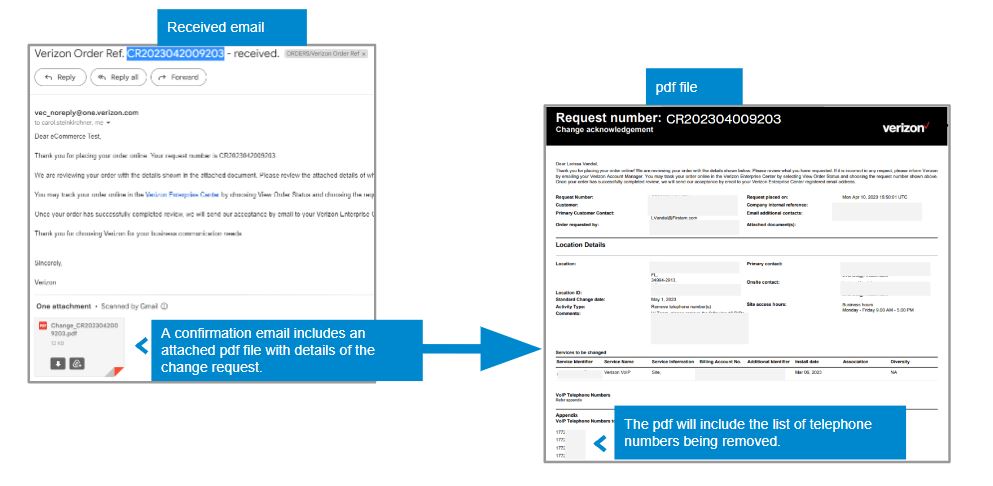
12. You will receive an email confirming your change request that includes an attached pdf file with your change request details. The pdf will include the list of telephone numbers being removed.
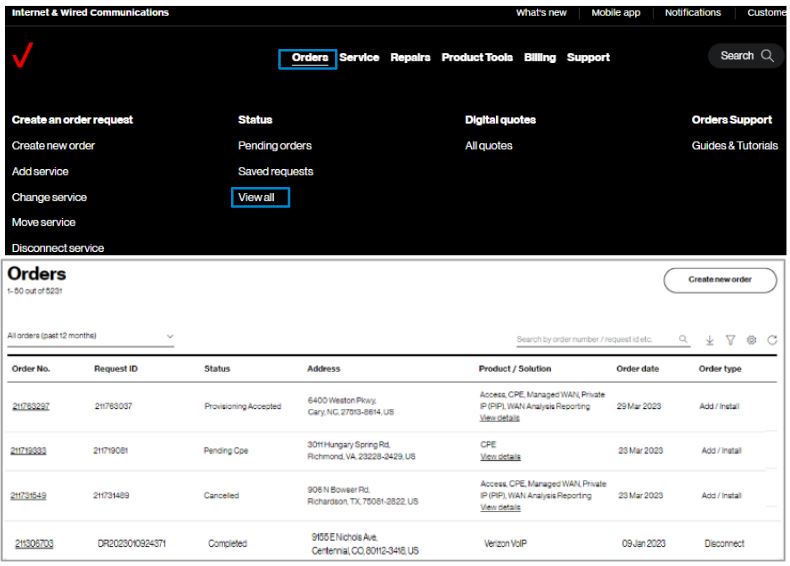
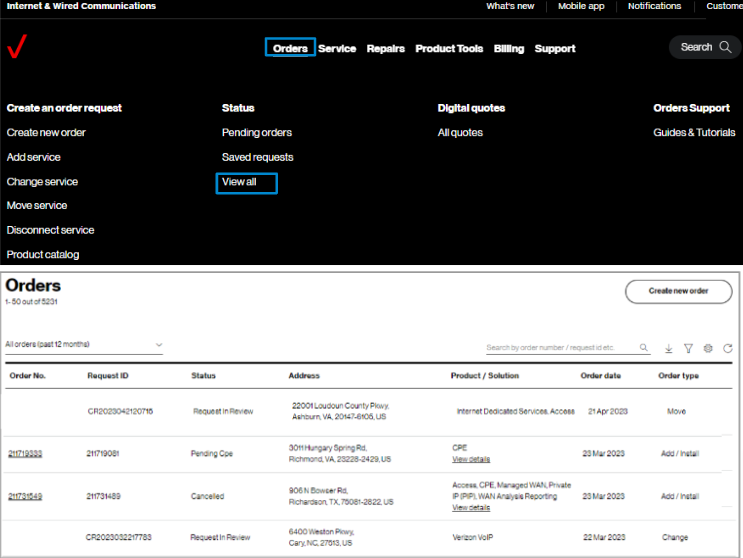
13. Track change requests online by hovering over Orders and click on View all under Status. A support guide is available to learn more about using View order status.
Tips and troubleshooting