Due to inactivity, your session will end in approximately 2 minutes. Extend your session by clicking OK below.

Due to inactivity, your session has expired. Please sign in again to continue.

One Talk First Steps

    Welcome to Verizon One Talk

    This document contains the initial steps to get you started with One Talk services and features. Information on all One Talk setup, features, and solution management can be found on our One Talk Support page.

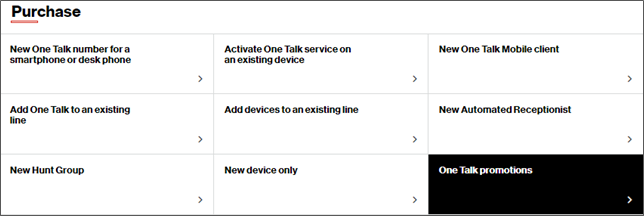
    • Adding devices and users
    • User Guides for all end-point devices (smartphones, desk phones, tablets, computers)
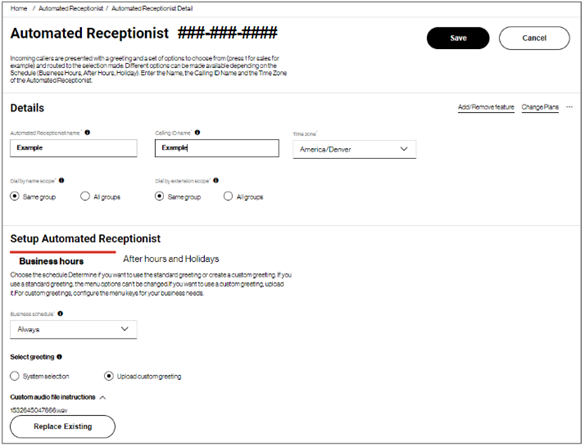
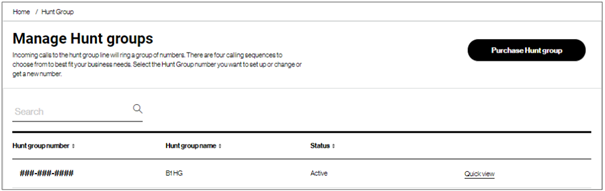
    • Services, features and functions including Auto Receptionist, Hunt Groups, and 50+ more
    • Support and troubleshooting

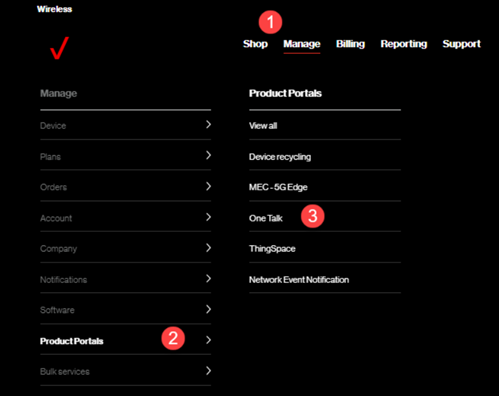
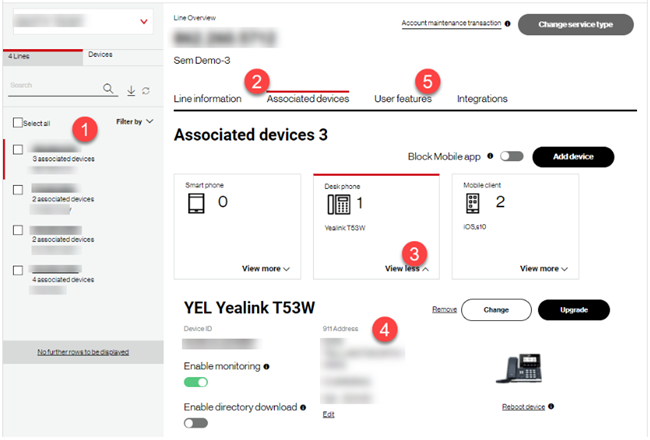
    Immediately after the One Talk service has been ordered, your business's account manager (One Talk Administrator) will receive a welcome email from Verizon with instructions on signing into the Verizon My Business Portal and managing your solution from the One Talk Administrator Portal.

    Step 1 - One Talk Administrator Portal

    If you placed your One Talk order through a Verizon retail store, a Verizon Business Sales Representative, or a Verizon Authorized Partner, you will be able to see your initial lines and devices when you first sign into the One Talk Administrator Portal within Verizon My Business. For more in-depth details, access the One Talk Administrator Guide and visit the One Talk Portal Device Tutorial.

    1. Sign in to your Verizon My Business account. If you have not set up an account, follow the instructions to register. The Verizon My Business portal can be found in the upper right corner of the vzw.OneTalk.com page.

    2. Go to the One Talk Administrator Portal by selecting Manage Account at the top of the My Business page, and then select One Talk under the Product Tools section.

    3. You can access all One Talk features and functions, purchase additional services, and access solution and support resources from the Manage Your One Talk Service page.

    Step 2 - Review your One Talk Lines

    The One Talk portal main page provides a summary of your One Talk lines. Make sure that you have enough lines:

    • Business numbers
    • Individual employee numbers
    • Auto Receptionist numbers
    • Hunt Group numbers

    If you have a number activated as a wrong line type (i.e., a user line that should be an auto receptionist), simply use the change service type option to change the line to the desired service type.

    Step 3 - Confirm user information for each line

    On the Manage Lines and Devices page, select Edit.

    • User Name is used to associate a user with a One Talk number.
    • Email address is critical to ensure proper delivery of an Activation PIN for the Mobile App.
    • Extensions are required if you want to use four-digit dialing.
    • Calling ID is what displays when calling other internal employees.

    Step 4 - Configure/Confirm Desk Phone Settings

    • Select View Details in the Total Lines box.
    • Select a user's line to check.
    • Select Associated devices tab.
    • Select View more for Desk Phones.
    • Make sure the 911 address is correctly assigned for a user's desk phone. If incorrect, select Edit.
    • Select User features to make any changes to end user features.

    Step 5 - Network Settings: Ports and protocols required for desk phones and mobile/desktop apps

    One Talk requires the following protocols and ports so that the devices have service and full functionality:

    One Talk Desk Phones

    • Device Configuration - FQDN: deviceact.myvzw.com Protocol: HTTPS | Port: 443
    • Signaling - FQDN: devicegw.myvzw.com & devicegw.gtm.myvzw.com Protocol: SIPTLS | Port: 5061
    • Media (voice/video) - FQDN: N/A Protocol: SRTP | Port: 1024 through 47383
    • Network Time - FQDN: 0.pool.ntp.org & time.nist.gov Protocol: NTP | Port: 123

      Note: NTP can be delivered by the customer’s DHCP server (option 42). If NTP is not delivered via DHCP, the fallback is to US NIST pool of time servers.
    • Default DSCP Marking Settings - RTP DSCP Value: 46 | SIP DSCP Value: 26
    • FQDN information is subject to change.

    One Talk Mobile & Desktop App registered via WiFi or Ethernet

    • Device Configuration/Authentication - FQDN: spc-mepfe.myvzw.com Protocol: HTTPS | Port: 444
    • 911 Feature Provisioning - FQDN: https://spg.vzw.com/SSFGateway/e911Location/changeAddress Protocol: HTTPS | Port: 443
    • Signaling - FQDN: volte-ice.myvzw.com Protocol: SIPTLS | Port: 443 and 5061
    • Media (voice/video) - FQDN: N/A Protocol: SRTP | Port: 1024 through 47383
    • Messaging - FQDN: v4bservices.vma.vzw.com Protocol: MQTT & HTTPS | Port: 443
    • Visual Voicemail - FQDN: v4becs-vvm.lv.imsvm.com Protocol: TCP | Port: 143
    • FQDN information is subject to change.

    General Firewall Setup Recommendations:

    • Ensure required ports are not being blocked.
    • Disable SIP ALG and SIP Transformations.
    • Enable Consistent NAT.
    • Increase UDP timeout to 120 seconds or longer.

    Step 6 - Download/Install One Talk Mobile App

    1. Download the Verizon One Talk app from the Apple® App Store® or Google Play™ Store. One Talk app is supported on the following operating systems:
      • iOS 13.0 and above
      • Android™ 8.0 and above
    2. Open the One Talk app.
      • A splash screen displays for a short while.
      • If presented, press Get Started to accept app permissions.
    3. Enter the One Talk number and the preferred name, then tap Request PIN to be sent by email.
    4. Enter the PIN sent via email, then tap Activate PIN.
    5. From the "Setup your Device & Profile" screen, enter the appropriate info and tap Next:
      • Name
      • Company (Optional)
      • Position (Optional)
      • Device Name
    6. You will be prompted to select one of the two calling modes:
      • App Calling - All calls are made and received through the app. Call quality is susceptible to data connectivity and congestion.
      • Call Through - All calls are made and received through the native device phone number; however, callers are using and seeing your One Talk number. This provides a higher level of audio quality.

    7. Follow the steps below to set up basic visual voicemail service.
      1. Select Menu.
      2. Select the Voicemail icon which places a call to the voicemail system.
      3. Follow the prompts to complete setting up your voicemail.
      4. Once complete, a voicemail icon is displayed.
    8. Select Help & Feedback for helpful tutorials and to provide feedback to the app developers.

    Important Note: If you receive a provisioning error -23 when requesting the PIN, this generally indicates a connectivity issue with the phone. Make sure to turn off Wi-Fi and try again. If the issue persists, contact technical support.

    Step 7 - Setting Mobile App Call Through

    Users with the One Talk Mobile App will need to 1) download the app, 2) configure the app, 3) choose between App calling and Call Through. Call Through benefits and installation are outlined below.

    • Call-Through for the One Talk Smartphone Mobile App routes calls over the cellular network voice channel.
    • Calls are routed over the cellular voice channel - providing better call quality than standard VoIP communications over congested public Internet
    • Multi-carrier support - Verizon phones use VoLTE, One Talk App on other carrier devices use that carrier's voice channel
    • Uses unlimited voice and not data plans for a VoIP calls
    • Reduce costs and impact to user data plans (especially employee-owned devices - BYOD)


    Installation and Usage

    • Once the Mobile App is installed, the user is prompted to select between App calling or Call Through calling. Mobile App Settings in the upper left of the screen provide options for enabling and disabling Call Through (Settings > Call Features > Call Through).
    • In-app tutorial provides overview of Call Through.
    • When enabling Call Through, the user will be prompted to enter or confirm the SIM number (the smartphone's phone number).
    • For outbound calls, the user dials the number in the One Talk app and is prompted to connect the call using the interim routing number (IRN).
    • For inbound calls, a quick call notification icon will pop-up when the screen is not locked, which is the only way to know the incoming call to the native device is a One Talk call aside from the audible instruction to press a key to answer the call when initially answering the call (available on Android only).
    • User experience differences between Android and iOS:
      • Android will display the IRN number and number being called for outbound calls. iOS will only display the IRN when placing outbound calls.
      • While on an active call, Android has a call bubble making it easy to switch to the app for call management options. iOS requires swiping off the dial pad and launching the One Talk app and clicking the active call banner for call management options.
      • Native Device Call History - Android displays the called number. iOS displays outbound calls placed to the IRN. Calls are displayed in the One Talk app call history as the number of the person called.

    Step 8 - BlueJeans Video Conferencing for Mobile App (New)

    BlueJeans Overview

    • Each One Talk Plus and One Talk Pro License includes a BlueJeans Meetings Enterprise License.
    • One Talk Plus and Pro users can access BlueJeans directly from the One Talk Mobile app or sign into BlueJeans desktop, browser or BlueJeans portal using their BlueJeans login credentials.
    • One Talk standard users will be able to use the One Talk mobile app to join a BlueJeans meeting only as a guest.
    • BlueJeans is not accessible from the One Talk Desktop application or One Talk Enabled Desk Phones.

    What to know

    1. The Administrator's email address must be a unique email address and not currently assigned to an existing BlueJeans account.
    2. User email addresses must be unique and not currently used for BlueJeans.
    3. Users will not have access to web client, web portal, or desktop client until they have a unique email address and complete setting up their BlueJeans password.
    4. If you already have a BlueJeans license or to purchase additional BlueJeans licenses for Verizon you will need to use a different Administrator email address to manage those licenses. These will appear separate from the One Talk Plus and Pro licenses.
    5. The BlueJeans administrator is created when initially purchasing a One Talk Plus or Pro line of service. Additional BlueJeans administrators can be added via MyBusiness.
    6. BlueJeans admins can only access the admin portal to manage BlueJeans user and enterprise settings. To have meeting access, their email address must be assigned to a One Talk Pro or Plus MDN.
    7. The BlueJeans Admin will receive an email notification when there is an error with a user's setup that requires addressing via the One Talk portal.

    From the One Talk Portal, an administrator can manage the following BlueJeans functions:

    • Edit email address
    • Edit first name, last name
    • Remove a user
    • Assign a user name and email address to a One Talk Plus or Pro Plan
    • Add additional One Talk Plus or Pro users

    Manage Lines and User One Talk Pro and Plus

    1. The One Talk Administrator signs into the One Talk Portal.
    2. Under "I want to," select Manage lines and devices. Select the line from the list you wish to manage.
    3. Under Line information, select Edit (the screen below will be presented).
    4. The Administrator can update the user's email address, first name and last name. If there was an error with the email address for Blue Jeans use, the Administrator can change it here.
    5. Select Submit to save.
    6. The email will then be validated with BlueJeans, If correct, the administrator can continue. If there is an error with using the email address, the customer will receive an error message with a warning.

    Assigning BlueJeans Administrator access for user

    Other BlueJeans admins can be created by the Verizon My Business administrator under Company Users in My Business.

    The administrator would assign the BlueJeans administrator option under products for the new or existing My Business user.

    1. From My Business, the Administrator goes to Manage > Company > Company users. Select a current user listed with the administrator role to edit or select add new user.
    2. After verifying the user information, select Continue to proceed to "Set up Access".
    3. Under product tools, select BlueJeans and Continue.
    4. Continue through the remaining screens and press Save when done.
    5. Upon completion, the user will be a BlueJeans admin.

    BlueJeans Portal Access

    Once a One Talk Plus or Pro administrator has activated their BlueJeans account through the BlueJeans welcome email they will have access to BlueJeans Portal from bluejeans.com.

    From the BlueJeans portal, the administrator will have access to the following management controls:

    • Group Settings
    • Manage Features
    • Manage Users - Note: Add users, edit user’s name/email address and remove users features will appear grayed out.
    • Meeting History
    • Recording Activity
    • Getting Started
    • Release Notes
    • Command Center

    Once a BlueJeans Plus or Pro user completes setup, they can access the BlueJeans portal for the following:

    • Manage profile
    • Manage personal meeting settings
    • Assign a delegate
    • View meeting history
    • Schedule a meeting
    • Access meetings Hub
    • Access recorded meetings

    For additional detail and instructions, visit https://support.bluejeans.com/s/article/Administrator-s-Training-Guide

    BlueJeans Support

    For support on the BlueJeans desktop, browser and portal, visit https://support.bluejeans.com/s/ or contact BlueJeans support https://support.bluejeans.com/s/contactsupport.

    For status on BlueJeans Service, visit https://status.bluejeans.com.

    Step 9 - New service availability & porting

    Using Verizon Wireless numbers

    It's important to understand when your service will be available to use. New telephone numbers can be used as soon as the device assigned to that number is connected. This applies to new smartphones, desk phones, or the One Talk App on mobile devices. Adding One Talk to an existing Verizon Wireless telephone number allows you to start using the service immediately.

    Moving other carrier numbers to Verizon Wireless (porting)

    When moving an active telephone line from another carrier to use on One Talk, known as "porting a line," the timeline for availability is different. Lines ported from a wireless carrier are typically available to use within 4 to 24 hours. Lines ported from a wireline carrier can take from 2 to 10 days to move, although most lines port within 2-4 days.

    Recommended porting steps:

    1. Leave your old desk phone plugged in and active until porting is completed.
    2. Install your new One Talk desk phone and connect for service as soon as it's received.

    Connecting prior to the completion of the porting process will allow you to place calls on the new line immediately, while incoming calls will still go to the old phone.

    When the new phone starts to receive incoming calls on that number, you will know porting is complete. You can unplug your old desk phone and contact your previous provider to discontinue your service and billing.

    Step 10 - Setting up call routing schedules

    Setting up schedules determines incoming call routing during and outside of business hours, ensuring your customer calls always get handled properly. You can use default settings or customize them for your business operation. From the primary One Talk Administrator Portal page, select Manage Schedules. For more details, refer to our One Talk Support page.

    Step 11 - Setting Automated Receptionists

    Setting up Automated Receptionists ensures your customer calls always get answered. From the primary One Talk Administrator Portal page, select Automated Receptionist. If you currently do not have an Automated Receptionist number, you can get one by clicking New Automated Receptionist in the Purchase section. For more information, please refer to our One Talk Support page.

    Step 12 - Setting Hunt Groups

    Setting up a Hunt Group allows you to direct a customer call to a group of lines. From the primary One Talk Administrator Portal page, select Hunt Group. If you currently do not have a Hunt Group number, you can get one by clicking New Hunt Group in the Purchase section. For more information, please refer to our One Talk Support page.

    Step 13 - Order additional lines or equipment

    You can easily order additional lines or equipment directly from the primary One Talk Administrator Portal page, in the Purchase section below Overview. Options include:

    • Adding a new line for a One Talk dialer on a smartphone, including:
      • Ordering a new desk phone
      • Adding the One Talk service to an existing Verizon mobile line
      • Authorizing employees to use their personal devices with the One Talk Mobile App

    Verizon Technical Support

    If you need additional support, please contact the Verizon Customer Care Support Team:

    1. (800) 922-0204
    2. Enter one of your One Talk mobile telephone numbers
    3. Press 1 to select technical support

    Visit our One Talk FAQs to review other helpful information.

Android is a trademark of Google, Inc.
iOS is a trademark or registered trademark of Cisco in the US and other countries and is used under license.
Apple is a registered trademark of Apple Inc.