Due to inactivity, your session will end in approximately 2 minutes. Extend your session by clicking OK below.

Due to inactivity, your session has expired. Please sign in again to continue.

One Talk Administrator Guide

    Welcome to Verizon One Talk

    This guide provides instructions for the management of all One Talk services.

    Additional information on One Talk Services can be found here:

    The administrator has complete management capability over corporate-liable lines, which are billed to the corporation.

    The One Talk Portal is accessible to Verizon Wireless business customers who have registered for My Business access to manage all of their Verizon Wireless services. The One Talk service administrator for your company can perform self-serve functions for business telephone numbers.

    To access the Portal from onetalk.com:

    1. Click My Business located on the far right of the screen and select Sign in.
    2. Enter your username and click Sign In.

    3. Next, you will be prompted on whether you want to receive a security code via a text, or whether you prefer to answer a security question.
    4. Once logged in, click the One Talk option to the right of the screen:

    One Talk Portal Layout

    Now let's get familiar with the One Talk Portal. The Main page is composed of six primary sections:

    • Group you are currently managing
    • Overview
    • Purchase
    • Resources
    • Need Help?
    • Actions/I Want To

    If you have more than one group, you will need to select the group you want to manage and configure at the top of the page, just below the "Manage Your One Talk Service" heading. Each time you sign on, you will be working in the group you were in the last time you signed into My Business.


    Overview

    The Overview section shows you how many Automated Receptionists, Hunt Groups, Lines and Devices are currently set up for the group you have selected, and also provides you with links to access other sections in the Portal, allowing you to make changes to them.

    Purchase

    The Purchase section provides the most optimal access to the different ways you can augment your One Talk service.

    Resources

    The Resources section provides you with links to sources of valuable information regarding the One Talk service.

    Need Help?

    The Help section gives administrators information and access to the most up-to-date documentation regarding One Talk features and support.

    Actions/I Want To

    The Actions section provides links to the most commonly used pages for ease of access and use. Administrators can quickly reach Group Management, Lines and Devices, Business and User Features, Global User Search, and more.


    The following pages will concentrate on the Actions/I Want To section, which is what allows a One Talk administrator to manage, configure and administer all the characteristics and customizable configurations that are applied to a given group and all the members in the group.

    Lines and devices


    This section shows a list of the telephone lines, devices and services in the One Talk group you are working in. You can click the appropriate line to view the details pertaining to that line.


    Once you are on the Lines & Devices page, there are several things you can do:

    • View all active lines or devices in the group. Note that only some of the lines and/or devices are loaded initially, but if there are more lines or devices in the group, you will have the option to click Load More Lines or Load More Devices to see more. You may have to click more than once to expose all available lines or devices, depending on how many are in the group.
    • Perform actions on specific/single lines or devices. If you click on any specific line or device, you will see additional information, including features, all associated devices and basic line information, like name and extension. Once a specific line is selected, you can perform several different actions on the associated devices, update the basic line/user info or configure features for that specific user.
    • Perform actions on multiple lines at the same time. This is done by using the checkboxes next to each line on the left-side navigation. You can also select All if you need to take the same action on all lines or devices in this group. This will expose a dropdown of "I Want To" actions for the selected lines or devices. Examples of multiline actions include blocking or unblocking the ability to use mobile clients. Examples of multidevice actions include rebooting desk phones, and enabling and disabling directory download.

    Here is an example of what you will see for associated devices when a specific line is selected. This example is for a desk phone, and it is important to know that the functions available at the associated device level depend on what type of device you are viewing. For example, directory download and the ability to update it is only shown for desk phones.

    Schedules - Business and Holiday


    There are two types of schedules that can be used: business schedules to accommodate hours of operation based on days of the week, and holiday schedules for specific calendar holidays. Once schedules are defined, they can be applied to features and determine when the feature is active. If business and holiday schedules overlap, the holiday schedule will be used. The following features can use schedules: Automated Receptionist, Group Forwarding, Simultaneous Ring, Selective Call Rejection, Selective Call Acceptance, Selective Call Forwarding and Pre-alerting Announcements.


    To create a schedule, click on the top right button labeled Create schedule.

    In the following screen, select the type of schedule you want: Business or Holiday.


    Fill out the proper details as required by your business.


    Press the Submit button and your schedule will be ready to be used by the following features:

    • Automated Receptionist
    • Group Forwarding
    • Simultaneous Ring
    • Selective Call Rejection
    • Selective Call Acceptance
    • Selective Call Forwarding
    • Pre-alerting Announcements

    Group management

    Groups can be created within the One Talk Portal to organize users by department or site location. Group features, such as Calling Line ID Delivery or Music on Hold, can be configured or enabled per group. To create, edit or manage groups, click Manage all groups in the Actions/I Want To section.

    Defining a group during enrollment

    Each business is provided a default group upon enrolling in One Talk. Group names can be changed any time in the One Talk Portal.

    Switching between groups

    Switching between groups is performed in the One Talk Portal.

    1. Display the details of the current selected group.
    2. The dropdown reveals all groups created in the account.
    3. Search by group name utilizing a full or partial name in the search field.
    4. Selecting a group from the list refreshes the page with the selected group's details.

    Creating groups

    Groups can be created from the Manage Groups menu option.

    1. Select Manage all groups from the One Talk Portal menu.
    2. Select Create group from the Actions dropdown.

    3. Enter a name for the group and select a time zone.

    Creating groups in bulk

    Groups can be created in bulk from the Manage All Groups screen using a template.

    1. Click Create bulk groups and select Download blank template (download and save the template to the desktop).
    2. Enter the group names and time zones for the new groups using the downloaded template.
    3. Upload the completed template by selecting Upload Excel. The created groups will appear in the group list.)

    Editing groups

    Group settings can be modified from the Manage Groups screen.

    1. Select the pencil (edit) icon next to the group to be edited in the group list.

    2. Edit the group name, time zone, extension length (two to six digits) and group dialing prefix (two to six digits). Check if you want to enable directory download for the users in the group.

    Moving users between groups

    Users can be moved to a different group from the Manage Group Members screen.

    1. Under the I Want To section, select Manage Group Members.
    2. Search for a user to move or select a group to display the list of users.
    3. Select the group to move the user to.
    4. Click Continue to confirm the move.

      Note: User information and settings are reset and will need to be reconfigured after moving the user to the new group.


    Deleting groups

    Groups can be deleted from the Manage Groups screen. Select the trash can icon next to the group to be deleted.

    Note: Only groups without users can be deleted. If a group has existing users, the users will need to be deactivated from One Talk or moved to another group first.

    Editing end users

    1. To edit end-user information, click Manage group members under the I Want To section.
    2. On the Manage Group Members page, select Edit to update any end-user information.

    3. To perform a bulk update, select Upload spreadsheet.
    4. Either download a blank template or a template that includes phone numbers for the group users.

    5. Save the template to your local device and select the file to be uploaded, followed by Submit.

      Additionally, end-user information can be edited when viewing line information in the Lines & Devices section.

    Reporting and Analytics

    1. From the Overview page under the "I want to" section click the Manage Reporting and Analytics link.

    2. A Dashboard view of the calls in the selected group will be displayed. The Dashboard is a summary view of the 4 available reports: Call Detail Report, Hunt Group Report, Auto Receptionist Report, and Call Volume Report.

      You can select 4 different time periods for your reports: last 24 hours, last 7 days, last 30 days and a custom date range. The time stamp in the upper right corner will reflect the time period selected. The information icon next to that time stamp shows the last time the data was refreshed.

    3. To view the Call Detail Report, simply click the > below Call Detail. The Call Detail report provides an overview for all calls for the selected group in your organization. You can download the Call Detail Report in csv or pdf format by clicking Download Report. To navigate to the Hunt Group report or the Auto Receptionist report, click > below the respective summary views.

    4. The Hunt Group report provides a summary of all incoming calls to the Hunt Group calls for the selected group. You can download the Hunt Group Report in csv or pdf by clicking Download Report. You can view the top 5 agent metrics on the right side of the report. Only calls that are answered by a member of the Hunt Group will appear here. To view the details of all the agents in the selected Hunt Group, click View all.


      Click Close to go back to the Hunt Group Report.
    5. To navigate to the Auto Receptionist Report, select Auto Receptionist Report in the menu on the left side.

    6. The Auto Receptionist Report provides a summary of all incoming calls to the Auto Receptionists for the selected group. You can download the Auto Receptionist Report in csv or pdf by clicking Download Report. The top 5 destinations are displayed on the right of the report. To view details of all destinations, click View all.


      Click Close to go back to the Auto Receptionist Report.
    7. To navigate to the Call Volume Report, select Call Volume Report in the menu on the left side.

    8. The Call Volume report provides a summary of inbound/outbound calls for your user lines for the selected group. You can download the Call Volume Report in csv or pdf format by clicking Download Report. To view the Call Trend for the Outbound calls, select the Outbound Calls tab in the Call Trend section.

    9. Detailed Downloads: There are 4 different detailed downloads available (in either PDF or CSV format) and each report has the same layout and columns. Detailed downloads are available for Call Detail, Automated Receptionist, Hunt Group, and Call Volume reports.
      1. For CSV format, there is a definition tab and the report.


    10. For PDF format, the first page shows the field definitions followed by the report details.


    Note:

    1. Only 30 days of call records are available. (At launch data will be available only as far back as 12/01/2020.)
    2. Custom view will only allow you to view up to 30 days of data (current day cannot be selected in custom date range).
    3. Unanswered Calls are calls where the caller hangs up during the ring cycle.
    4. Calls that go to voicemail have a call status of “Forwarded”.
    5. Call detail records are only associated with the first number called. Examples:
      1. A call that a user parks or transfers to someone else will only report as a call for the user that received and parked/transferred the call.
      2. A call that is received by an Auto Receptionist and forwarded to a Hunt Group will not show up in Hunt Group reporting. It will only show as a call to the Auto Receptionist.
      3. When a One Talk line (A) is forwarding calls to another One Talk line (B), reporting will only show the details of the call for One Talk line A, and it would show as a call status of “Forwarded” and will show the forwarded phone number in the detail reporting.
    6. If a user is using Busy Lamp Field monitoring and answers a call on behalf of a user, the call will show as an unanswered call for the One Talk line called. There is no record of an answered call.
    7. Calls between internal One Talk users will show as 2 calls in reporting: an originating call for the user making the call and a terminating call for the user that received the call.
    8. Calls that go to a Hunt Group and are forwarded out to the designated phone number after no group members answer will show the forwarded phone number in the detail reporting.
    9. Auto-Receptionist reporting does not list the actual option number that was selected in the reporting; instead, it shows the phone number associated with the selected option.
    10. User names are not reflected in reporting with the exception of Hunt Group calls answered by a group member and calls routed from an Auto-Receptionist which will show “agent name” and “agent number”.

    One Talk features management (Business & User)

    BlueJeans Video Conferencing for Mobile App (New)

    BlueJeans Overview

    • Each One Talk Plus and One Talk Pro License includes a BlueJeans Meetings Enterprise License.
    • One Talk Plus and Pro users can access BlueJeans directly from the One Talk Mobile app or sign into BlueJeans desktop, browser or BlueJeans portal using their BlueJeans login credentials.
    • One Talk standard users will be able to use the One Talk mobile app to join a BlueJeans meeting only as a guest.
    • BlueJeans is not accessible from the One Talk Desktop application or One Talk Enabled Desk Phones.

    What to know

    1. The Administrator's email address must be a unique email address and not currently assigned to an existing BlueJeans account.
    2. User email addresses must be unique and not currently used for BlueJeans.
    3. Users will not have access to web client, web portal, or desktop client until they have a unique email address and complete setting up their BlueJeans password.
    4. If you already have a BlueJeans license or to purchase additional BlueJeans licenses for Verizon you will need to use a different Administrator email address to manage those licenses. These will appear separate from the One Talk Plus and Pro licenses.
    5. The BlueJeans administrator is created when initially purchasing a One Talk Plus or Pro line of service. Additional BlueJeans administrators can be added via MyBusiness.
    6. BlueJeans admins can only access the admin portal to manage BlueJeans user and enterprise settings. To have meeting access, their email address must be assigned to a One Talk Pro or Plus MDN.
    7. The BlueJeans Admin will receive an email notification when there is an error with a user's setup that requires addressing via the One Talk portal.

    From the One Talk Portal, an administrator can manage the following BlueJeans functions:

    • Edit email address
    • Edit first name, last name
    • Remove a user
    • Assign a user name and email address to a One Talk Plus or Pro Plan
    • Add additional One Talk Plus or Pro users

    Manage Lines and User One Talk Pro and Plus

    1. The One Talk Administrator signs into the One Talk Portal.
    2. Under "I want to," select Manage lines and devices. Select the line from the list you wish to manage.
    3. Under Line information, select Edit (the screen below will be presented).
    4. The Administrator can update the user's email address, first name and last name. If there was an error with the email address for BlueJeans use, the Administrator can change it here.
    5. Select Submit to save.
    6. The email will then be validated with BlueJeans, If correct, the administrator can continue. If there is an error with using the email address, the customer will receive an error message with a warning.

    Assigning BlueJeans Administrator access for user

    Other BlueJeans admins can be created by the Verizon My Business administrator under Company Users in My Business.

    The administrator would assign the BlueJeans administrator option under products for the new or existing My Business user.

    1. From My Business, the Administrator goes to Manage > Company > Company users. Select a current user listed with the administrator role to edit or select add new user.
    2. After verifying the user information, select Continue to proceed to "Set up Access".
    3. Under product tools, select BlueJeans and Continue.
    4. Continue through the remaining screens and press Save when done.
    5. Upon completion, the user will be a BlueJeans admin.

    BlueJeans Portal Access

    Once a One Talk Plus or Pro administrator has activated their BlueJeans account through the BlueJeans welcome email they will have access to BlueJeans Portal from bluejeans.com.

    From the BlueJeans portal, the administrator will have access to the following management controls:

    • Group Settings
    • Manage Features
    • Manage Users - Note: Add users, edit user’s name/email address and remove users features will appear grayed out.
    • Meeting History
    • Recording Activity
    • Getting Started
    • Release Notes
    • Command Center

    Once a BlueJeans Plus or Pro user completes setup, they can access the BlueJeans portal for the following:

    • Manage profile
    • Manage personal meeting settings
    • Assign a delegate
    • View meeting history
    • Schedule a meeting
    • Access meetings Hub
    • Access recorded meetings

    For additional detail and instructions, visit https://support.bluejeans.com/s/article/Administrator-s-Training-Guide

    BlueJeans Support

    For support on the BlueJeans desktop, browser and portal, visit https://support.bluejeans.com/s/ or contact BlueJeans support https://support.bluejeans.com/s/contactsupport.

    For status on BlueJeans Service, visit https://status.bluejeans.com.

    Account Codes

    Account Codes allow you to place either a mandatory or optional code to be dialed in front of a regular call-digit pattern. The code is associated with individual calls for tracking purposes. The system administrator can later view the calls placed using each code via billing reports.

    1. Under the I Want To section, click Manage features, then click Account Codes.

    2. Click Create code.
    3. Enter the account code and account code description.
    4. Click Submit.


    To add users to a specific code:

    1. Click Manage/Assign Users.
    2. Select the users that will be using the code for outbound calls.
    3. Select whether the user will be Mandatory, Optional or Unassigned.

      Note: Mandatory will require a code entry for all outgoing calls. Optional will require the user to enter the **71+ Account Code prior to placing a call.

    Auto Receptionist

    1. Access the Auto Receptionist configuration tool from the Overview page or by clicking the Auto Receptionist icon on the Manage Features page.

    2. Click the phone number of the desired Auto Receptionist to edit.

    3. Enter a name for the Auto Receptionist.
    4. Enter a Calling ID name that will be displayed for calls routed to desk phones.
    5. Select a time zone.
    6. Select whether you want your dial-by-name and dial-by- extension options to be limited to the users in the same group as the Auto Receptionist or open across all groups.
    7. Select whether to add a schedule to allow for business hours and an after-hours/holiday setup or to have the Auto Receptionist answer all calls with the same greeting and options 24/7. When using a schedule, make sure to set up greetings and options in the Business Hours tab and the After Hours and Holidays tab.
    8. Upload a custom greeting to be used to greet callers. Follow the instructions regarding the proper audio file format.
    9. Set up your call routing options for the 11 programmable options.
    10. Click Save to complete the setup

      Note: Make sure to change the default transfer to operator assigned to 0 to another routing option. Available routing options:
      • Dial by Name—Prompt callers to enter the name of the person they wish to contact. The last names entered for your One Talk subscribers are searched.
      • Dial by Extension—Prompts callers to enter the extension of the person they wish to contact. The extensions set up for your One Talk subscribers are searched.
      • Transfer without Prompt—Caller is silently transferred to the number assigned to the option selected by the caller.
      • Transfer with Prompt—Callers hear a message letting them know their call is being transferred.
      • Repeat Menu—The recorded greeting will be replayed for the caller.
      • Exit—The call will be terminated.

    Note: Forward-to phone numbers can only be 10-digit phone numbers. Also, the direct-to-voicemail option is only available to calls routed to a One Talk user's line.

    Hunt Groups - Voice and Messaging

    1. From the Overview page, click the > button to view or manage available Hunt Groups - Voice and Messaging.


      Alternatively, you can access Hunt Groups by clicking the Manage features link. Then select the Hunt Group feature.

    2. Any Hunt Group lines that you have on your account will be listed. If you need to purchase an additional Hunt Group line, simply click Add a Hunt Group. For each active Hunt Group, you can enable Messaging for Hunt Group by clicking the Purchase Messaging for Hunt Group link. For Hunt Group lines that have messaging enabled, a check mark is displayed.

    3. To set up your Hunt Group, simply click the linked phone number.
    4. For lines that have messaging enabled, the next screen will show two tabs: Voice Hunt Group and Messaging for Hunt Group. If messaging isn't enabled, you will not see the tab for messaging.

    5. Items that can be edited in the next screen for Voice Hunt Group include Hunt Group name, caller ID name, time zone, calling sequence and additional settings. Once complete, select which One Talk users will participate by clicking Add Lines.
    6. Click Save once you are finished.
    7. In the top right corner of the screen, you have options available to change the phone number, change the type of service for this line, suspend the line or disconnect the line.

    8. Messaging for Hunt Group allows incoming SMS/MMS messages to be received and replied to by a group of One Talk users with mobile applications that are assigned to the group. Messaging for Hunt Group does not allow users to initiate a new message from the hunt group. Users can only reply to messages received. Follow these steps to setup the Messaging for Hunt Group feature for those Hunt Group lines that have the feature enabled:
      1. Either use the same name as the Hunt Group name or enter a new name to be used. All message threads will be displayed under this name label in the mobile app.
      2. Establish a message escalation rule that will forward a copy of a message to another One Talk user after no response to a message for a set duration of time. This One Talk user will now be part of the messaging thread.
      3. Enter text to close a message thread. There are up to 3 options available, and these messages will be selectable in the mobile app to terminate a message thread. A message thread will remain active unless a user selects a close message option. Once a message thread is closed, the messages will automatically delete after 7 days. At least one message is required to complete the configuration.
      4. Select members for the Messaging for Hunt Group. You can either copy users from your voice hunt group or select different users. Only One Talk lines that have a mobile app associated can be added.

        Recommendation: If a customer decides to call the number associated with the message, the call will route via the Voice Hunt Group. For consistency of conversation with the customer, it would be best to have the same members for voice and messaging.
    9. Click Save once you are finished.
    10. In the top right corner of the screen, you have options available to remove the messaging or add additional features to the line.

    Call Queue

    A One Talk Call Queue line allows you to direct incoming calls to a maximum of 40 assigned agents. If all of your assigned agents are busy, additional callers will be placed in queue for the next available agent. One Talk offers 2 different Call Queue price options: maximum Call Queue size of 10 and maximum Call Queue size of 25. A One Talk admin for your business has the ability to configure the setup for purchased Call Queue lines.

    Managing Your Call Queue:

    1. From the Overview page, click View Details to view or manage your available Call Queue lines.


      Alternatively, you can access Call Queue by clicking the Manage features link. Then select the Call Queue feature.

    2. To set up your Call Queue, simply click the linked phone number.

    3. Select Edit to being configuring your Call Queue.

    4. Start by inputting the Call Queue name, which will help you organize your call queues when you have multiple Call Queues on your account. The default value is the phone number for each Call Queue.
    5. Add a Calling ID Name. This name will be displayed as secondary caller ID information for incoming calls routed to the agents.
    6. Select the desired calling sequence for routing calls to the agents.

    7. Even though you can purchase a Call Queue line that has a max limit of 10 or 25 callers in queue, the admin has the ability to select how many callers to allow to be queued. Once the limit is reached, additional callers will be forwarded to the phone number set up in step 12.
    8. Select how many times the line will ring before advancing the caller to another agent.
    9. Select if you want to allow call waiting to be used or not. If used, it means the caller will route to someone that is already on a call, which could delay the caller getting to someone that can answer their call.
    10. Select if you want callers to be forwarded out of queue after a certain amount of time on hold. Maximum time limit is 600 seconds (10 minutes).
    11. Select if you want to allow callers to opt out of waiting, which will forward the caller to the phone number setup in step 12. If you decide to use this option, you will want to make sure one of your recordings lets the caller know they can press a key to opt out of waiting.
    12. Enter a phone number where you want callers to be forwarded if the queue is full, they've exceeded the wait limit, or opted out of waiting.

    13. Add, delete, or rearrange your agents for the Call Queue. Only One Talk users with the Call Queue feature on their One Talk line can be added to a call queue.

    14. Set up your recorded messages to play for callers that are in queue. You can select to load custom audio files, and it will need to be in the following format:
      • WAV file format:CCITT, u-law, or a-law codec
      • 8.000 kHz (sampling rate/frequency)
      • 8 bit mono
      • .WAV file type
      • 2 MB or less total size
      You can also use g711.org to convert your audio files to the format required.
      1. Select to enable your Entrance Greeting. This determines if your callers will hear a greeting after their call is connected. If "play entire greeting to completion..." is toggled off, the greeting(s) are only played if the caller is put into queue due to all agents being busy. If that switch is toggled on, all callers will hear the entrance greetings before connecting to an available agent.
      2. Select to enable/disable your On Hold Message. If this is on, the network will play these file(s) while the caller waits to connect. On hold is played whenever the Comfort Message or Estimated Wait Message isn't playing.
      3. Select to enable/disable your Comfort Message. If activated, these messages will interrupt your hold messages and play every 10 seconds for your callers held in queue. Hold messages will restart from the beginning when they resume playing.
      4. Select to enable/disable Estimated Wait Message. If enabled, you can select for a message to play every 10, 15, or 20 seconds. This message will interrupt your hold message, and the hold message will resume playing from the beginning of the audio file.
        1. Select if you want it to play a message letting the caller know their place in line or their anticipated wait time.
        2. Estimated wait time option will calculate a caller's wait time based on the default call handling time selected.
        You can upload a maximum of 4 Entrance greetings, 2 On Hold messages and 4 Comfort Messages. All Entrance greetings will be played in sequence before the On Hold message(s). Comfort message(s) will be played after all the On Hold message(s) are played. Wait time or Queue position is played after the Comfort Message(s) and before the On Hold Message(s).

        Recommendation. We recommend using an audio file that isn't much longer than 10 seconds for hold messages when using comfort and/or wait messages due to the fact that the audio will get interrupted and start over when play resumes.

    For example, if you have 2 greetings uploaded for each greeting type and either wait time or queue position is enabled, the messages will be played in the following sequence:

    • Entrance Greeting 1, Entrance Greeting 2
    • On Hold Message 1, On Hold Message 2
    • Comfort Message 1, Comfort Message 2
    • Wait time/Queue Position
    • On Hold Message 1, On Hold Message 2
    • Comfort Message 1, Comfort Message 2
    • Wait time/Queue Position
    • On Hold Message 1, On Hold Message 2
    • Comfort Message 1, Comfort Message 2
    • Wait time/Queue Position....

    Group Forwarding

    Group Forwarding allows you to quickly forward multiple user lines to the same destination/number.

    1. Click Manage features.
    2. Then click Group Forwarding.


      Changes that can be made:
      • Turn the feature on or off.
      • Enter a number in the Forward to Phone Number field.
      • Select when to activate (Always or Schedule).
      • Search for or select lines to add to or remove from Group Forwarding.

    3. Click Submit.

    Calling Line ID Delivery

    This feature allows one 10-digit phone number to display for outbound calls from all One Talk phone numbers in the group. Every outbound call made displays the same 10-digit phone number.

    Navigate to “Manage Features > Caller Line ID Delivery” to enable the feature in the One Talk Portal.

    1. Select the appropriate option to enable or disable the group feature:
      • Calling Line ID Delivery default value is “Use individual phone numbers” (disabled).
      • The administrator must select the second option, “Select a One Talk number or enter any number for all lines in the group” (enabled).
    2. Click the Submit button to submit any changes to this group feature.

      Note: To disable the feature and display individual phone numbers for outbound calls, select Use individual phone numbers and click Submit.

    Custom Ringback

    Upload a custom audio file (e.g., music or an advertisement) that gets played when callers dial a One Talk business line. This replaces the standard ringtone for One Talk phone numbers in the group when enabled.

    To enable Custom Ringback:

    1. Click Manage features, then click Custom Ringback.

    2. Click Upload Custom File, then select the appropriate WAV file to upload from your desktop.


      Ensure that the file meets the following requirements:
      • Consultative Committee for International Telegraphy and Telephony (CCITT) u-law or a-law codec
      • 8,000 kHz (sampling rate/frequency)
      • 8-bit mono WAV file type
      • 2 MB or less total size

    3. Click Submit to enable Custom Ringback.
    4. A success message will display.

    To disable Custom Ringback:

    1. Select Play Standard Ringing, then click Submit to disable Custom Ringback for that group.

    Setting or changing Remote Group Pickup

    Remote Group Pickup allows you to define a group of users that can remotely pick up someone else's ringing line in the group by dialing **98.

    1. On the Features page, click Remote Group Pickup.

    2. Select an existing group or create a new one. If you’re creating a new Remote Group Pickup, give it a name. Then assign the lines to the group using the right-facing arrow or drag and drop to the Selected Lines box. To edit a Remote Group Pickup, click the desired name. You can search for available lines by name or number.

    3. Select the Remote Group Pickup name. Once in the Modify screen, you will be able to enter or edit the group name and select One Talk numbers. One Talk numbers can only be included in one group for Remote Group Pickup.

    4. Click Save to confirm your group settings.

    Scheduling business hours or after-hours and holidays

    The One Talk service can route incoming calls based on your normal business hours, evening hours or holiday periods, with these features:

    Desk phones, dialer and client-paired lines:

    • Pre-alerting Announcement
    • Simultaneous Ring Service
    • Selective Call Forwarding
    • Group Forwarding
    • Selective Call Acceptance/Rejection Hunt

    Group lines:

    • Selective Call Acceptance/Rejection
    • Selective Call Forwarding

    Auto Receptionist:

    • Selective Call Acceptance/Rejection
    • Selective Call Forwarding

    To create, edit or view business hours, after hours or holiday schedules:

    1. Click Manage features and then click Schedule.

    2. View or edit a schedule by selecting a listed schedule, or click Create schedule to make a new schedule.

    3. Before editing a schedule, it is recommended that you dissociate its use from the assigned features. Any changes made to a business schedule in use will impact the features listed. To remedy this, create a new schedule and associate it with the desired features. Once a desired schedule is selected, you will be able to edit the schedule. You can edit the name, the time and the days. Once completed, click Submit and you can now associate it in your feature configuration.
    4. To create a schedule:
      • Select the type of schedule
      • Create a name for the schedule
      • Choose a template
      • Enter start and end times
      • Click Submit when finished
      Your schedule is now ready to be assigned.

    Music on Hold

    When you need to put callers on hold, let them listen to your custom or default music and recorded messages.

    1. Select Manage features and then click Music on Hold.

    2. Choose from “Off,” “System Music” or “Custom Music”.
    3. Click Submit.

      Please note: You must click Submit whenever you turn Music on Hold on or off, and when selecting either System Music or Custom Music.

    To use Custom Music

    Click Upload to add an audio file. Please note: The file must be in the WAV file format with the following specifications:

    • Consultative Committee for International Telegraphy and Telephony (CCITT) u-law or a-law codec
    • 8,000 kHz (sampling rate/frequency)
    • 8-bit mono WAV file type
    • 5 MB or less total size

    Virtual On-Net Extensions

    Virtual On-Net Extensions allow you to create short codes or extensions for dialing external numbers (e.g., 800 numbers or any non–One Talk phone number) that can be dialed as an extension from One Talk devices.

    1. From the One Talk Portal, locate and select Virtual On-Net Extensions within the Features menu.

    2. Select Add a line from the Actions dropdown.

    3. Enter the phone number, username and virtual extension and click Save.

      Note: Virtual extensions can also be added in bulk using a template.

    Group Call Park

    Group Call Park allows you to create a group with users who will be notified whenever a call is placed on Park.

    Prior to configuring the Business Feature Group Call Park, you will need to take a look at the timer settings that are used for both, standard Call Park and Group Call Park.

    To do so, first select the Manage all group option from the I want to menu, and then edit the Group you are working on by selecting the Edit Group option:


    At the Edit Group screen you will see a section called Call Park and Group Call Park timers.


    The default value for both is 45 seconds, if you need to use a different value, please enter it in the appropriate box and press Save.

    Important note: Both features (Call Park & Group Call Park) use the values specified in this section. The values apply to all the Groups created in the Call Park Group feature that is explained in the next section.

    1. From the One Talk Portal, locate and select Group Call Park within the Manage Features options, under “Business Features”.

    2. Once you are in the Manage Call Park Group, click on the Create Call Park group button.

    3. Once you are in the Manage Call Park Group, click on the Create Call Park group button. Which will bring you to the page where you will specify .

    4. Specify the name you want to give to the new Group you are creating.
    5. Select what you want to happen to the call placed on Park after the call park timer expires. Three options are available.
      1. Return the call to the line that parked it (default setting). This will send the call back to the user who placed the call on park.
      2. Return the call to a Hunt Group. This will forward the call to a specified Hunt Group of your choice; only Hunt Groups in your current One Talk Group can be selected.
      3. Return the call to the user who placed the call on Park, and if that user does not pick up the call, then, forward it to a Hunt Group; only Hunt Groups in your current One Talk Group can be selected.
    6. Add lines: Once you press the “add lines” button, you will be able to add up to 15 lines to be part of the Call Park group. The order in which you list the lines is of extreme importance, since the user at the top will be the first one receiving the notification that a call is placed on Park.
    7. Once you have completed all the previous steps, you can press “Save” to apply the updates you made. From that moment on, whenever a user presses the “Group Call Park” button, the system will use the specified settings to that action.

    Important things to know about the Group Call Park feature:

    • Group Call Park is available to all One Talk users.
      • Users can only be a member in one group.
      • Only members in the group can park a call to the group.
      • Users cannot park a call to a group that they are not assigned as a member.
    • You can create as many call park groups as you need in the One Talk portal.
      • You can only add up to 15 lines to a call park group.
      • You can move lines up/down at any time in the call park group, and the changes will take place immediately.
    •  Only the top user in the call park grouping list will be the recipient of the call park notification.
      • There are only two conditions that will send a call park notification to a member other than the top one listed in the call park group list:
        • The user already has a call parked to their line.
        • The user’s device is off.
        • Note: Do Not Disturb does not prevent the call from being parked to the user.
      • There is not a notification to the rest of the group members that a call is parked.
    • The user can have only one call park notification at any given time.
    • For now, desk phone users will have a new button to place a call in group call park and an option for individual call park.
    • The user can choose to use standard “Park” which will allow him to park a call to a specific One Talk number/extension.

    • If no call park group is defined in the portal, the user will hear a fast busy signal if they press the group park button.
    • Users of any other type of One Talk device (native dialer, mobile app, desktop app) will need to use the group call park feature access code **58 to place a call in group park.
    • If the user has a Desk phone, the user will receive a pop up telling a call has been parked and is ready to be retrieved.
    • If the user has Mobile/Desktop app end points in that line, they will receive the standard Call Park notification they see today.
    • The call park timers on the Edit Group screen apply to all the call park groups created.
    • The call park timers also apply to the individual call park user level feature.
    • The Hunt Group to which you can send a call after the call park timer expires must be an HG in the One Talk Group the line is part of.

    End-user feature management

    Call Forwarding


    There are five settings. Select from the following Call Forwarding options:

    • “Group” enables you to forward all calls for multiple lines in the group to another number all the time or based on a schedule.
    • “Selective” forwards calls based on a predefined schedule and phone numbers.
    • “Always” forwards all calls to another destination.
    • “Busy” forwards calls when your line is busy.
    • “No Answer” reroutes a call if you don’t answer after five rings.
    1. Call Forwarding features can be turned on and off as needed. Turning on the feature will give you the option to forward to voicemail or to another phone number. Call Forwarding can be enabled with a schedule.

    2. Select the desired Call Forwarding option.
    3. Select Enable next to the user to be modified.
    4. Select either voicemail or input a phone number.
    5. Submit the change.

    You can adjust Call Forwarding settings by clicking the + icon next to the line to which changes will be made. This will expand the view to allow editing.

    You can also use the Lines & Devices tab to set up Call Forwarding for a single line.

    1. Select the Lines & Devices tab and choose the line you want to add Call Forwarding to by checking the box or clicking the phone number.

    2. Click on the User Features tab and scroll down to set or adjust Call Forwarding features.
    3. Select Configure.
    4. The Call Forwarding dialog box will appear. Make the desired changes, then click Submit.

    Selective Call Forwarding

    The Selective Call Forwarding feature enables you to define criteria that cause certain incoming calls to be redirected to another phone number. You can have up to five criteria to forward incoming calls.

    You access Selective Call Forwarding the same way you access Call Forwarding.

    1. Click Selective Call Forwarding.
    2. Select Enable next to users you want to configure.
    3. Select whether to forward all calls or calls from specific phone numbers.
    4. Enter a 10-digit phone number to which calls will be forwarded.
    5. Select either Always or Custom to associate a schedule.
    6. If needed, select Add new to add additional criteria (up to five).
    7. Click Save.

    Alternatively, you can configure Selective Call Forwarding for specific users via the Lines & Device page.

    Monitoring and managing extensions with Busy Lamp Field

    The Busy Lamp Field (BLF) allows One Talk desk phone users to monitor the status of other users in a defined group and to answer incoming calls for the monitored extensions. This feature allows a receptionist or administrative assistant to see whether a person is on the line, to answer a call on behalf of the monitored user, to speed dial the user when the LED is showing green, or if setup, barge a monitored user;s call when the LED is showing red.

    The BLF feature is generally provisioned to a desk phone using an expansion module (EXP40). A single line represents the status of each monitored extension on the monitoring user’s desk phone. A BLF monitored line is assigned to an available softkey on the monitoring user's desk phone and displays the user's calling ID name from the One Talk portal.

    To utilize this feature, you must have a compatible One Talk desk phone and access to the One Talk Portal.

    Multiple users can monitor the same extension and a maximum of 50 lines may be monitored.

    Before you begin, each monitored line must have the One Talk extension and caller ID name defined in the One Talk Portal.

    Note: Network latency and network congestion can impact a user’s BLF monitoring experience.

    To start, click the > icon under Total Lines to access the Lines & Devices page.

    1. On the Lines & Devices page, you can search for a phone number or username. Select a line to manage.
    2. Select the Associated devices tab for the line selected.
    3. Click View more on the Desk Phone tile to display more information.
    4. Toggle the Enable monitoring switch to the on position.
    5. Scroll down the page and click Configure lines to monitor in the Busy Lamp Field section.


    6. On the pop-up screen, select the user lines to be monitored followed by Save to complete selection.
    7. Once complete, you will see the list of user lines being monitored in the Busy Lamp Field section.
    8. After the phone reboots, the user will see the BLF monitored lines assigned to the available softkeys on their desk phone.

    Things to Know about BLF:

    • Green LED means the user is not on the phone.
    • Solid Red LED means the user is on the phone.
    • Flashing Red LED means the user is receiving a call.
    • Pressing the softkey assigned to a monitored line when the LED is showing green will initiate a speed dial call to the user.
    • Pressing the softkey assigned to a monitored line when the LED is showing red will initiate a call barge. The call barge will not be successful if it isn't allowed and configured properly in the One Talk portal.
    • When a monitored line receives an incoming call, the user with BLF enabled will see a notification for the inbound call and will have the ability to remotely pick up the call on behalf of the monitored user.
    • When a monitored user sets their phone to Do Not Disturb, the LED status will still show as green.
    • When a monitored line has a call on hold, the LED is solid Red. There isn't a separate identification for a call being on hold.
    • There is no BLF notification for a call being parked to a user's line.
    • When a user has their phone set to do BLF monitoring, the user will hear a call waiting tone when they are on an active phone call and a monitored line receives an incoming call.

    Block Barge-In feature

    This feature allows other members of your business to barge into another user's active call. By default, this feature is disabled. Currently, only a user that has a status of disabled will be able to barge into a call for a user with a status of enabled. Also, a warning tone must be used. If the warning tone is disabled, the Barge-In function will not work.

    1. Select Manage features under the I Want To section, select the User Features tab and then click Block Barge-In.

    Selective Call Acceptance/Rejection

    This feature allows you to accept only specific calls based on conditions that you define, or to reject incoming calls based on predefined conditions you set. You can accept all calls or only calls from up to 10 specific phone numbers, based on a predefined schedule (business or holiday). Up to five conditions/options can be configured. If you have both Selective Call Acceptance and Rejection activated, the settings for Acceptance will be used first.

    To start, select Manage features under the I Want To section, then select the User Features tab and click Selective Call Acceptance/Rejection.

    1. Select the desired function for either Acceptance or Rejection.
    2. Search for and select the user line you want to enable.

    3. Toggle the switch to the On position (green) to enable.
    4. Enter desired phone numbers.
    5. Either choose Always or associate a schedule.
    6. If desired, add additional criteria (limit of five criteria).
    7. Click Submit to save.

    Anonymous Call Rejection

    This feature will prevent calls with no caller ID number from ringing the user.

    To enable, select Manage features under the I Want To section, then select the User Features tab and click Anonymous Call Rejection.


    1. Select the user line you want to enable.
    2. Toggle status switch to On (green) to enable.

    Calling Plan

    Your business can require a user to use an authorization code for placing international long distance calls.

    To enable, select Manage features under the I Want To section, then select the User Features tab and click Calling Plan.

    1. Search and select a user to enable.

    2. Click the + to expand view.
    3. Select Use Authorization Code.
    4. Enter a two- to six-digit code.
    5. Enter a description.
    6. Click Submit to save

    Pre-alerting Announcement

    This feature allows the business to play an audio file for the caller to hear prior to ringing the number called.

    To enable, select Manage features under the I Want To section, then select the User Features tab and click Pre-alerting Announcement.

    1. Search and select user to enable.

    2. Toggle the switch for status to On (green) to enable.
    3. Select Custom announcement.
    4. Click Upload and select an audio file that meets the audio file requirements to be uploaded.
    5. Either select Always or set a schedule for when the audio file should be played.
    6. Click Submit to save.

    Caller ID Blocking

    Using this feature will prevent your number from being sent on outgoing caller ID.

    To enable, select Manage features under the I Want To section, then select the User Features tab and click Caller ID Blocking.

    1. Search for and select the user lines to enable.
    2. Toggle the status switch to On (green) to enable.

    Simultaneous Ring Service

    Using this feature, a user can have additional phone numbers ring when someone calls their One Talk phone number.

    Note: When using this feature to ring other phone numbers, any features like Call Forwarding that are enabled on those phone numbers can impact how the call is directed and answered. For example, if one of the phone numbers selected to ring is associated with a cell phone that is currently turned off, the call would be forwarded directly to voicemail for that cell phone, which is the typical rule for call handling when a call rings a cell phone that is currently turned off.

    To enable, select Manage features under the I Want To section, then select the User Features tab and click Simultaneous Ring Service.

    1. Search for and select a user to enable.

    2. Toggle the status switch to On (green) to enable.
    3. Either select other One Talk numbers to ring or enter additional 10-digit phone numbers, followed by commas.
    4. Select a schedule option.
    5. Toggle to either not ring the additional numbers when the One Talk number isn’t in use or always ring.
    6. Click Submit to save.

    Voicemail to Email

    Users have the ability to enable Voicemail to Email for their One Talk service. By default, this feature is disabled. Once enabled, the service will attach a recorded voicemail message to an email that is sent to a designated email address.

    Subscribing to an enhanced voicemail option will provide a transcription of the message within the body of the email.

    To enable, click the > icon under the Total Lines section, which will take you to the Lines & Devices page.

    1. From the Lines & Devices page, search for and select the user you want to enable.

    2. Click the User Features tab.
    3. Toggle the status switch to On (green) to enable the feature.
    4. On the pop-up screen, enter up to two email addresses where you would like the voicemail recording to be emailed. By default, the primary email address is the end user’s email address that was defined during end-user setup.

    Desk phone Business Directory download

    This feature, when enabled, pulls information from different sources in the One Talk Portal and pushes it out to one or more desk phones in a given group. All the lines in the specified Group, including Automated Receptionists, Hunt Groups and Virtual on Net Extensions, get pushed down to the selected devices. As stated in the feature, the push is only received by Desk phones in the Group and no other devices.

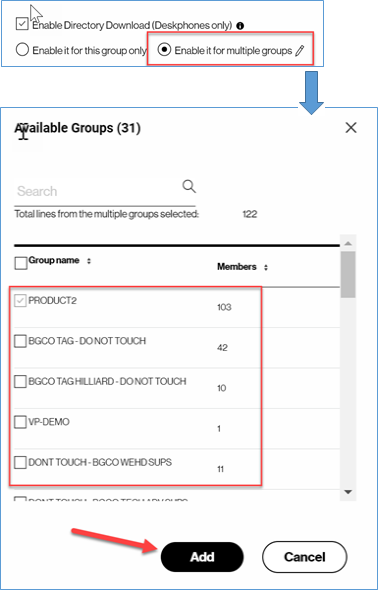
    The admin can select one or multiple groups to be downloaded. There is a maximum of 10 groups that can be selected and a maximum number of 2000 contacts that can be sent to each individual desk phone. The more groups and contacts to be downloaded, the longer it takes for the desk phones to receive that information.

    The fields that are sent to the Desk phones are:

    • Phone number
    • First name
    • Last name
    • Extension

    For Automated Receptionists are:

    • Phone number
    • Name

    For Virtual on Net Extensions they are:

    • Phone number
    • Name
    • VON extension

    Things to know about the Business Directory:

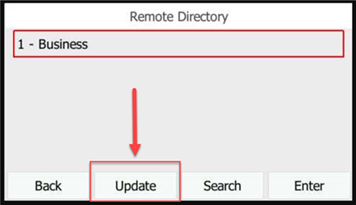
    • The Business Directory is a unidirectional push from the One Talk portal down to the desk phone(s).
    • The Business Directory is read-only; manual entries to it are not allowed.
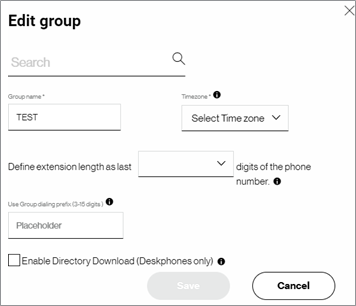
    • If the administrator disables the feature in the Edit Group screen, all desk phones will lose the Business Directory.
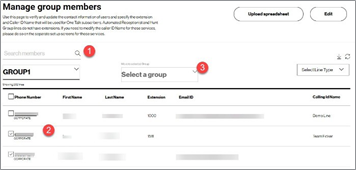
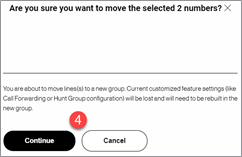
    • When a line is moved from one group to another, the administrator will need to perform the line-level enablement explained later in this document to have the desk phone download the Business Directory of the new group or groups.

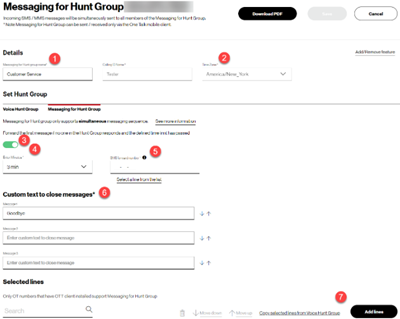
    To enable the feature, perform the following steps:

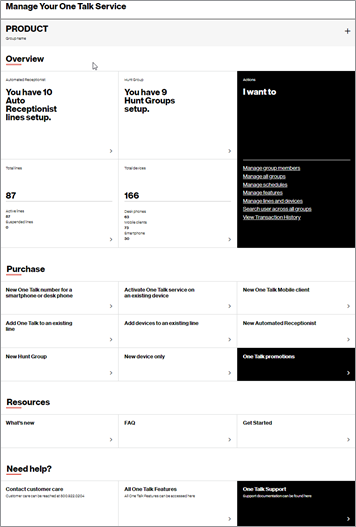
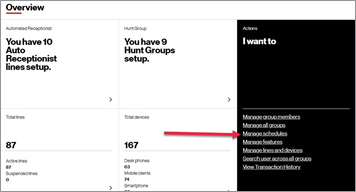
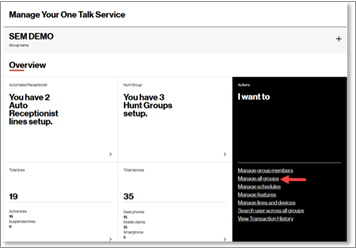
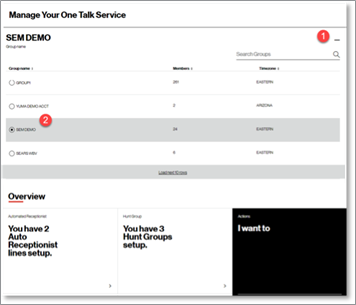
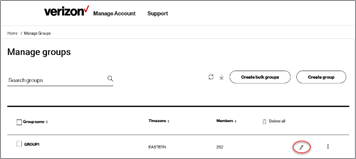
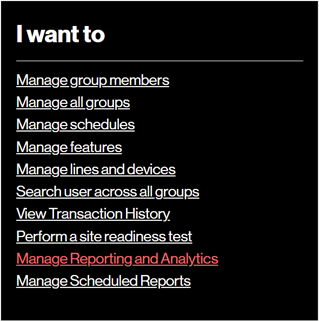
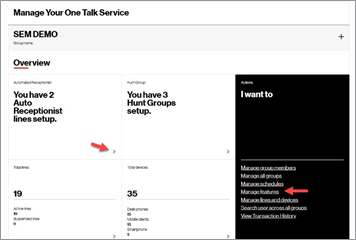
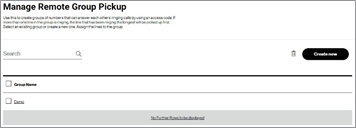
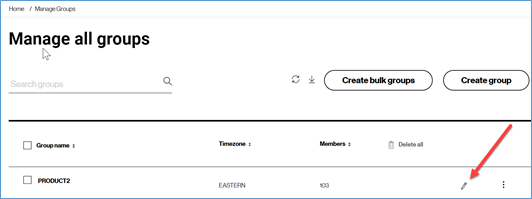
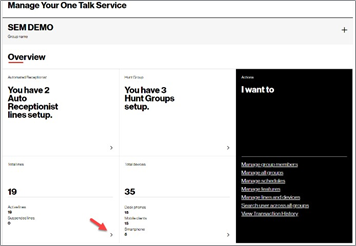
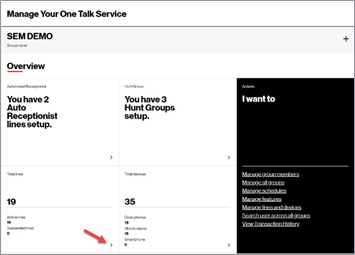
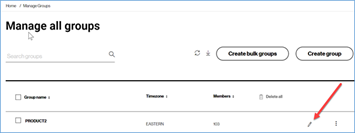
    1. Enable the group for the feature by clicking the Manage all groups link under the I Want To section on the One Talk Overview page.
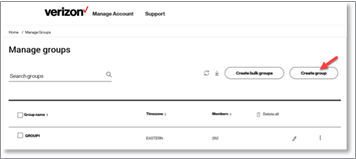
    2. Proceed to edit the group you want to enable the directory download feature by clicking the pencil icon.

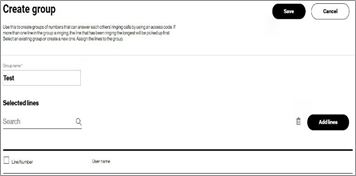
    3. In the Edit Group screen you will then proceed to:
      1. Enable/Disable the feature.
      2. Choose the option to download the contents of one group or multiple groups.
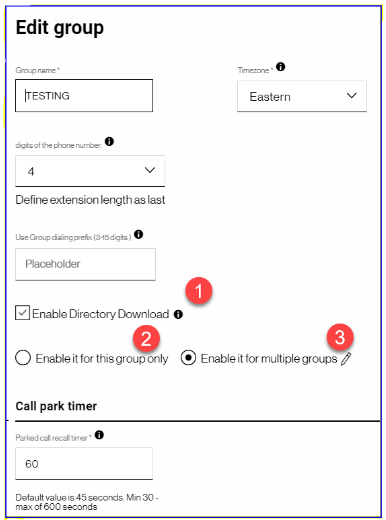
    4. When you select the “Enable for multiple groups” options, you are then given to specify which groups to add.

    Once you have enabled the feature, you then next need to specify which Desk phones in the Group will be receiving the downloaded information. The steps above enable the feature to work, and the selections of the Desk phones tell the system the destination for the download.

    Select the destination desk phones by following the next steps.

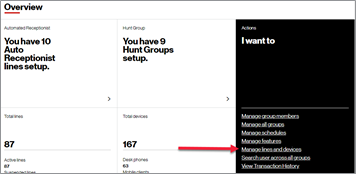
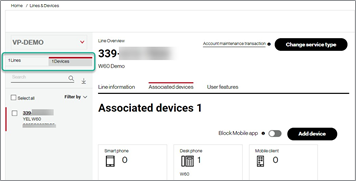
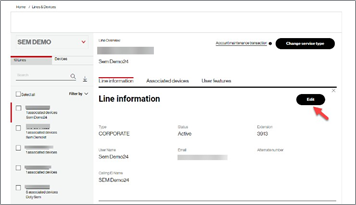
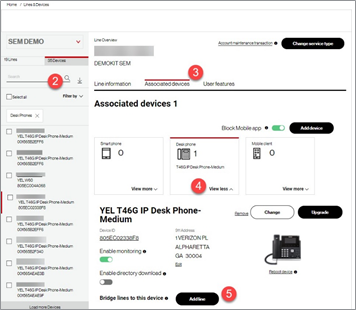
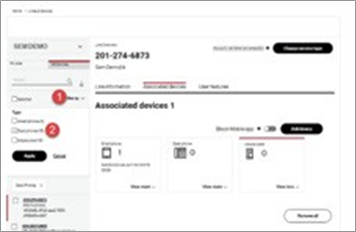
    1. Begin by selecting the Manage lines and devices link under the I Want To section on the One Talk Overview page.
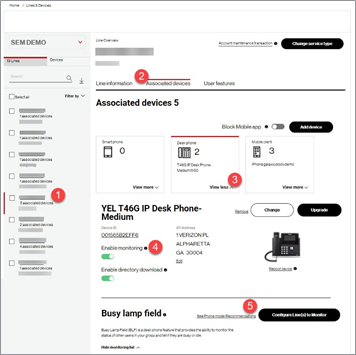
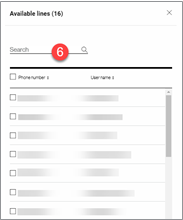
    2. Select the Devices Tab, and proceed to filter the available lines by “Desk phone” type.

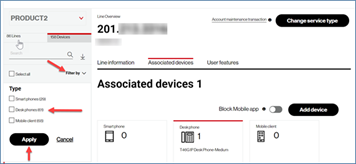
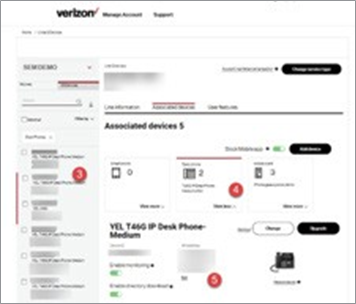
    3. Next, select the desk phone (one, multiple or all of them) and from the “I want to…” menu, choose Enable Directory download.

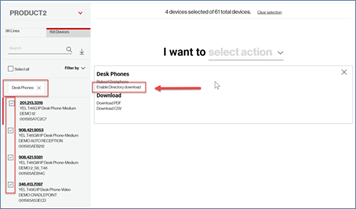
    4. The system will present a pop–up, requesting confirmation that you do want to enable the Directory download for the selected device; make sure to check the box to enable the feature and submit the changes.

    Business Directory experience on the desk phone

    The following screens will present what the Desk phone users are able to see, once a Directory Download for one or multiple groups is configured as described above. In the example below, the administrator configured three groups to be downloaded to a series of T46 Desk phones.

    From the Desk phone Main Screen, the user will press the Directory button.


    Next, the user will choose the Remote Directory option.


    Next, the user will press the Business option.


    The user will then see the exact Groups that were downloaded to the Desk phone as shown in this example.


    Once you have performed the above steps, there are three ways the desk phones will receive information from the One Talk Portal:

    1. The desk phone contacts the One Talk Portal once every night to check for new information and the updates it needs to download and present to the customer.
    2. The user can reboot the desk phone at any point in time after the above steps have been completed; whenever a desk phone reboots, the device contacts the One Talk Portal and retrieves any new information/updates in real time.
    3. The user can also retrieve new changes made in the Portal by pressing the Update button in the Business Directory screen.

    Line Bridging feature—Boss/Admin function

    Line Bridging allows the business to bridge a user's One Talk phone number to another One Talk user's desk phone. This allows that user the ability to answer incoming calls on the three line appearances for the other user, make outgoing calls on behalf of the other user and join an active call on one of that user's lines.

    Things to know:

    • Requires capable desk phone.
    • A maximum of 11 One Talk phone numbers can be bridged to a user’s desk phone.
    • One Talk phone numbers can be assigned to a maximum of two desk phones. Bridging a user’s phone number uses a desk phone assignment. If a One Talk phone number is already being shared on two desk phones, the phone number cannot be bridged to another desk phone.

    How to set up:

    1. Click on the > icon under Total Lines on the One Talk Overview page.
    2. On the Lines & Devices page, select a user with a capable desk phone that is needing another user’s One Talk phone number bridged to his or her device.
    3. Click the Associated devices tab.
    4. Click View more on the Desk Phone tile to expand the viewable information.
    5. Click the Add line button next to “Bridge lines to this device”.
    6. On the pop-up screen, select the phone number to be bridged. Only one phone number at a time can be bridged.
    7. Click Save to complete. A success message will be displayed.

    The user’s phone will need to be rebooted in order to be updated with the changes made.


    Paging for Desk Phones

    Desk phones will be able to place a multicast paging call to all other One Talk capable desk phones on the same LAN.

    To Setup:

    1. On a capable desk phone, select Features.
    2. Select Option 7: Multicast Paging.
    3. Select to enable Send Paging in order to page from the device.
    4. Select to enable Accept Paging in order to accept pages to the device.
    5. Once complete, the desk phone will have a new softkey assigned called paging (the phone will always use the linekey next to the "features" linekey and will replace anything already configured in the linekey.

    To Use:

    User presses the paging button and begins to speak. The user will be broadcast through the speakerphone for enabled desk phones. To end the Paging call simply press EndCall on the screen. A page will be ignored by a user's device in the following situations:

    • The user's desk phone isn't enabled to receive the page or they have a desk phone that isn't capable.
    • The user has an active call or call on hold on their phone.
    • The user has a call forwarding option enabled on their phone.
    • The user is receiving or active on a 1:1 intercom call.
    • The user's phone is set for Do Not Disturb.

    Requirements:

    1. Any T4S Yealink Desk phone (T41S, T41SW, T42S, T46S or T46SW).
    2. Desk phones are all on the same LAN network.
    3. If LAN traffic restriction policies are in place on their Firewalls, you will need to make sure the following port and protocol are open to allow for the Multicast Paging to work properly: Protocol: UDP / Port: 8665
    4. Customers wanting to send a Paging call using IP Multicast should use the IP address 224.0.0.1 as the destination address of their IP paging devices. The native use of IP multicast both within the network and to / from the Internet. No additional configuration is required on clients or servers for multicast to work; however on some Operating Systems it may be necessary to configure the system's firewall to allow UDP data to and from the IP range 224.0.0.0/4 (or 224.0.0.0 with a subnet mask of 240.0.0.0).

    For more information, check out the desk phone simulators and search paging.

    Updating 911 address for desk phones

    It is important to make sure the 911 address information is accurate so that the correct address information is transmitted when calling 911. Use the following step to edit the 911 address for a user’s desk phone.

    From the Overview page, click Manage lines and devices in the I Want To section.

    1. On the device tab, click Filter by.
    2. Select to filter for desk phone. The 911 address for desk phones can only be edited in the One Talk portal.

    3. Search and select a user to edit.
    4. On the Associated devices tab, select View more.
    5. Click Edit to make changes to the 911 address.

    6. Make the necessary changes on the pop-up screen.
    7. Press Submit to update.

    Side View - Business App Integrations

    One Talk Side View enables select third party business apps to easily work with One Talk Mobile and Desktop Apps.

    Side View integrations enhance One Talk by providing a quick snapshot of important details about contacts while on a call, saving employee time and improving productivity.

    The Mobile and Desktop Apps display recent emails, past and upcoming meeting events and CRM account information for a contact, to help make your customer interactions more productive.

    • One Talk "helper apps" display available information about callers on incoming & outgoing calls
    • Recent emails, past & upcoming meetings and CRM account detail
    • One Talk user can log calls, tasks and events, auto syncs back to the CRM account
    • Side View integrates with multiple business productivity suites and CRM apps*
      • Basic Integrations - included with all One Talk lines: Google Workspace, Microsoft 365*
      • Premium Integrations - optional & additional Side View and third party business app fees apply: Salesforce, SugarCRM, Microsoft Dynamics 365*

    Resources for Side View Business App Integrations:


    *Customers must separately purchase business apps for their smartphones and/or computers.

    My Verizon for Business app

    You can perform most of the administrative tasks described in this guide through the One Talk section in the My Verizon for Business app.

    The My Verizon my Business app allows you to configure all of the business features of One Talk and a select number of user features as well.

    You can obtain the application here: https://www.verizonwireless.com/business/my-biz-mobile/

    About One Talk

    One Talk, together with its related devices, software and applications (“Service” or “One Talk”), is a business telephone solution that brings together the functions of desk phones and mobile devices (smartphones and tablets) into a unified system, with all devices sharing the same communication features (see our One Talk Features page for a listing of features available with the service).

    http://www.onetalk.com

    Technical support

    For additional information, please visit the One Talk support website (https://www.verizon.com/support/one-talk/), where you can find additional documentation and answers to the most frequently asked questions.

    You can always reach our Customer Support line by dialing (800) 922-0204.