Introducing Verizon Adaptive Network Fabric
Overview
Verizon Adaptive Network Fabric is a flexible, programmable Network-as-a-Service (NaaS) solution that leverages Verizon’s Intelligent Edge Network (iEN) to simplify any-to-any connectivity to public clouds, private data centers, and enterprise locations. Designed to support resource-intensive, high-performance, and AI-driven workloads. Adaptive Network Fabric separates physical network entry points from virtual services, allowing you to dynamically build, control, and scale your network topologies on demand.
Key Adaptive Network Fabric capabilities:
Agility: Fast provisioning and on-demand scaling of virtual connections.
Visibility: Deep analytics for monitoring network health and uptime.
Performance: Designed for high-performance applications requiring scalable bandwidth and optimized latency.
Forecasting: Provides insights based on previous traffic patterns allows for intelligent decisions on how to optimize the network performance
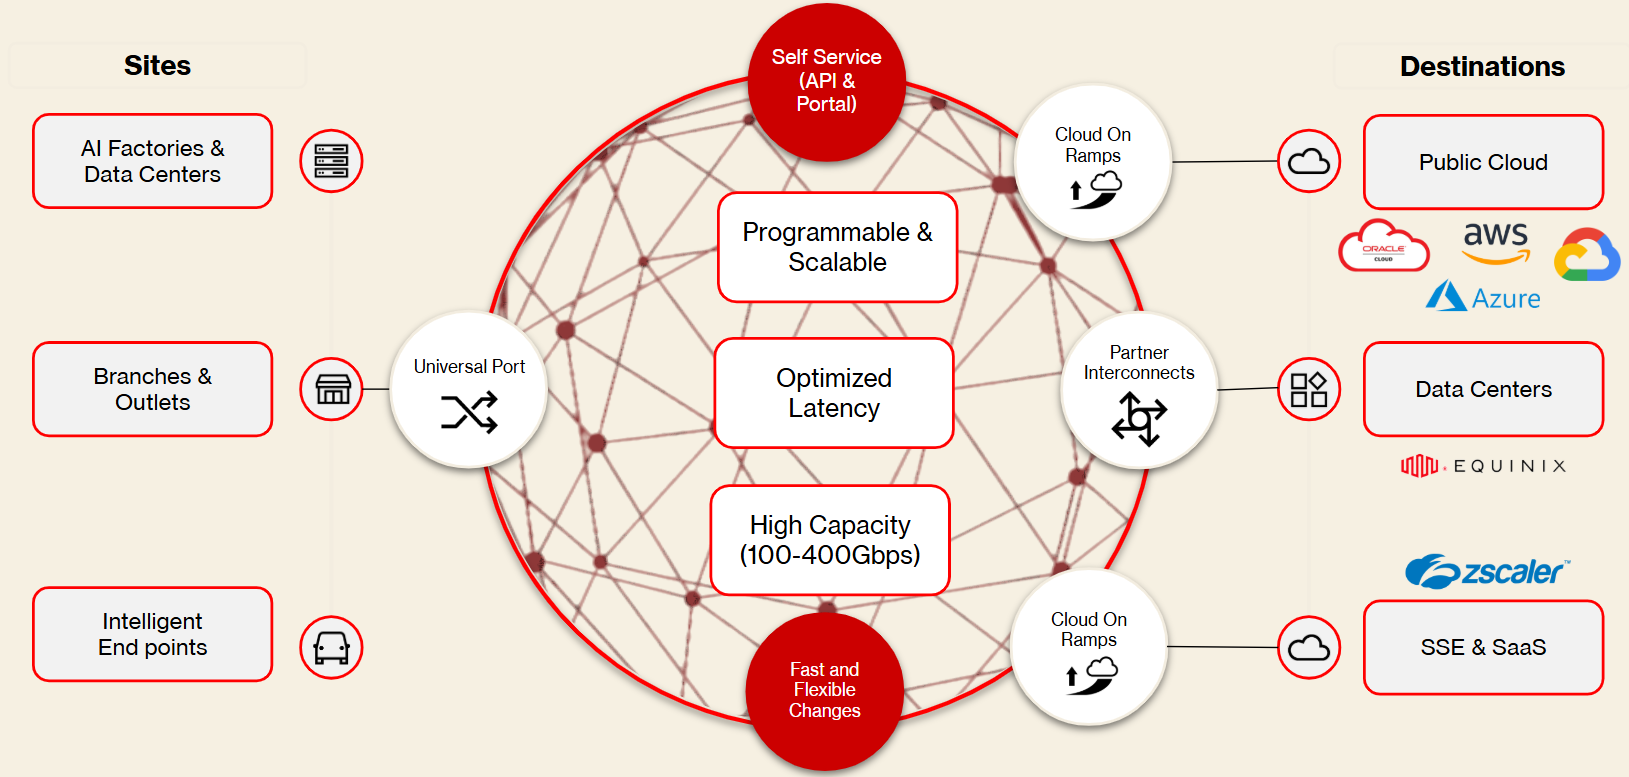
Basic Architecture and Components
The Service has the following modular components.
Port: The physical entry point into the intelligent Edge Network, available in 1Gbps, 10Gbps, and 100Gbps speeds. A single universal port can support up to 128 virtual connections and allows up to 400% oversubscription of the aggregated bandwidth.
Cross Connect: The link between your Equipment and the Port. This can be Verizon-provided or you can order this as “customer provided” directly from your Data Center provider.
Adaptive Connections: Virtual circuits that connect Ports, Cloud Service Providers (third-party hyperscalers), or Verizon Services (such as Private IP).
You can choose from four network types:
Ethernet Connection: A Point-to-Point Layer 2 Ethernet virtual connection.
Internet Connection: A Layer 3 internet dedicated virtual connection providing connectivity to public networks.
L3VPN Connection: Private Layer 3 connectivity.
Cloud Connection: Virtual connections to Cloud Service Providers (third-party hyperscalers) such as Amazon AWS, Microsoft Azure, Google Cloud, Oracle Cloud, and CoreWeave.
Your Central Location for Network Service Delivery
Adaptive Network Fabric provides the ultimate flexibility to procure and manage your network through two distinct, complementary methods. You can transition to the Self-Serve Portal whenever you want for ongoing network management, including service additions, modifications and support. Importantly, these journeys are not mutually exclusive, you can order your network in two ways.
Self-Serve Portal: Allows you to quickly order your ports and network connections via a 3-step quote-to-order process. You have full control over how you configure connections and order your service.
Sales-Assisted: If you prefer our Verizon experts to design and order more complex connectivity for you, contact your account team for guidance. If you forget to supply any required information to complete the order, our network ordering verification process will contact you so that you can supply the missing details.
Administration & Monitoring
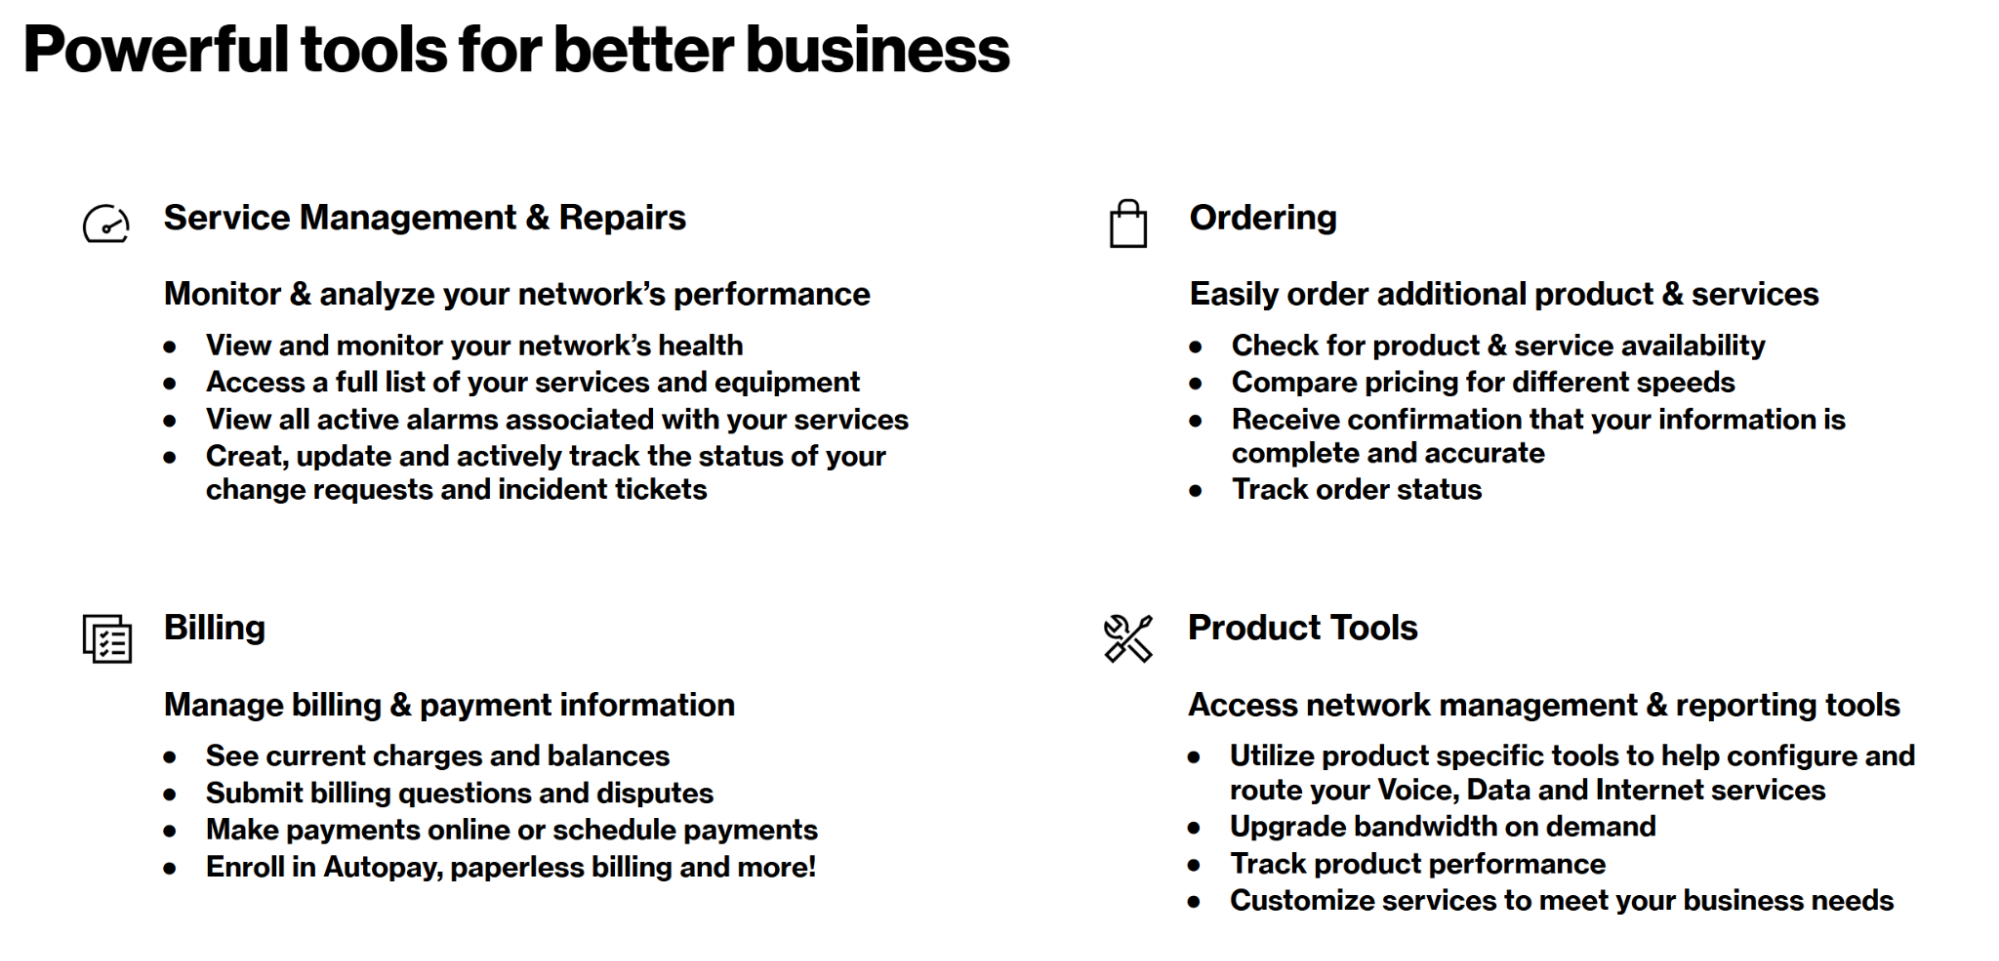
The Adaptive Network Fabric Portal is a centralized, API-driven dashboard that allows you to configure, monitor, and manage your network ecosystem. Key functions include:
Inventory & Order Management: Manage your service inventory, activate newly provisioned services, and track the progress of in-flight orders or disconnects directly from the dashboard.
Port Health Insights: Monitor physical infrastructure health via telemetry reports, including Port Availability (%), Bandwidth Throughput, Utilization and Operational Status.
Connection Health Insights: Monitor the performance of your virtual circuits (Ethernet, Internet, L3VPN, and Cloud) with metrics covering Latency, Jitter, Packet Loss, and Downtime.
Administration: Manage user access (controlling who can view or buy services), request sales consultations, create and track repair tickets, and audit and pay your bill.
Billing: Securely pay invoices, and view payment history. Audits are made simple with the Incremental Billing Reports providing a clear breakdown of all speed changes , with charges prorated down to the nearest hour. If you have billing questions, you can create and monitor an "Invoice Inquiry" online, or access Live Chat to connect with Verizon Customer Care directly.
Your Verizon Team
As you deploy your service, you will partner with dedicated Verizon teams to ensure a smooth and successful implementation. Below is a quick guide to the Verizon team members who will support you as you set up and scale your Adaptive Network Fabric services.
| Role | Responsibility |
| Customer | Place Order Verify Order Sign Contract Provide Contacts |
| Account Executive | Client Relationship Contractual Support Pricing and quoting support |
| Solutions Architect/Engineer | Design Support Technical solutions |
| Order Manager | Verification and order track (fallout only) |
| Provisioning/Service Delivery Team | Circuit Creation Implementation |
| Service Assurance | Ongoing network support Ticket management |
Manage your Account with Adaptive Network Fabric Portal
The Adaptive Network Fabric Portal uses role-based access to help support security and operational efficiency. We recommend designating at least two (2) Portal Administrators for continuity while keeping overall privileged access restricted.
Your organization's designated Portal Administrator will send your official invite to register and log in.
Available User Roles
Your level of access will be determined by one of these three roles:
| Role | Primary Responsibility | Key Permissions |
| Admin | "Super User" with full oversight. | Manage users, security, and has full access to all portal features. |
| Buy | Procurement and financial management. | Place orders, track billing, and monitor contract lifecycles. |
| View | Oversight and review | Provision services and manage support tickets. |
*Note: The Buy role can track the status and history of all submitted service requests.
Registering Users on the Portal
Initial registration for the Adaptive Network Fabric Portal [Provide link to portal] is a self-service signup, however, the company must be a legal entity and the user must have a corporate email address to allow the registration to complete. Once the initial user is created, that user will automatically be assigned the Admin role. Any additional users desired require an internal administrative action.
Administrative Invitation: An existing user with the Admin role must invite you by clicking the "Add new user" button on the User Management page.
Required Information: The Admin will provide your corporate email address and assign you a specific role (Admin, Buy, or View).
Onboarding Status: Once the invitation is sent, your account status will remain "Pending" until you complete the setup instructions sent to your email.
Getting Started
After your account is validated and finalized, you can then log in and start ordering and managing your network assets. You will land on the Dashboard, which serves as your command center. The Dashboard highlights your most critical KPIs, so you can quickly go to the section you are most interested in.
Global Navigation: Use the left-hand sidebar menu to access key areas like Network (for Ports and Connections), Orders, Network Health, Billing, Support, User Management (if you have an Admin role) and Action Center
Verify Account Details: Check the top header to confirm your Company Name and active Contract ID are correct, especially if you manage multiple accounts.
Review Your Profile: Use the utility icons in the top right to access your User Profile and notification settings.
Summary Cards: At a glance, view your total active Ports and Connections, operational Service status and Action center.
Orders & tickets: Monitor Recent Orders and Recent Tickets, with highly visible alerts for any items needing immediate attention. Review the "Action Required" section on the Recent Orders card to see if there are any pending tasks.The Add Ports and Add Connections cards allow you to quickly order more connections.
Services: Set of cards highlighting all the services you need to quickly set up your network.
Flexible Billing Terms
Adaptive Network Fabric offers flexible service commitments to match your business needs, including a Zero Term option, as well as standard 12-month, 24-month, and 36-month term plans. The Zero Term option is a flexible, month-to-month billing model, specifically designed for highly variable or "bursty" workloads. It features hourly billing and allows customers to scale or disconnect their services without paying Early Termination Liability (ETL) fees. However, it is important to note that one-time Non-Recurring Charges (NRCs) for setup are applied to ports and cross-connects purchased under this plan To ensure accurate invoicing, your monthly charges are billed in arrears and prorated to the nearest hour of active use.
Standard taxes and fees, including Property Tax Recovery and the Federal Universal Service Fund (FUSF), are applied to your invoice based on your specific service configuration. For example, FUSF charges apply when more than 10% of your connection traffic crosses state lines.
Designing your Networks
Here are some tips to get you started with designing your networks. The Adaptive Network Fabric uses a flexible framework with adaptable components to enable seamless interconnectivity across your locations and the broader Verizon network. At the core of this framework is a port, which serves as a virtual network termination point allowing users to create, configure, and interconnect multiple interoperable connections across data centers, cloud service providers (CSP) and your locations. By simplifying and unifying network connectivity, Adaptive Network Fabric offers a single, flexible abstraction to establish efficient network connections between locations.
Note: if you are a Verizon customer, Adaptive Network Fabric is compatible with our other Layer 3 services and may not require any migration of your other services.
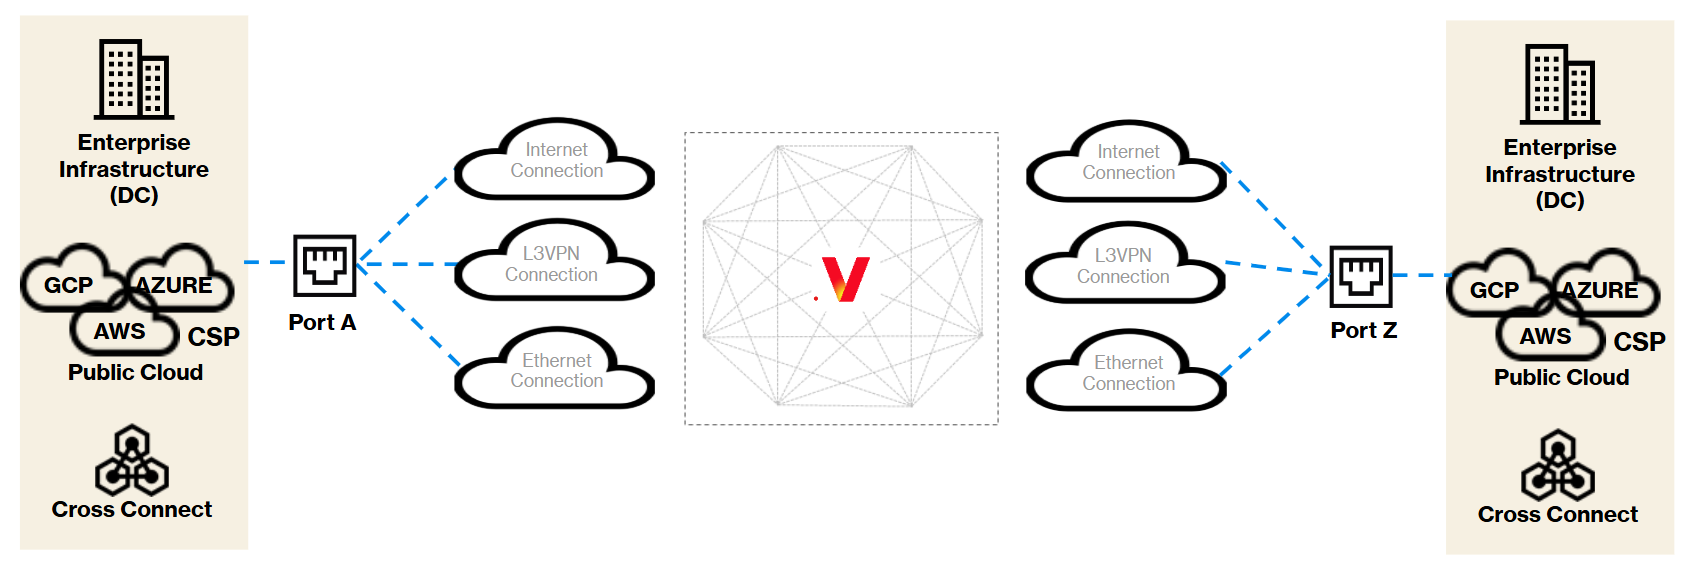
Figure 1: Adaptive Network Fabric Components
Designing a network with the Adaptive Network Fabric involves using two interrelated components: a set of Ports at physical locations and virtual connections between these Ports.
Physical Layer (Ports) Start by establishing your physical entry points. You will need a minimum of two active Ports (for an Ethernet Connection, that would be the A-End and a Z-End) located in your chosen data centers before you can build your network. You will also need Cross Connects to provide access to your actual equipment and these Verizon ports.
Virtual Layer (Connections) Once your ports are active, you configure the software-defined logical pathways that move your data. You choose how you want to build the connections between the services that fit your needs: Ethernet, Internet, L3VPN, or Cloud Connections.
Network Topology You can mix and match these components to build your desired architecture. By combining these physical and virtual components, you can build a customized network topology tailored to your business. Common architectures include creating a mesh network connecting multiple data centers locations, building a hub and spoke network from your remote locations to either data center locations or directly into high-speed, secure on-ramps to Cloud Service Providers (CSPs) such AWS or Azure.
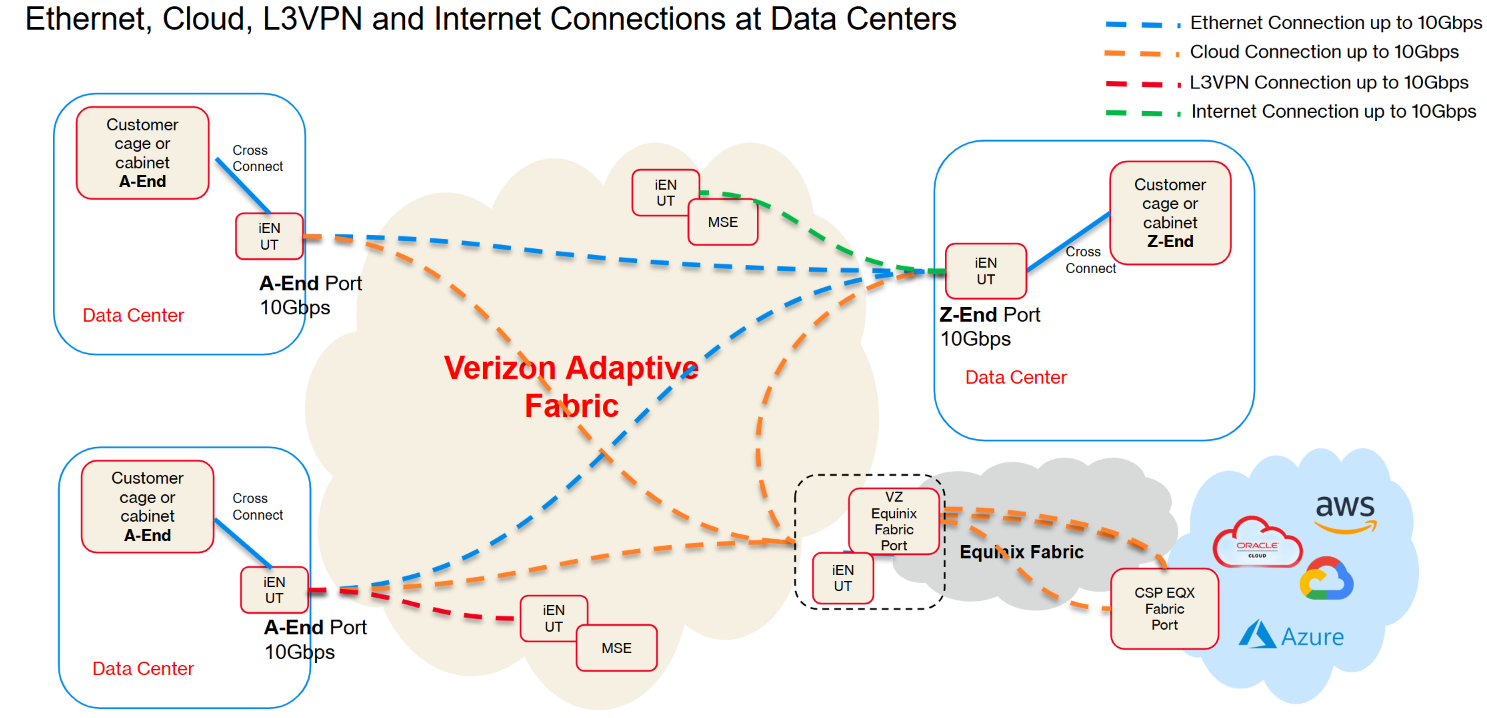
Use Case 1: Connecting Across Multiple Data Centers
The simplest use case is establishing high speed connections between your equipment located in disparate data centers. Often called “middle mile” connections because they are established between data center hubs rather than out to your locations, which are often referred to as “last mile” connectivity.
The connections between the Ports can be Ethernet, Internet or L3VPN, depending on what you are using for other parts of your network. On the left of the diagram is a locally cross-connected colocation space connected to a Verizon Unified Transport node (UT) (or UT/AAC Port), while on the right is a remote connected data center using partner fabric network to reach a location beyond where the you can be locally cross-connected to Verizon.
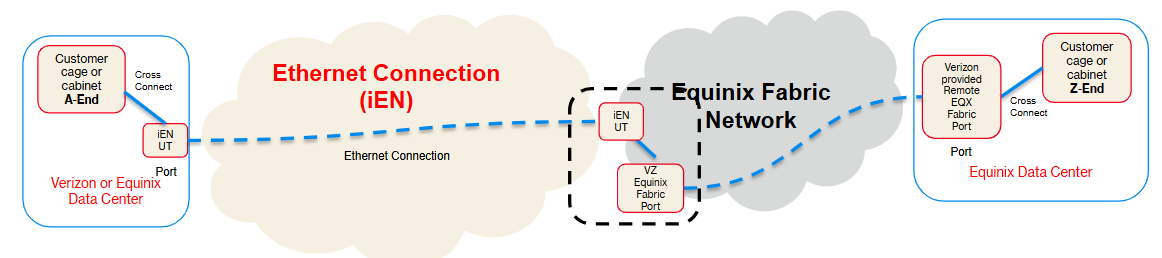
Figure 2: Data Center to Data Center Basic Architecture Diagram
Use Case 2: Connecting Data Center Locations to Cloud Service Providers (CSP)
One of the most common use cases is connecting your equipment located in data centers to Cloud Service Providers over a private connection bypassing the public internet. A Cloud Connection is a virtual connection that allows you to connect to their Cloud Service Provider assets. Designing a connection to a public cloud provider like Amazon AWS, Microsoft Azure, or Google Cloud Infrastructure requires connecting the A-End Port in the Adaptive Network Fabric to your infrastructure in the cloud provider.
There are three ways to connect to Cloud Service Providers:
Your DC location (Port) to CSP (using Ethernet Cloud Connection) for Layer 2 connectivity
Public Internet Connection via the CSP’s Internet Gateway to CSP (no customer port required, as it connects to the CSP over a Layer 3 connection over a VPN tunnel to the CSP ) Used for SaaS providers that do not support Ethernet or L3VPN connections directly.
L3VPN to CSP (no customer port required, as it peers over Layer 3 with the CSP )
Important information to keep in mind when architecting cloud connections: Bandwidths vary by CSP and market.
During Cloud connection configuration, you will select bandwidth, market and region, except for Azure. For Microsoft Azure you select bandwidth, metro and peering location as part of the Microsoft ExpressRoute Service Key. No selection is needed on Verizon’s side as these values are derived from the Microsoft ExpressRoute Service key itself.
For Redundant connection type, you can choose different bandwidth for each connection (except for Microsoft Azure)
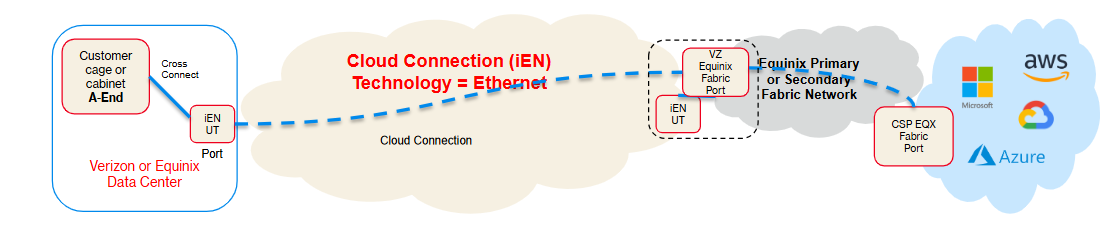
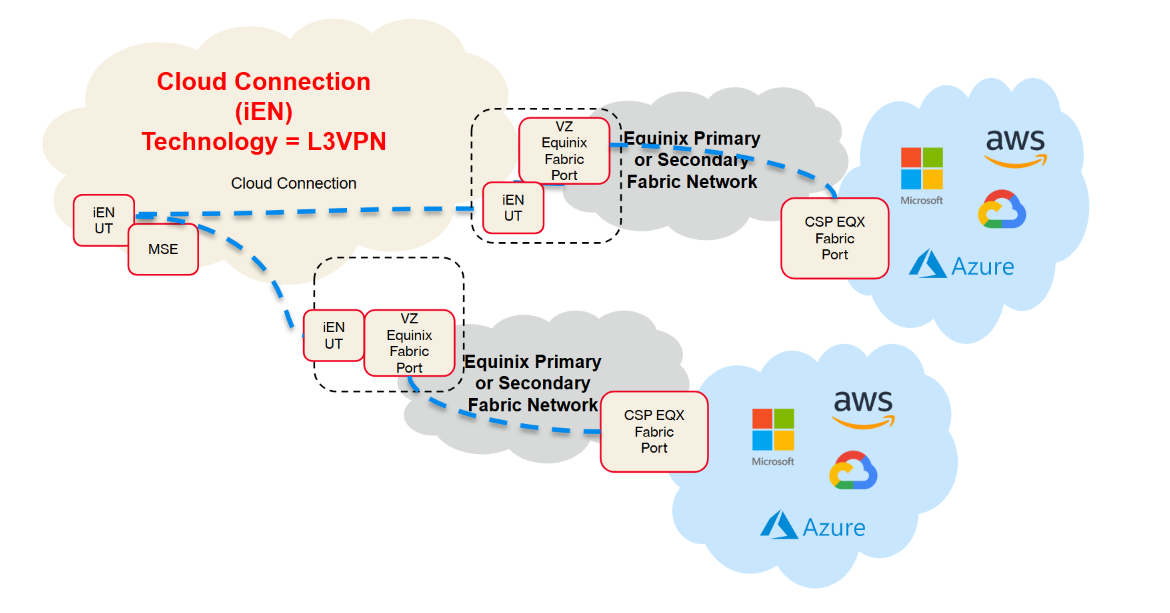
Figure 3: Data Center to Cloud On-ramp Basic Architecture Diagram
Use Case 3: Extending Your Network to Multiple Cloud Service Providers (CSP)
A common cloud architecture is having applications built across multiple cloud provider infrastructures. Adaptive Network Fabric makes setting up connectivity between the different cloud environments (including multiple cloud vendors and locations) simple. This architecture is essentially Use Case 2, but for each of the multiple providers. You have the choice of connecting to your locations in data centers or out to your remote locations. Note: The only option for connecting to remote locations at this time is if you are connecting using the Private IP or the L3VPN network.
Figure 4: Cloud On-Ramp to Cloud On-ramp Basic Architecture Diagram
Use Case 4: Connecting Your Locations to Cloud Service Providers (CSP)
Another common use case is to connect branch locations to either your equipment located in data centers, then connecting from there into your infrastructure in the cloud via Cloud on-ramps. In this architecture, you are essentially combining elements of Use Case 1 and Use Case 2 into an architecture that covers both the last and middle miles of the overall network. Note: The only option for connecting to remote locations at this time is if you are connecting using the Private IP or the L3VPN network.
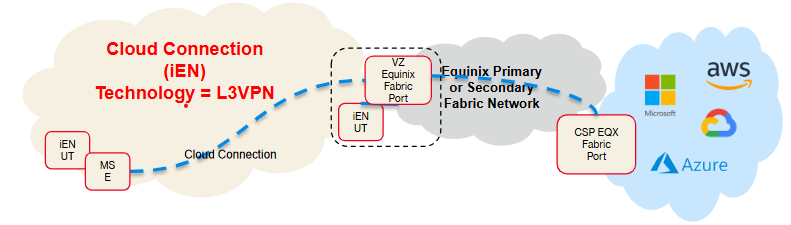
Figure 5: Branch locations to Cloud On-ramp Basic Architecture Diagram
Preparing for a Successful Delivery
The activities to deliver your Adaptive Network Fabric services are divided into three phases:
Customer - This is when you will be ordering the desired services including Ports, Cross Connects and Adaptive Connections. See Understanding your network options for more details about the different options. Use Create Port and to establish a physical presence in a data center. As part of the ordering process you will need to order a Cross connect to reach your colocation rack/cage, the crossconnect can be Verizon provided or Customer-provided. For access to cloud on-ramps no physical cross connect is required.
Provisioning - Once the order has been placed and the contract has been signed, Verizon will then provision the services.
Activation - After Verizon has completed the provisioning, you will then complete the activation and configuration (if required) of the services. For Cloud Connections (e.g., AWS Direct Connect), you must accept the virtual interface in your Cloud Provider’s console after completing the portal order to fully "light up" traffic.
A successful implementation of your services requires your active involvement.
Order Tracking: Monitor the Orders page for any "Action Required" status, which may indicate a need for management contract approval, a Letter of Authorization (LOA), or final service configuration. The Dashboard serves as your command center for all order and service status updates. Check the Action Required card often to ensure nothing is holding up your activation.
Adaptive Network Fabric is designed to make the ordering and provisioning process simple. However, some critical information is needed to facilitate the provision and activation process.
You are responsible for providing technical contact information for any issues that come up during the provisioning and activation phases. This information should be provided as part of the ordering process. If it has not been provided or needs to be changed, contact Tech Support or your account manager.
While the locations for the Ports and the types of connections are determined prior to ordering, you need to provide equipment location details for the Cross Connects before the provisioning can be completed.
Verizon Provided Cross Connect
When ordering a Verizon-provided cross connect, your main responsibility is to provide accurate physical location and corresponding demarcation details in the format specified by your colocation provider as appropriate for their equipment within the data center location. During the order process, you will be asked to input specific details such as the cage, aisle, rack, and port numbers on the Letter of Authorization (LOA) and Connecting Facility Assignment (CFA) documents. Verizon will use this documentation to complete the physical connection service order. Note: If these details are missing, the installation and provisioning process will be held up until the correct information is supplied.
Customer provided Cross Connect
When opting for a customer-provided cross connect, Verizon will generate a Letter of Authorization with Connecting Facility Assignment (LOA/CFA) details and provide it directly to you. You are then responsible for giving this LOA/CFA document to their third-party data center vendor to arrange for the connection to their equipment. Once the installation is finished, you must notify Verizon that the site is ready so the service activation process can proceed. Note: You are responsible for any expenses related to customer provided cross connects.
Port
Once your order is placed and the contract is signed, Verizon starts the technical provisioning of your network services. Verizon will take the following steps to complete your service provisioning.
Logical Provisioning: Configuring the software-defined port on the network so it is ready to route your data.
Verizon Provided Cross Connect Installation: If you ordered a Verizon-provided cross connect, Verizon sends the customer provided Letter of Authorization (LOA) to the data center facility. Verizon will then arrange with that facility to install the fiber linking your equipment to the new port.
Service Activation: Once the physical and logical setups are complete, Verizon activates the port and hands it over to you. It will then appear as "Active" in your portal, and you can begin building virtual connections.
Adaptive Connections
Once your physical Ports are active, Verizon will also provision any Adaptive Connections required. You may order additional Adaptive Connections for existing ports or request changes to these connections such as change bandwidth capacity.
Logical Routing: Verizon automatically creates the virtual pathway across its network to connect your chosen A-End and Z-End ports.
Bandwidth Allocation: The network dynamically provisions the exact speed and capacity you selected for that specific connection.
Rapid Activation: Because the connection is virtual, Verizon can activate it after required provisioning and configuration steps are complete. Activation timing may vary based on the connection type, configuration, your actions, and third-party provider requirements.
Installing Cloud Connections
Cloud Connections can be ordered and activated in the Portal just like any other connection, however, because you are connecting to your Cloud Infrastructure, there are some additional steps and information that you will need to obtain before completing the service activation.
Note: Any charges related to these connections from the Cloud Provider are your responsibility.
Prerequisite: Generate the Cloud Key. Before logging into the Portal, you must first log into your Cloud Service Provider (CSP) console to obtain a unique authorization key. Depending on the provider, this is referred to as an OC ID (Oracle), ExpressRoute Service Key (Azure), Account ID (AWS), or Pairing Key (Google Cloud). This information will be used later in the process to establish the connection.
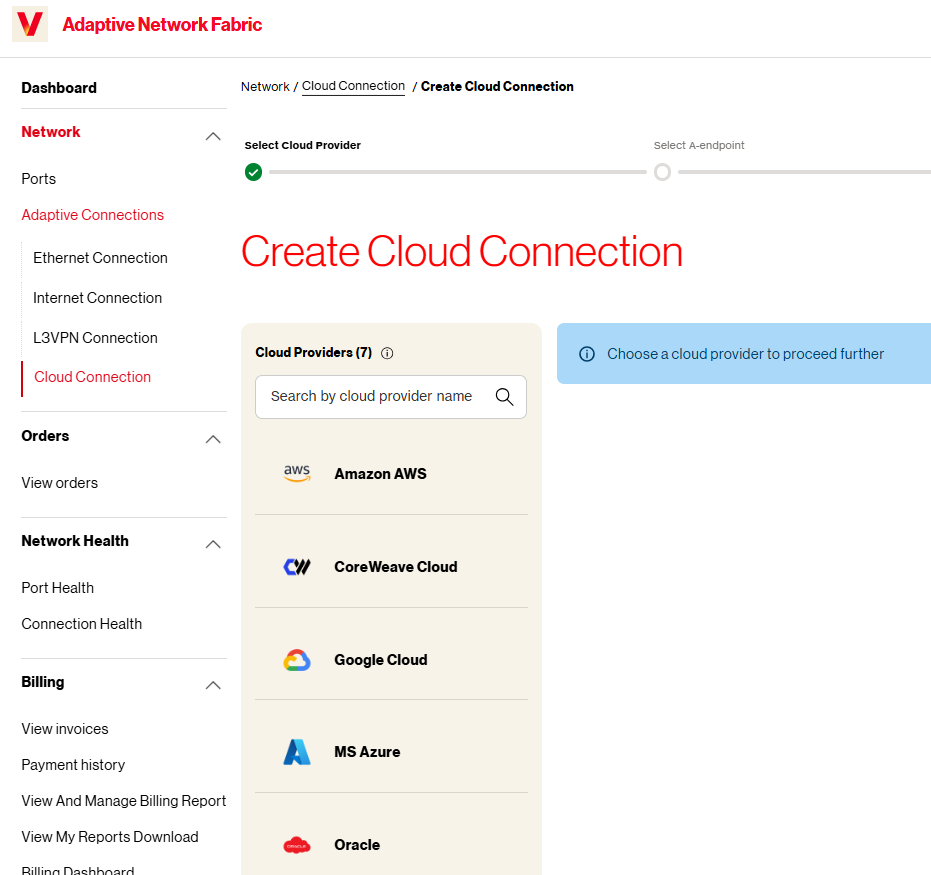
Step 1: Start the Order in the Portal with your key ready and an active physical Port already established in the fabric. Click on Create Cloud Connection, then select the desired Cloud Provider from the menu.
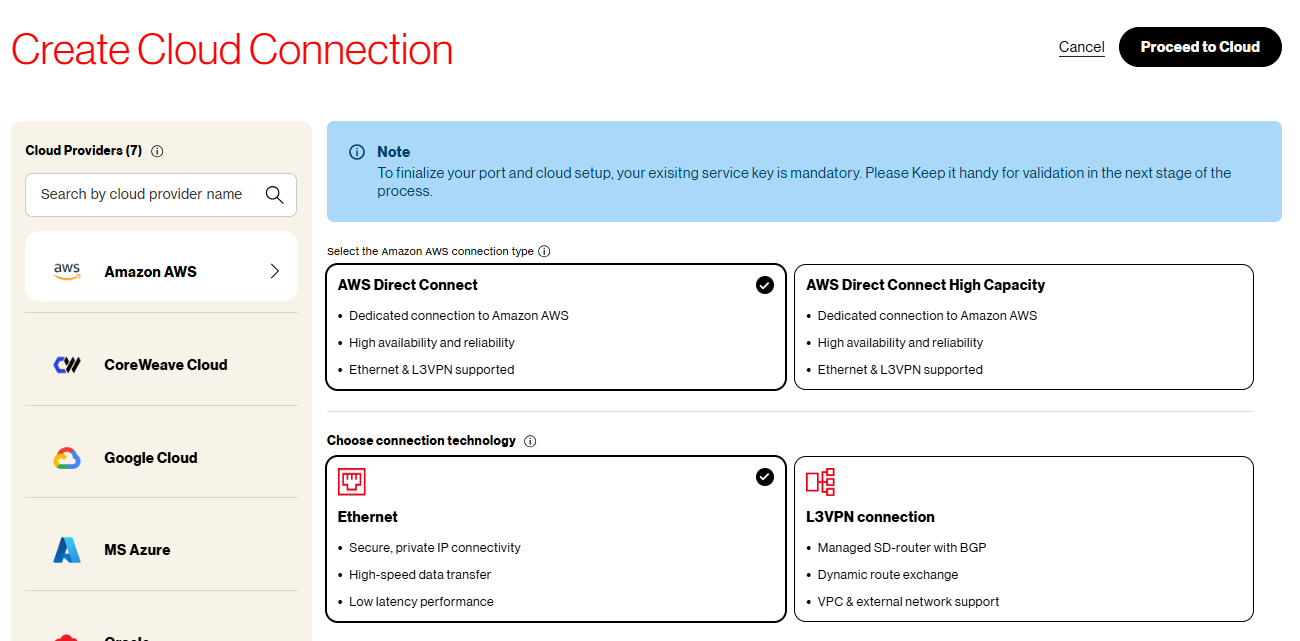
Step 2: Configure the Connection Technology. Next, choose how the data will be routed:
Connection Type: Select the provider's specific on-ramp service, such as AWS Direct Connect, Azure ExpressRoute, or Google Partner Interconnect.
Technology: Choose between an Ethernet connection (for secure, high-speed point-to-point Layer 2 links) or an L3VPN connection (for managed Layer 3 routing with BGP support).
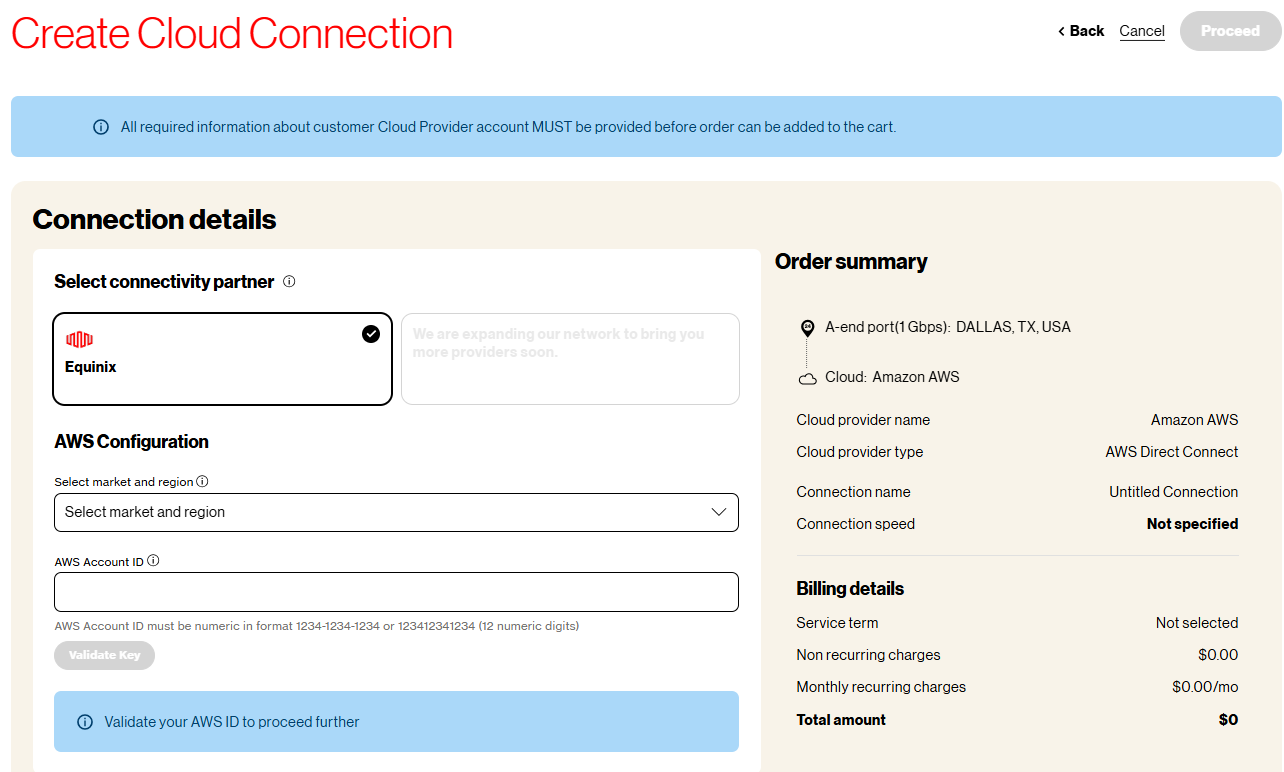
Step 3: Validate and Finalize Details. Enter the CSP Service Key or Account ID and click Validate Key.
Note: Make sure you enter the correct CSP Service Key for YOUR CSP account. Once the system successfully validates the key with the provider, select the desired bandwidth speed and assign VLAN tags for the traffic in applicable.
Step 4: The Cloud "Handshake". After submitting the order, the connection will show as "Pending". At that point you will need to log back into your CSP console to officially "accept" the virtual interface, which fully activates the traffic flow once all the IP and BGP configurations have been applied.
Disconnecting Ports and Connections
To disconnect a service, navigate to the Network section in the left-hand menu of the portal. From the inventory list, click the three-dot Options menu next to the specific Port or Connection, then select the Disconnect option. Disconnecting a Port will automatically terminate all Adaptive Connections attached to it. Additionally, depending on contract terms, early termination fees may apply.
Same-Day & Next-Day Disconnects: You can schedule service disconnections for the same day or the next day directly through the portal. Note: Disconnections are not executed on weekends (Friday, Saturday, and Sunday). If you submit a disconnect request on a Thursday, it will automatically be routed for completion on the following Monday.
The "Soft Disconnect" Safety Net
5-Day Grace Period: On your scheduled disconnect date your service will enter a "Soft Disconnect" state for 5 days.
Billing Stops Immediately: Your billing will cease exactly on your confirmed disconnect date. However, this 5-day window gives you a brief reinstatement period to reactivate your service before it is permanently removed from our network.
Note: Any Customer managed Cross Connects and Cloud Provider Cloud Connections are independent of the Verizon service. It is your responsibility to disconnect these services or charges may continue to accrue.
Managing Your Infrastructure
Reporting and tools
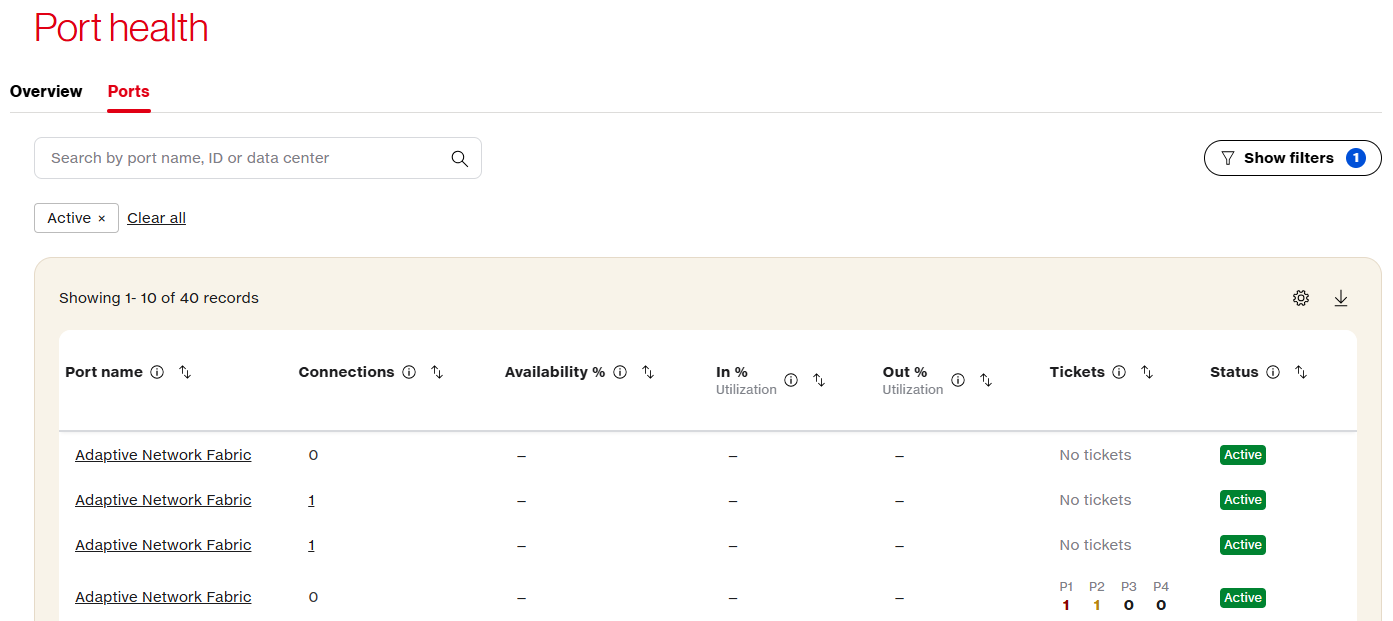
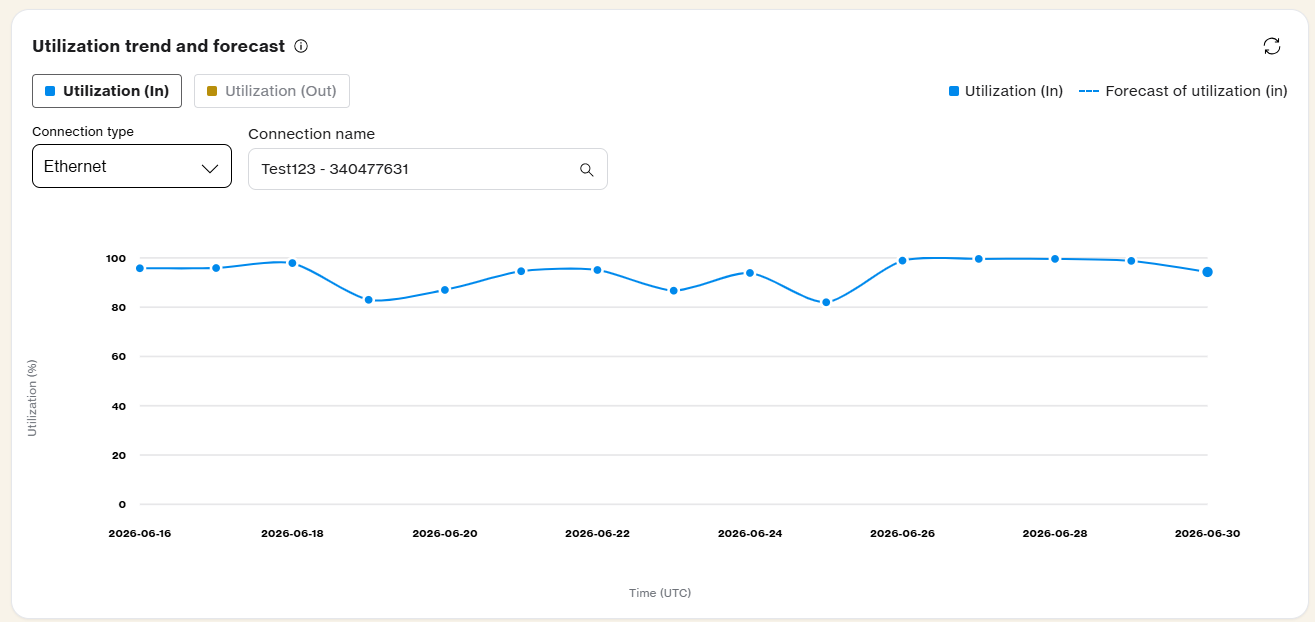
The Adaptive Network Fabric Portal is engineered for network agility, offering several built-in features to help manage both planned and unplanned events: Monitor active connections directly in the Network Health section found on the left-hand navigation menu. By selecting Port Health or Connection Health, you can view available analytics for services, including operational status, bandwidth utilization, latency, and packet loss, as well as forecasting tools that can help with capacity planning and network performance monitoring.
Bandwidth Utilization & Forecasting: Monitor inbound and outbound traffic throughput, view daily peak utilization, and access available forecasting information where supported.
Availability Metrics: Track historical and daily availability percentages to see how your network performance compares to your Service Level Agreements (SLAs).
Performance Diagnostics: Analyze specific connection metrics, including round-trip latency, jitter, and packet loss.
Error Tracking: Keep an eye on total transmission errors and dropped or malformed packets across your network
Operational Status: Check whether your Ports and Adaptive Connections are active, inactive, or experiencing downtime based on available portal information.
Business continuity
Service disruptions can significantly impact an organization's mission and financial health. To mitigate these risks, the Adaptive Network Fabric can provide the visibility and tools necessary to maintain a resilient, enterprise-wide network environment.
The economic and reputational imperatives of the current market have shifted the discussion from IT disaster recovery to an enterprise-wide business continuity focus. Organizations of all sizes and industry types should have ongoing, enterprise-wide Business Continuity Programs that develop, prepare and exercise the various areas of continuity from critical business processes to IT service availability. The Business Continuity Program should address areas such as Emergency Response, Impact Analysis, Business Continuity Plans, Disaster Recovery Plans, Supplier Plans, Exercises, and ongoing Business Continuity program management.
The goals of today’s most relevant Business Continuity Programs are those providing organizations with an enterprise-wide business continuity focus, that not only includes strategizing and planning for IT service availability and disaster recovery but addresses the ability to manage all areas of critical and continuity activities of the program to help prepare and mitigate the impact from ever-increasing risks threatening to interrupt organizations’ critical processes.
Verizon helps you to effectively prepare and maintain continuity during planned and unplanned events to help reduce the risk and impact from disruptions. Please contact your Verizon account team for further assistance.
Billing & Financial Transparency
The Billing section provides online access to billing information in the portal.
Financial Access: The billing section provides visibility into service costs and allows you to track spending information available for their accounts.
View Invoices: You can easily search, filter, and download current or historical invoices in multiple currencies. They can also check outstanding account balances or export their billing data to CSV or Excel files.
Incremental Billing Report: Provides a clear per-change breakdown of all speed changes, with charges accurately prorated down to the nearest hour.
Payment History: This provides a ledger of all available processed transactions, including payments, refunds, and Service Level Agreement (SLA) credits where applicable. You can track available transactions by invoice number and download individual receipts for their internal audits.
Support & Troubleshooting
If you encounter issues, the portal provides access to support through chat and other available support channels.
Portal and Non-network Related Issues
Live Chat: For navigation assistance or any issues not related to networks or ports or connectivity, use the Live Chat button in the bottom right corner on the Portal
Incident Management
In the event of a service loss or degradation, the Adaptive Network Fabric Support module allows you to open a "Incident" ticket by clicking on the Create an Issue link found in the left side menu. These requests are prioritized for handling consistent with applicable support processes.
Service ID Integration: Always link your tickets to specific Service IDs. This gives technicians context and can help with issue review and resolution.
Real-Time Tracking: Monitor your ticket's lifecycle from "Open" to "Resolved" directly in the portal.
Verizon is committed to helping you effectively prepare for and maintain continuity. For advanced business continuity planning or specialized disaster recovery architectures, please contact your Verizon account team for further assistance.
Need help with your first order? Review the Orders page to track every request from initial submission to final activation.
Training
The Customer Learning Portal provides Verizon Business customers with training and resources for products, systems, and tools. To access the Customer Learning Portal, please go to https://customertraining.verizon.com.
FAQs
Below are the most common questions you might encounter while managing your network assets.
Think of the Port as the physical "door" to the public data center or customer location and the Connection as the virtual "path" between two Ports or locations.
A Port represents your physical hardware inventory at a specific location.
An Adaptive Connection is the virtual circuit (Layer 2 or Layer 3) that brings that hardware to life.
No, the allocated virtual bandwidth of a single connection cannot exceed the speed of the physical port it resides on.
If your circuit bridges two ports of different speeds, the maximum connection speed will be limited by the lowest-speed port.
The total capacity of all the connections for a given port is 400%. That is, all the connections need to add up to less than 400% of the port capacity.