Profile
1. Log in to Verizon Enterprise Center
2. Select your name in the top right corner and select My role
3. Under Profile Information, click Change password OR Change secret question
4. Click Edit to update your password or secret question. To keep your account secure, you'll be prompted to enter a One-Time Passcode sent to your phone or email before making any changes.
1. Log in to Verizon Enterprise Center
2. Click your name in the top right corner and select My role
3. Click the pencil icon![]() next to Profile Information
next to Profile Information
4. Update your information and Save your changes
NOTE: If you update your email, you are required to wait 30 days before finalizing the change to ensure your account remains secure. During this time your My Profile page will show that the email address change is pending and awaiting to change. You can contact Verizon and report if you did not authorize the change.
Getting Started
VEC Document Management System is a secure online document exchange system where internal and external users exchange files and manage documents. It’s an easy and convenient way to share files and serves as an alternate to exchanging files through email. Verizon will have access to all the files and folders created in the Document Management System.
1. Log in to Verizon Enterprise Center
2. Select your name in the top right corner and select "Document Management System" If you have access to more than one Customer legal entity, you will need to select a Customer legal entity from the dropdown on the top left, at your first login. You can also switch to a different Customer legal entity at any time using the dropdown.
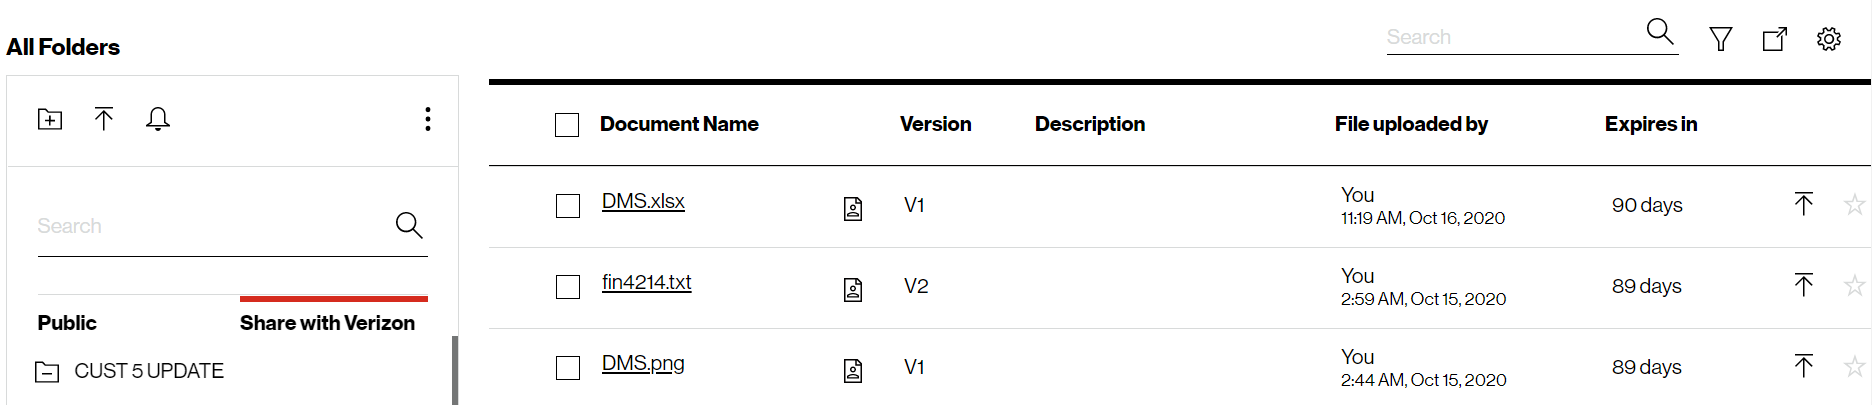
Home page:
The Document Management screen shows the Public folder by default. You can switch to the Share with Verizon folder by clicking on it from the left navigation. The content in the selected folder is displayed on the right. It shows Document Name, Version, Description, and the User name who uploaded the file. It also displays the number of days remaining before the document is archived. A document is kept for a total of 90 days from the date it is uploaded/created to the time it is automatically removed from Document Management System.
- My Uploads: Displays all the documents uploaded by you.
- Favorites: Shows the documents that are marked as favorites by you.
- Shared with Me: Shows the documents that are shared with you by Verizon Service Managers.
- Archived: Folders and documents can be ‘Archived’ anytime for up to 30 days. The ‘Archive’ period is included in the total 90-days a document can stay in the system without being deleted. The ‘Archived’ item can be moved back to its original folder any time before it is deleted. If the 90-day expiration date comes before the 30-day archive limit, the file will still be removed. A file cannot stay in the system for more than 90 days, therefore ‘Archived’ items may not always reach their full 30-day archive period. Click
 if you want to restore a document to where it was archived from.
 - Click
 to mark a document as favorite. These documents are listed under the Favorites tab on the top, to access quickly.
 - You will see
 next to a file name if you are the owner of the document.
  Denotes the document is checked out by a user.
Public folder
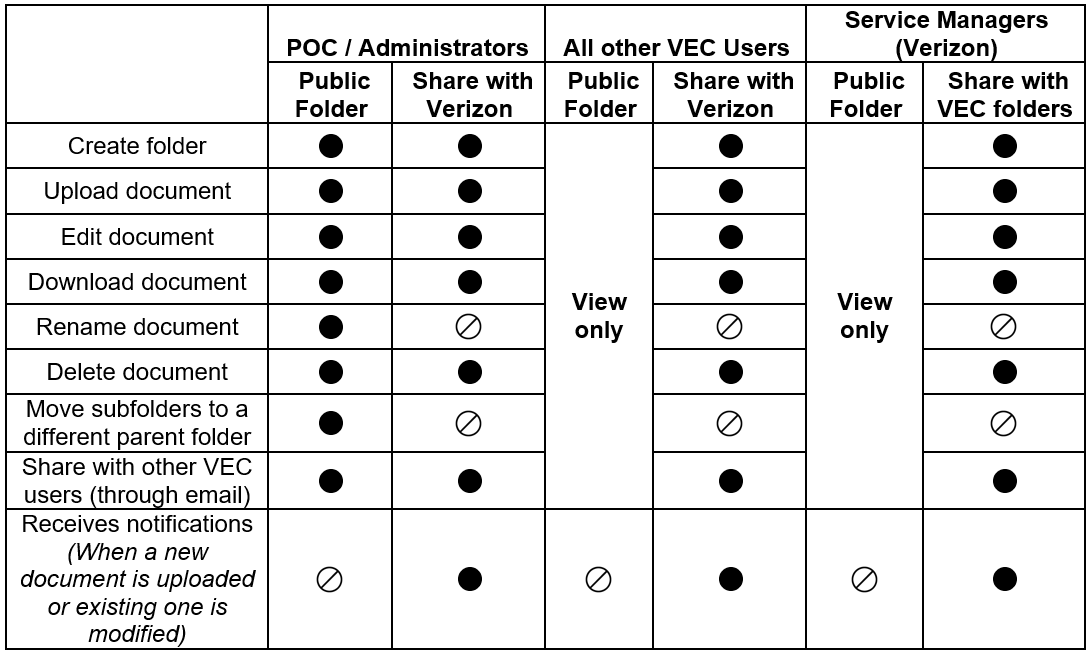
The Public folder can be viewed by Primary contacts (POCs) and Administrators, all authorized VEC users, and Service managers from Verizon. Only Primary contacts (POCs) and Administrators have the privileges to create a new folder in the Public folder. POCs and Administrators can also upload, edit, delete, download, and rename a document in the public folder.
Share with Verizon folder
All authorized VEC users can create a folder, upload, edit, download, and delete documents in the Share with Verizon folder. As a VEC user, you are expected to use this folder only to share files with Verizon (Service Managers) and not with any other VEC user. Primary Contacts (POCs)/ Administrators and Verizon Service Managers can opt to receive notifications when a new document is uploaded and the existing one is modified.
The following table shows the privileges provided to Primary Contacts (POCs)/ Administrators, other VEC users, and Verizon Service Managers. Please note, if the Service Managers have not made it available for sharing or have marked a document as read-only, you may not be able to view it or perform one or more of the actions mentioned in this table.
Important points to note
- The Document Management System is intended to provide a convenient way to share documents/files only with Verizon. VEC users shouldn’t use this to exchange files amongst themselves.
- By default, the files and folders that are created by a POC/Administrator or any other VEC user in the Document Management System is auto shared with Verizon and Verizon has access to all of the content in the Document Management System.
- All the documents are scanned by an approved software tool when they are uploaded by POCs/Administrators and other VEC users. This is to check and prevent personal or any other confidential data from being uploaded.
- The documents are also scanned by an antivirus program to check and prevent corrupted files from being uploaded.
Technical Information
1. A file will remain in the system for 90 days from the day it is uploaded, after that the file will be removed from Document Management System. The file can be re-uploaded from your computer and the 90-day retention period will start over.
2. There is a storage restriction of 50 MB per user to upload and keep documents in the “Share with Verizon” folders
3. The maximum file size of a document can be up to 35 MB and only DOC, DOCX, PDF, TXT, XLSX, XLS, CSV, PNG, ZIP, and JPG files are supported
Create/Delete a folder
If you are a POC or Administrator, you have the privilege to create/Delete folders in both “Public” and “Share with Verizon” folders. Other VEC users can only create folders in the “Share with Verizon” folder.
- Click
 on the left navigation to create a folder
 - Enter a Folder name, Folder description, and click Create
- Click Create folder on the confirmation pop-up and click Ok
Note: If there are any documents inside a folder, you need to delete them first. You will not be able to delete a folder with contents.
- Click
 on the left navigation and select Delete Folder
 - Click Ok on the confirmation pop-up
Rename a folder
If you are a POC or Administrator, you have the privilege to rename folders in both “Public” and “Shared with Verizon” folders. Other VEC users can only rename folders in the “Share with Verizon” folder.
- Click on the left navigation and select Rename Folder
- Enter a New folder name and enter Folder Description
- Click Rename
- Click OK on the confirmation pop-up
Upload a file
If you are a POC or Administrator, you have the privilege to upload files in both the “Public” and “Share with Verizon” folders. Other VEC users can upload a file only in the “Share with Verizon” folder.
- Click on Public folder or Share with Verizon folder on the left navigation where you want to upload the file
- Click
 on the left navigation.
 - Click Browse for files here on the right pane and upload the file.
- Enter Tags and comments, if applicable.
- Agree to the T&Cs and Click Submit.
- Click Upload file on the confirmation pop-up and click Ok.
- If the new file doesn’t automatically appear on the screen, click on the right to refresh the table until the file is visible.
Edit/Delete a document
If you are a POC or Administrator, you have the privilege to edit a document that is either in "Public" or "Share with Verizon" folders. Other VEC users can edit a document in Share with the Verizon folder.
Edit a document
- Click
 and select the document which you want to edit
 - Click on the right to upload a new version of the document
- Click Browse for files here on the right pane, if you want to upload a new file
Note: The file name and type should match with the existing file
(OR)
- Click Check-out if you want to download the existing file, edit locally, save and upload it
- Enter comments, if applicable
- Agree to the T&Cs and Click Upload
- Click Ok on the confirmation pop-up
Delete a document
- Click and select the document which you want to delete
- Click on the right and select Delete
- Click Delete file on the confirmation pop-up and click Ok
Move files to a different folder
All authorized VEC users can move a document to a different subfolder under the Share with Verizon folder.
- Click and select the document which you want to move
- Click on the right and select Move
- Select the folder to which you want to move this file and click Move.
- Click the Delete folder on the confirmation pop-up and click Ok.
Download a document
- Click on a document name to download it. You can also use Email the document option if required.
Email a document
All authorized VEC users can email a document to another authorized VEC user
- Click on the right and select Email the document
- Enter the Email ID and press Enter
- Modify Subject or comments, if applicable
- Click Send
Search documents/folders
Documents
1. Enter the document name in full or part in the search field on top right of the table
Folders
2. Enter the folder name in full or part in the search field on left navigation
Document transfer from older version
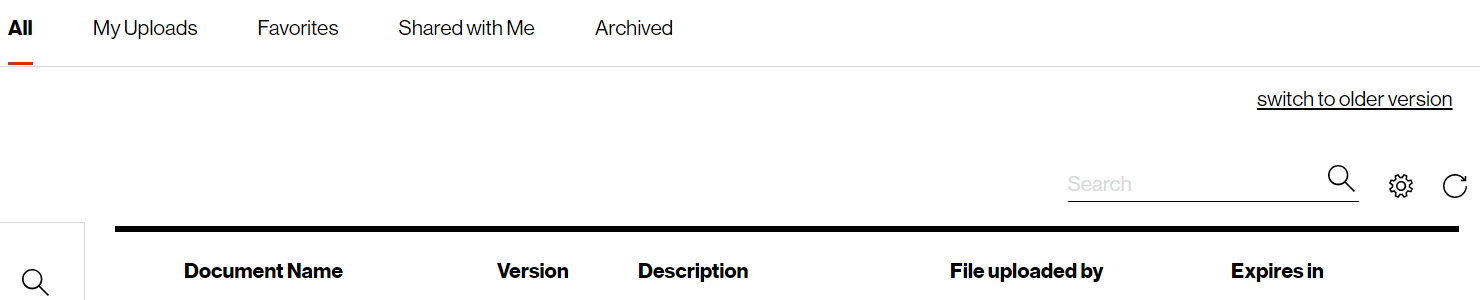
1. All VEC users who currently have access to 1.0 DMS will be able to ‘Switch to older version’ of Document Management System by clicking on switch to older version in the top right-hand corner
1. They can view and download the documents from the folders that they have access to documents can be transferred from the old version of Document Management System by clicking on the link to switch to older version on the top right side of the screen.
You can switch to the older version, download the documents to your computer, switch back to the newer version of the Document Management System, and upload it by creating a new folder in the newer version.
To keep your information secure, Verizon Enterprise Center requires you to register with an email that:
1. Is a business email and not a generic email:
2. Matches the company name for the services you want to access
Add a new email domain
If your business has multiple email domains or you are a third party vendor who needs to access another company’s services, you can contact us and request to have additional email domains approved. Once an email domain is approved you'll be able to continue registering with your existing email address.
Extend your session time to prevent your account from logging out from inactivity.
Extend your session time
Log in to Verizon Enterprise Center
Select your name in the top right corner and select My role
Click the pencil icon
 next to Site Preferences
Under Allow extended session timeout, select Yes
Under Extended hours, choose the number of hours you want your account to stay active for
Click Update to save your changes
Easily update your contact information, preferences and settings.
Getting started
1. Log in to Verizon Enterprise Center
2. Select your name in the top right corner and select My role
3. Once the My Profile page opens,
- Click the carat (>) to open a link
- Click the pencil icon to change information
Contact information
1. Log in to Verizon Enterprise Center
2. Select your name in the top right corner and select My role
3. Click the pencil icon
4. Update your information and Save your changes
NOTE: If you update your email, you are required to wait 30 days before finalizing the change to ensure your account remains secure. During this time your My Profile page will show that the email address change is pending and awaiting to change. You can contact Verizon and report if you did not authorize the change.
Password or secret question
1. Log in to Verizon Enterprise Center
2. Select your name in the top right corner and select My role
3. Under Profile Information, click Change password OR Change secret question
4. Click Edit to update your password or secret question. To keep your account secure, you'll be prompted to enter a One-Time Passcode sent to your phone or email before making any changes.
Prevent your session from timing out
1. Log in to Verizon Enterprise Center
2. Select your name in the top right corner and select My role
3. Click the pencil icon
4. Under Allow extended session timeout, select Yes
5. Under Extended hours, choose the number of hours you want your account to stay active for
6. Click Update to save your changes.
Time zone settings
1. Log in to Verizon Enterprise Center
2. Select your name in the top right corner and select My role
3. Click the pencil icon
4. Change your time zone and click Update to save your changes.
Check your role
To see which user role you have:
1. Select your name in the top right corner and select My role
2. Scroll down to My accounts and product tools. Here you’ll see your role and the number of product tools you can access
3. Click view details next to your role to see a full list of your permissions
Check your accounts
To check which accounts you can view:
1. Log in to Verizon Enterprise Center
2. Select your name in the top right corner and select My role
3. Under My accounts and product tools, click view details to see a full list of the accounts you can access.
Check your product tools
While Verizon Enterprise center offers dozens of product tools, you will only be able to view tools you’ve been given permission to use. To check which product tools you can access, follow the following steps:
1. Select your name in the top right corner and select My role
2. The number of product tools you can access is displayed under My accounts and product tools
3. Click View details to see a full list of the product tools you have permission to use.
Checking which account(s) you can view with a product tool
To keep your account information secure, you can only get the specific accounts you’ve been given permission to view for each product tool. If you find a product tool but can’t see any data when you try to use it, you most likely need to have additional accounts added to that product tool.
4. Click View details under a specific product tool to see which accounts you can view in that tool.
Note: Just because you can find an account in one product tool does not mean you can use that account with all tools. Every list of accounts is custom to each specific product tool. For example, if a certain account is not showing up under Network Manager but you can view the account information in other places in Verizon Enterprise Center, you’ll need to request access for that account to be added to Network Manager specifically.
1. Log in to Verizon Enterprise Center
2. Select your name in the top right corner and select My role
3. Click the pencil icon![]() next to Site Preferences
next to Site Preferences
4. Change your time zone and click Update to save your changes.