Add new service
Introduction
This user guide shows you how to add more voice services to an existing account or location, including actions such as:
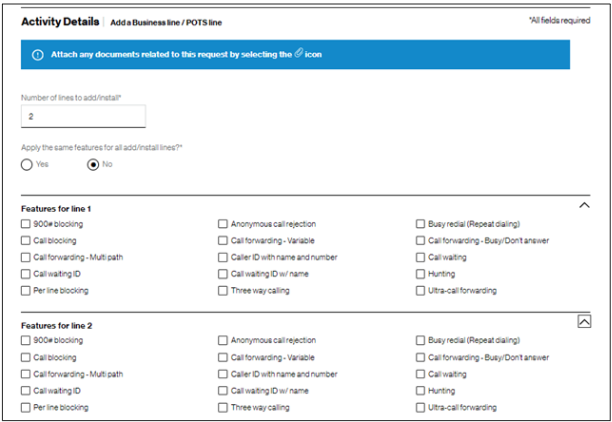
- Adding another Business Line (POTS)
- Adding Verizon Long Distance to a number
- Adding more ID codes to Long Distance service
- Ordering new voice service for a new location
- Requesting a new Toll-Free number
- Adding a new location (globally) of VoIP service
Get started

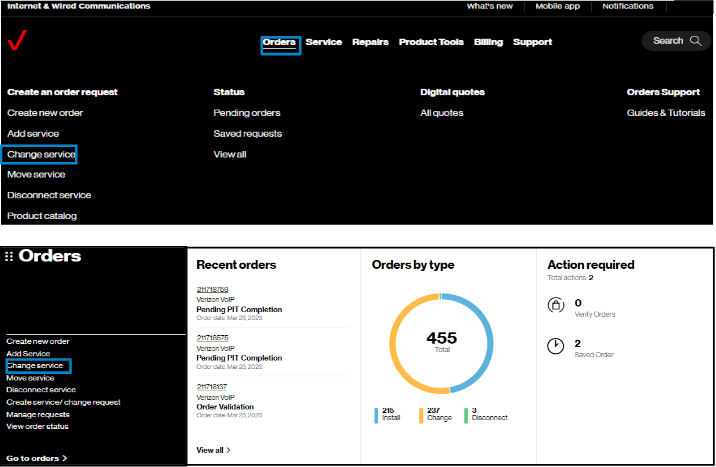
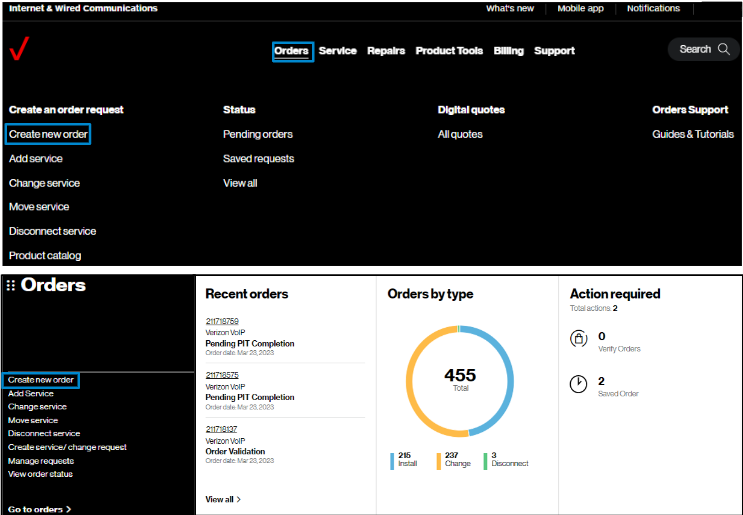
2. Hover on Orders and click on Change service under Create an order request.. On the Verizon Enterprise Center home page, you can also click on Change service in the Orders pod for the same option to create an order. Change Service is supporting requests for additional and new voice services such as business lines (POTS), outbound switched long distance, ID codes, Toll Free, and VoIP services.
Identify service
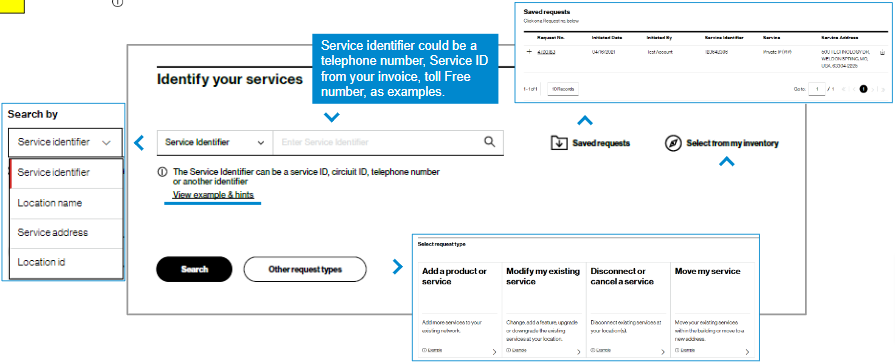
3. To start, you will need identify the voice service(s) you already have, such as a Toll-Free number, telephone number, or account number.
In Identify your service, search for the service to work with by entering a service identifier or address found on your invoice and click Search or the icon. You can find examples of service identifiers in View examples & hints. Or, you may choose Select from inventory to see a complete listing of all inventory in your profile.
Requests previously saved, but not submitted, can be found in Saved Requests.
Note: the info icon ![]() indicates helpful information.
indicates helpful information.
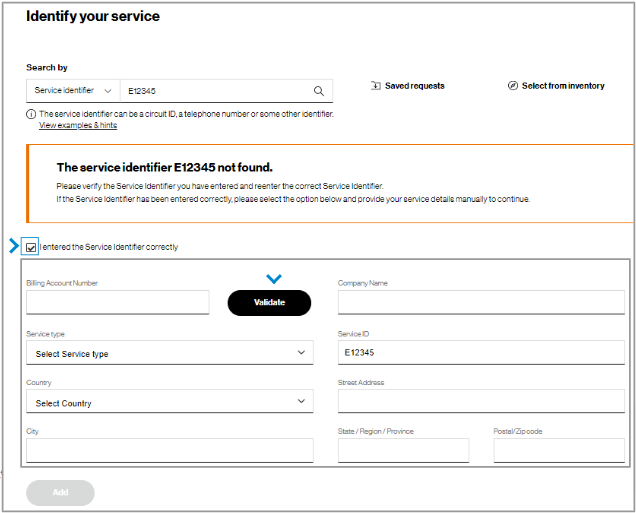
4. If you can't find service details for the entered value, check the information for accuracy and make corrections as necessary. If everything is entered correctly, check I entered the Service Identifier correctly. This will display fields to complete so that a Verizon representative can validate the information and fulfill your request.
Note: If the service identifier is not found, its associated billing account number may be missing from your user profile. Please contact your Verizon representative or company point of contact to add these accounts to your profile to support future requests.
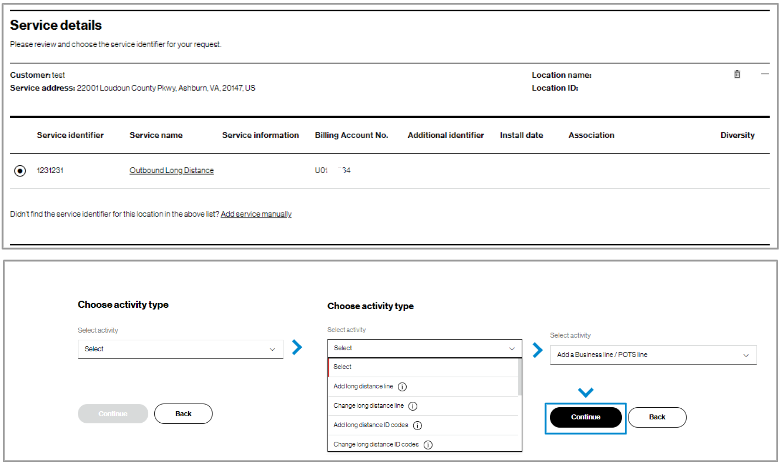
Service details

5. The service details display for the telephone number or account entered. Select the service you would like to include in the change order request.
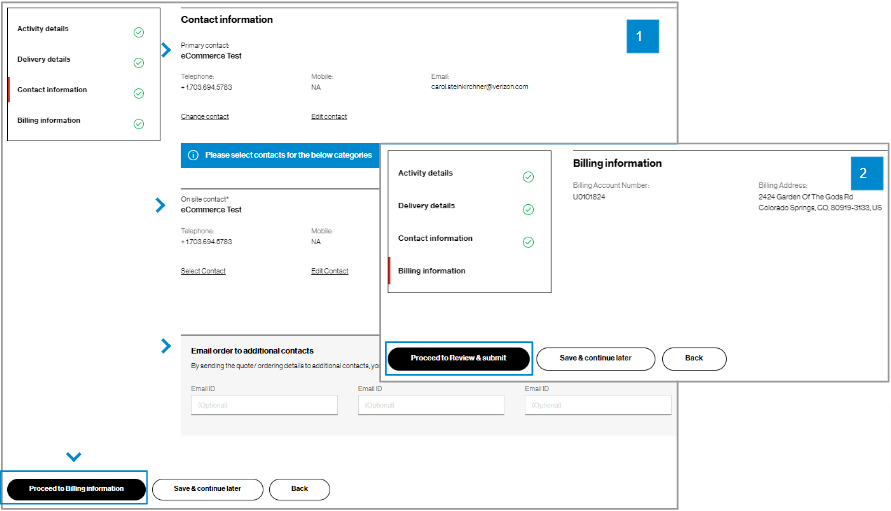
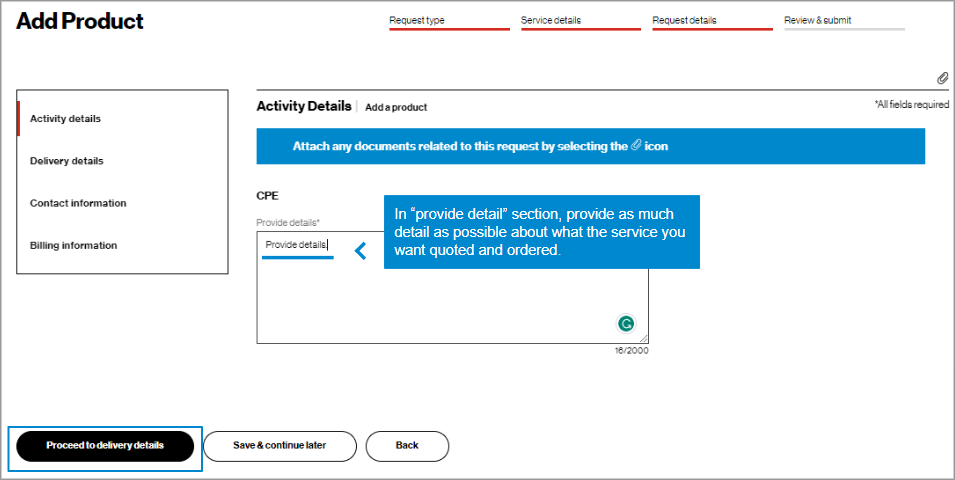
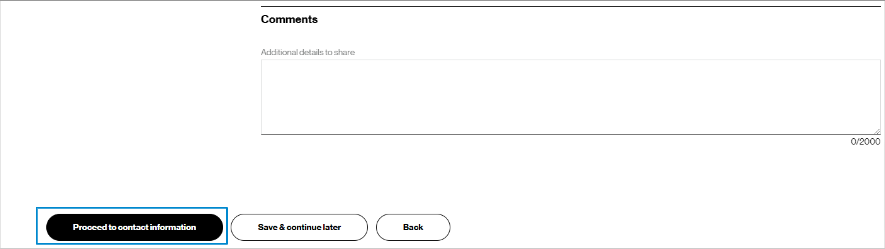
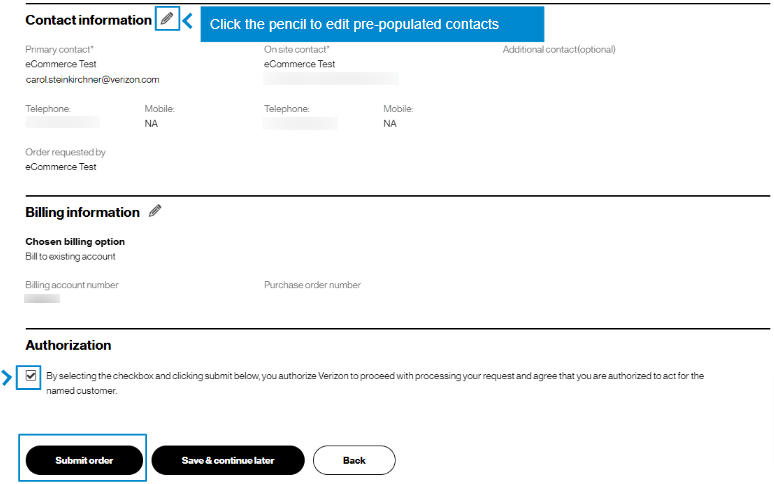
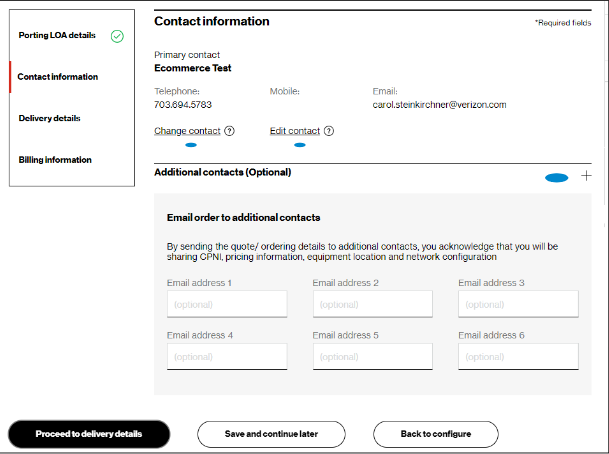
9. For Contact information, you will be the primary contact since you are placing the order. You can edit your contact information if needed, add an On site contact, and enter up to three additional email addresses to receive the order confirmation. (image 1). Then click Proceed to billing information.
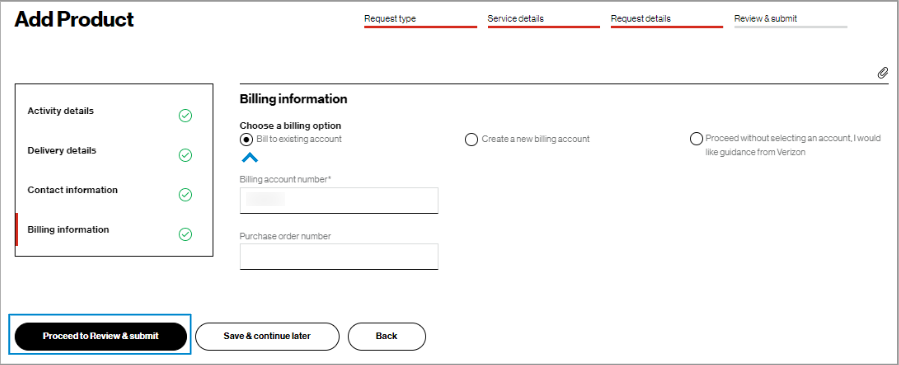
10. In Billing information details, you can view the billing account number and billing address for the service being changed. (image 2) You cannot edit this field. Click Proceed to review & submit.
Review and submit
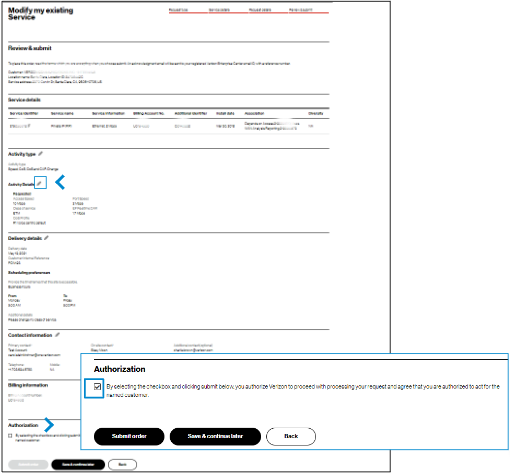
11. In Review & submit, scroll down the page to review all the order request information. Select on the pencil icon to edit a field. At the bottom of the Review & submit page, select Submit order to place your order request. You can also save the order request and return to it later. To return to the order, hover on Orders and click Saved requests under Status. Once submitted, you can track your order online by hovering on Orders and click on Pending orders under Status.
Track the request
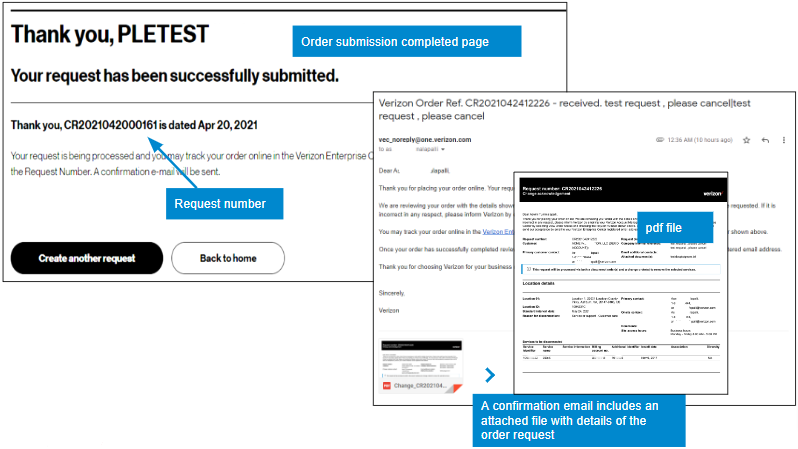
12. After you click Submit, you will see a message that gives your request ID, and you will receive an email confirming your order that includes an attached PDF file with your order request details.
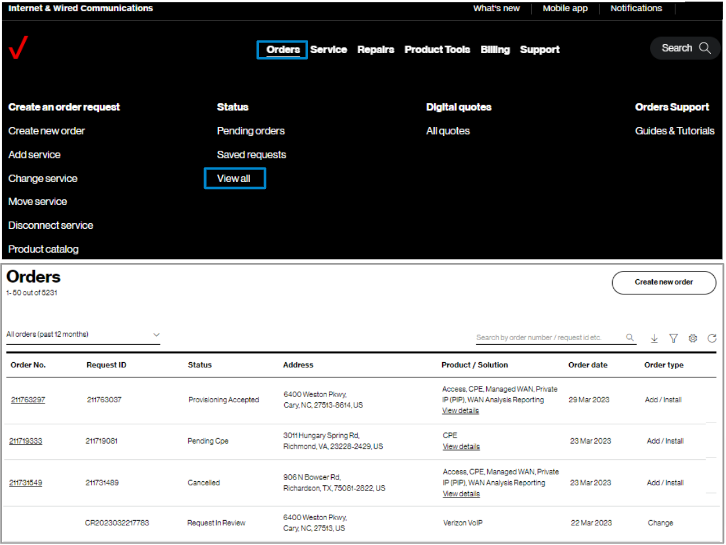
13. Track orders online by hovering over Orders and click on View all under Status. A support guide is available to learn more about using View order status.
Tips and troubleshooting
Topic | Tip |
Logging in or Accessing the tool | User IDs will need a password change if you have not logged in for 90 days. A new User ID is needed if not logged in for a year. |
Finding the service identifier | If you have access to a Verizon invoice, the Service Identifier and Location ID are listed. Otherwise, you may search a few different ways for the Service Identifier while online. In Verizon Enterprise Center, hover over Service and click View Inventory under Manage service. In this section, the map can be very helpful to find the service. The link View Inventory has a search at the top and filter icons on the left.
Remember! You can change the search parameter by clicking on the Service Identifier dropdown. |
Adding service identifiers by typing them in | When you don’t see a service you are looking for, it could be that the service address has more than one Location ID. Or, it could be that the service is much older and it may not have a Location ID. Include these services by entering them manually and a Verizon representative will review them. |
Other ways to locate the service you want to change | If not finding service, try searching by service ID, circuit ID, telephone number, service address, location name, or location ID. Click on the caret to the left of the search field to change the way you search. |
Tracking the order | Once an order is submitted you will receive onscreen confirmation and email confirmation with a tracking number that starts with DR or CR. Search on that number in Verizon Enterprise Center by hovering over Orders and clicking on Pending orders under Status. If your order status list is empty, you may try to change the filter in the upper left of the table, or click on the funnel icon. You may also change the sequence of the columns and add new columns using the gear icon. |
Prevent your session from timing out |
|
General | When the tool is acting strange, sometimes it is a signal to clear your browsing history or refresh the page. Your session may have timed out and you need to log in again.
Opening a new Chrome window in ‘incognito mode’ is one method of getting a clean session each time. |
Support | For help with navigating an online tool, or to report an error message, contact Verizon Enterprise Center support via Support / Contact us. |
Introduction
This user guide shows you the steps to order products online. This Add Product user guide shows you the steps to browse our product catalog by category to request additional service:
Scope:
- Global
- Any Product
Examples:
- Add another location of Internet dedicated
- Add a long distance line
- Request service at your new office
- Add a global location for Private IP
- Add a security service
Benefits
- Saves time
- Global capability
- All products & services can be ordered online
- Offline quotes can be viewed online
- Quicker quotes
Get started

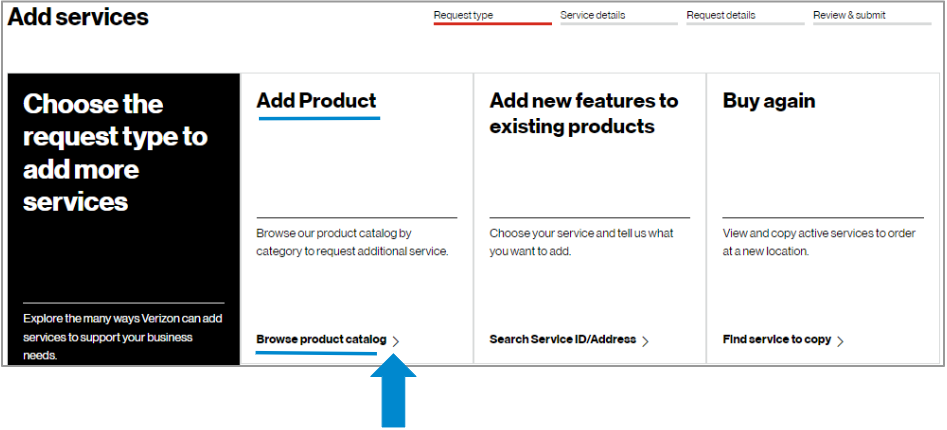
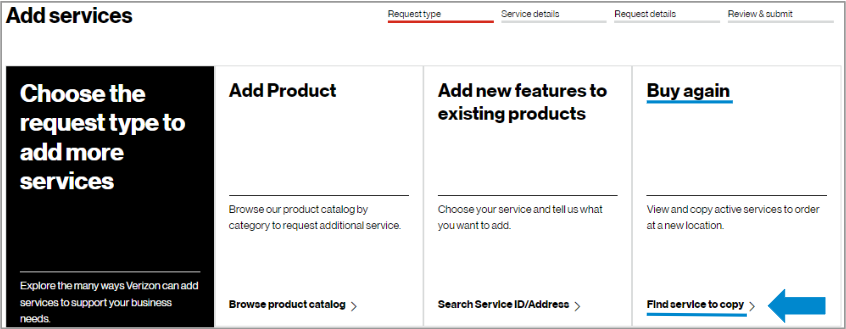
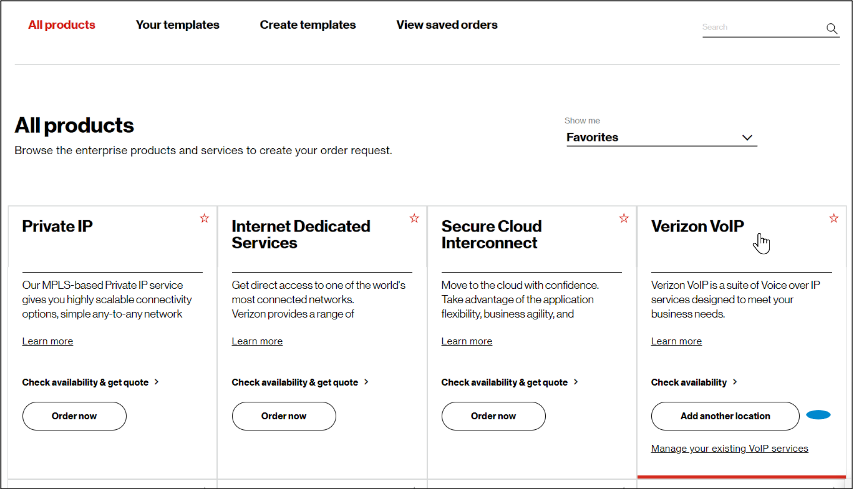
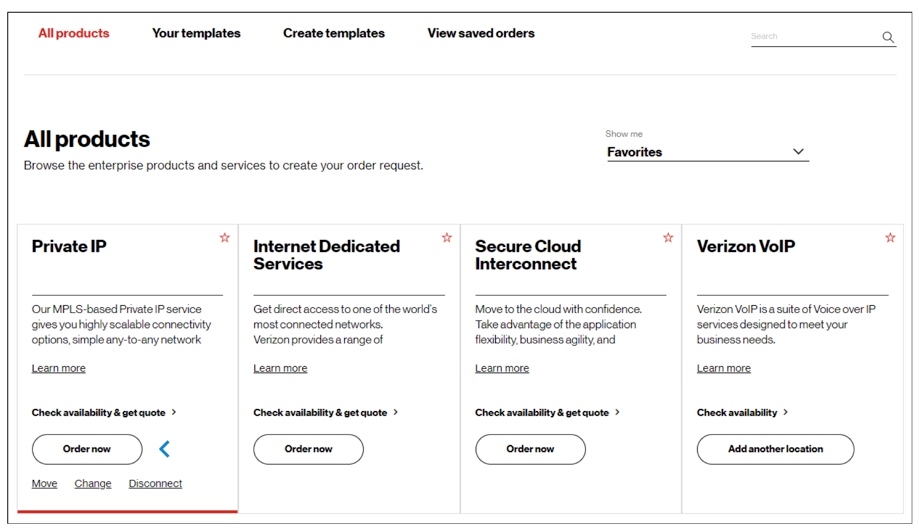
To choose Add Product, click on Browse product catalog.
Service details
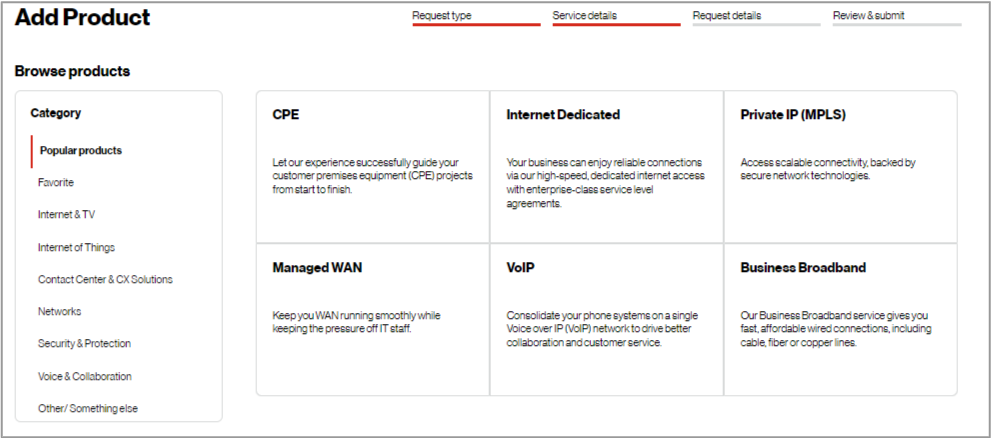
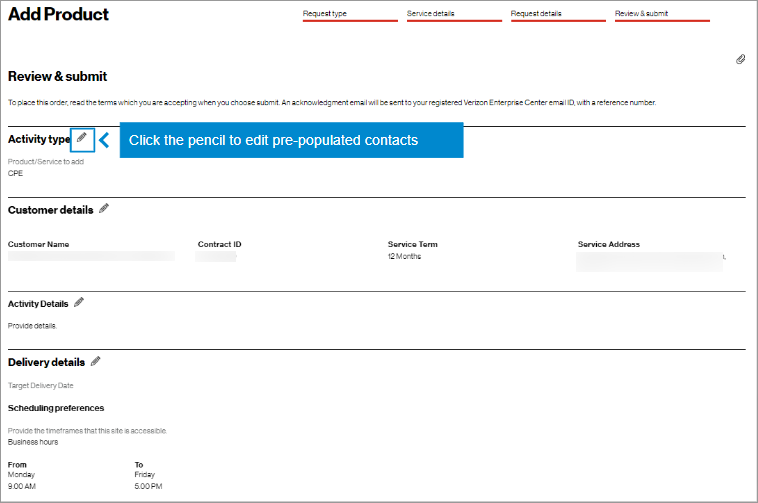
4. Browse Verizon’s product catalog by category and request additional service. In this example, CPE was chosen.
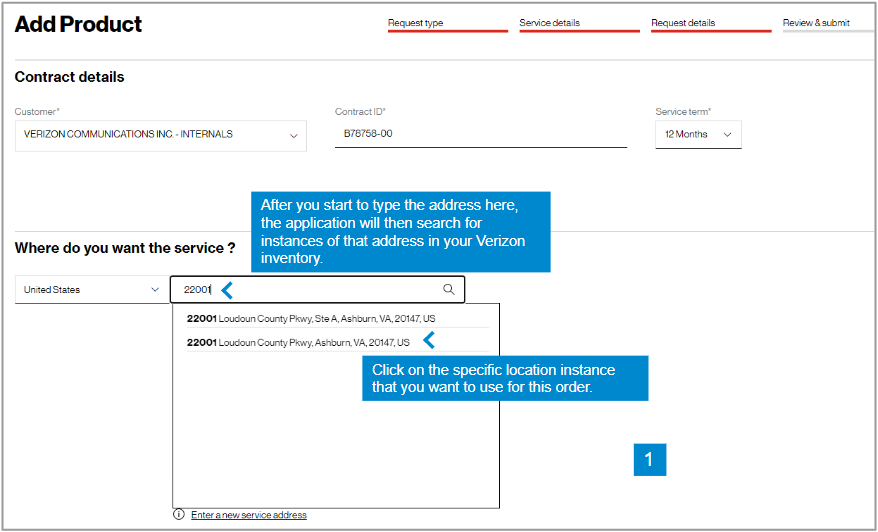
5. Select your Contract ID and input the address for which you want new service (image 1). If you only have one Contract ID, it will pre-populate..
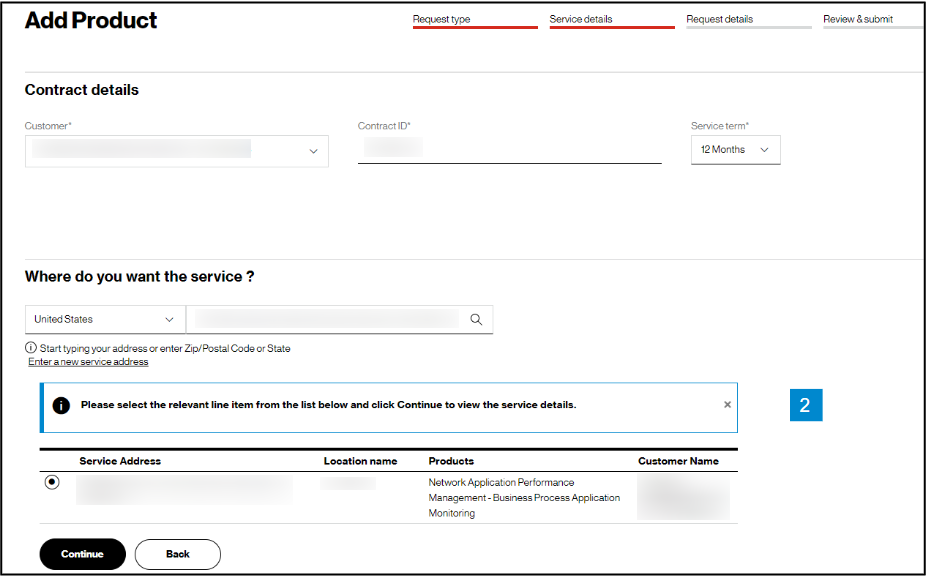
6. When you enter your address, the system may or may not find your address. If it finds the address, select it and it will appear as (image 2).
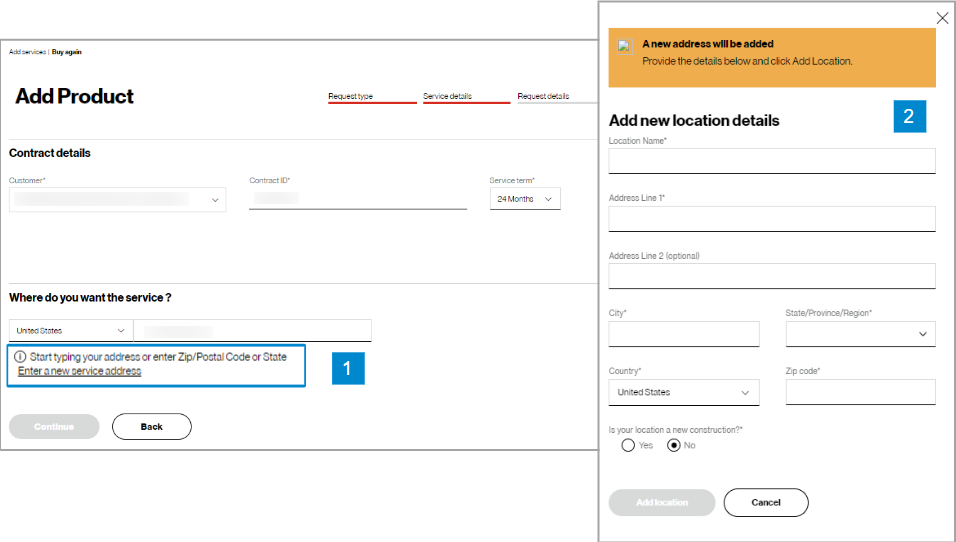
7. If the address is not found, click on the Enter a new service address link, below the address field (image 1).
8. In the Add new location pop-up (image 2), manually add your custom “Location name” and address for this order request.
11. Click Proceed to contact information. You can also save the order request and return to it later. To return to the order, hover over Orders and click Saved Requests under Status.
14. Enter billing information. Click Proceed to review & submit.
Review and submit
16. At the bottom of the Review & submit page, click on Submit order to place your order. Once submitted, you can track your order by hovering over .Orders > Pending Orders
Track the request
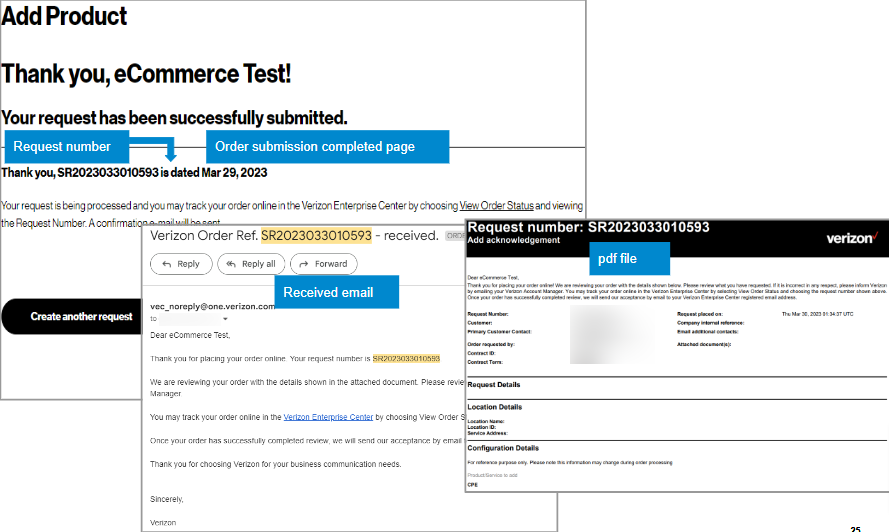
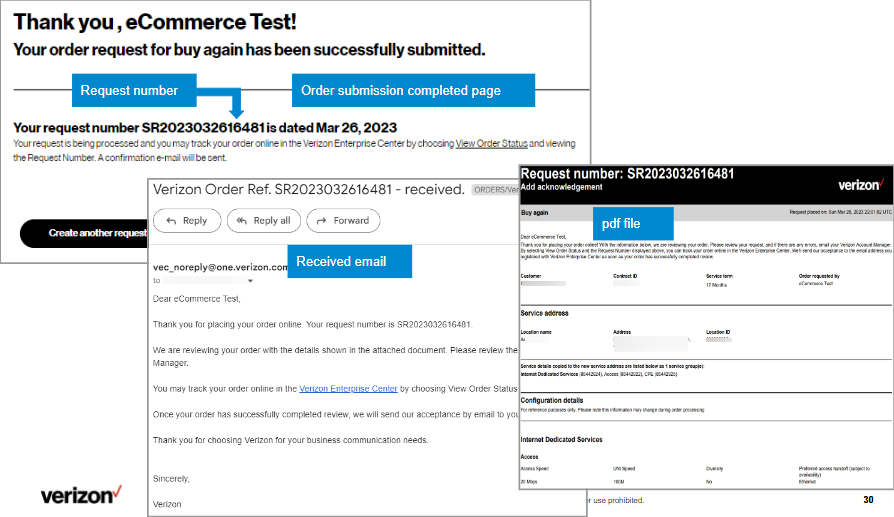
17. After you click Submit, you will see a message that gives you your request number, and you will receive an email confirming your order that includes a pdf file of your order details. Next, you will be asked to review and accept your quote.

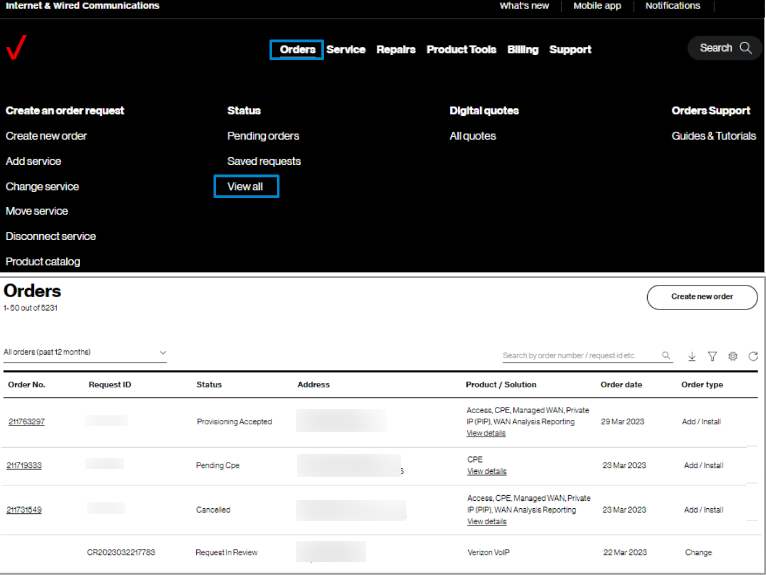
18. Track orders online by hovering over Orders and click on View all under Status.
View the quote
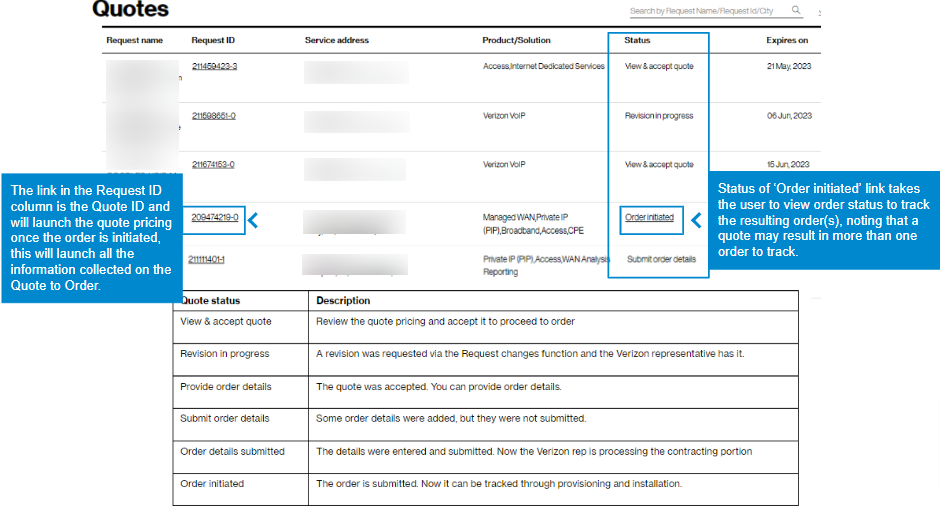
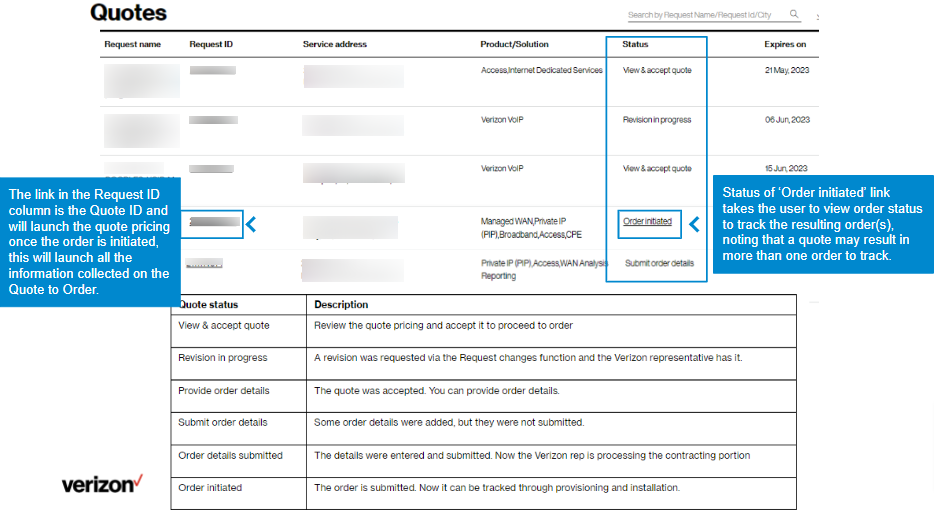
19. You can view your quote online by hovering over Orders and clicking on All quotes under Digital quotes. You can click on the Request ID to view the quote. While your quote is in progress, there are status phrases to direct your actions online, as shown below under Status. Once the quote becomes an order, the status changes to ‘Order initiated” and you can click on it to view your order status.
Note: Click here to view guide for Check your order status,
Click here to view guide for View and accept your online quote.
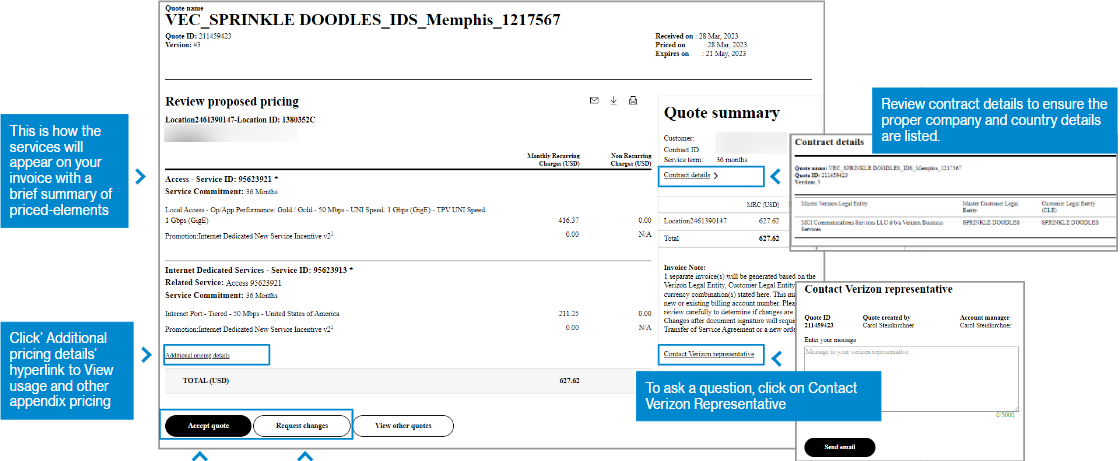
20. The quote displays as a digitized version of the PDF file. To accept the quote, select Accept quote. This alerts the representative who prepared the quote that you have accepted the pricing and they can proceed to prepare the contracting portion, as required. To request a change to the quote such as a new speed or feature, select Request changes and briefly describe the change. This alerts the representative who prepared the quote to make the change and send an updated quote, accessible via a new email and online by hovering over Orders and clicking on All quotes under Digital quotes.
Tips and troubleshooting
Topic | Tip |
Logging in or Accessing the tool | User IDs will need a password change if you have not logged in for 90 days. A new User ID is needed if not logged in for a year. |
Finding the service that you want to add | If can’t find the product, click on Buy again to search for similar service. |
Tracking the order | Once an order is submitted you will receive onscreen confirmation and email confirmation with a tracking number that starts with SR. Search on that number in Verizon Enterprise Center by hovering over Orders go to Status and click on Pending Orders to track your order. If a price change is required, you will receive a Quote ID in addition once the quote is complete. If your order status list is empty, you may try to change the filter in the upper left of the table, or click on the funnel icon. You may also change the sequence of the columns and add new columns using the gear icon. |
Prevent your session from timing out |
|
General | When the tool is acting strange, sometimes it is a signal to clear your browsing history, or a refresh of the page. Your session may have timed out and you need to log in again. Opening a new Chrome window in ‘incognito mode’ is one method of getting a clean session each time. |
Support | For help with navigating an online tool, or to report an error message, contact Verizon Enterprise Center support via the Support / Contact us. |
Introduction
This user guide shows you how Buy Again provides the ability to view and copy active services to order at a new location.
These order requests for additional new service will be sent to a Verizon representative to quote for you. The pricing will not be shown in near real-time on the screen, but it will be sent to you via email and it offers a digital display in Verizon Enterprise Center by hovering over Service and clicking on All quotes under Digital quotes.
Scope:
- Global
- Any previously purchased product or service
- Copy existing services
- Populated configuration and technical details from existing services can be edited for new requests
Examples:
- Repeat ordering for new offices that need the same service
- Need technical upgrade to 15 more sites
- Request similar services that you have at another location
Benefits:
- Saves time - Easy, quick, don’t have to look up information, just copy, saves time, all they have to know is the service ID of the location they want to copy
- Global capability
- All products & services can be ordered online
- Offline quotes can be viewed online
- Standardized inputs
- Copy product and product configurations for buy again
- Quicker quoting
Get started
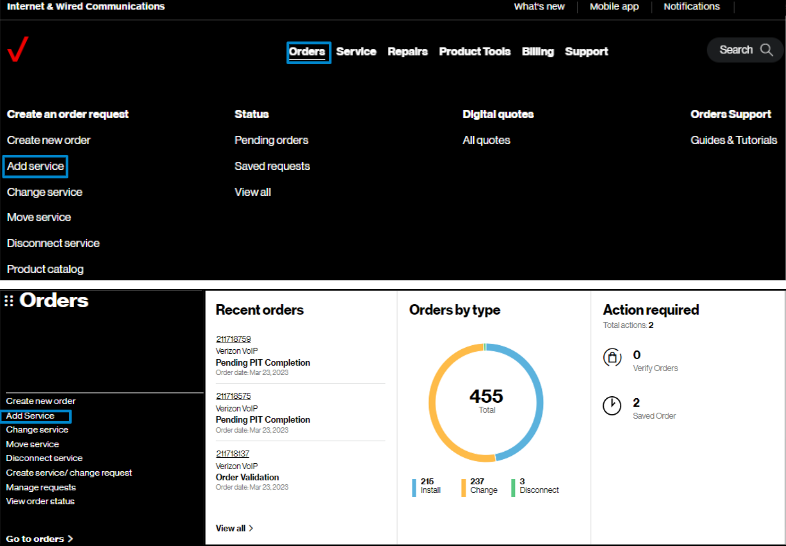
2. Hover on Orders and click on Add service under Create an order request.. On the Verizon Enterprise Center home page, you can also click on Add service in the Orders pod for the same option to create an order.
Identify service
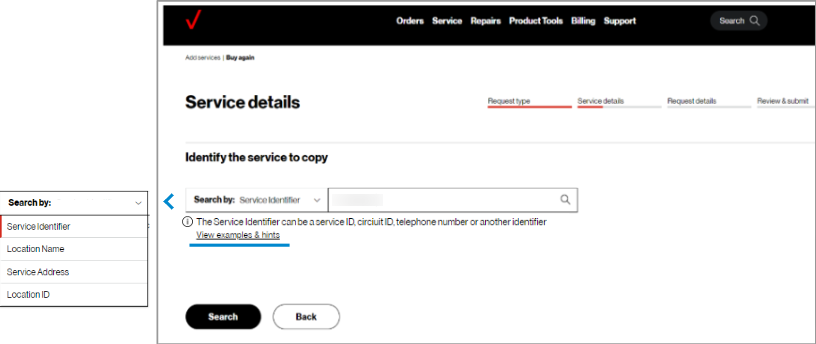
4. The Service details step is to identify the service to copy to a new location.
To identify the service to copy, search by entering the existing service identifier, location name, service address, or location ID.
Examples for service identifier are found in View examples & hints.
Click search to review service identifiers and associated linked services.
Note: If the service identifier is not found, its associated billing account number may be missing from your user profile. Please contact your Verizon representative or company point of contact to add these accounts to your profile to support future requests.
Service details
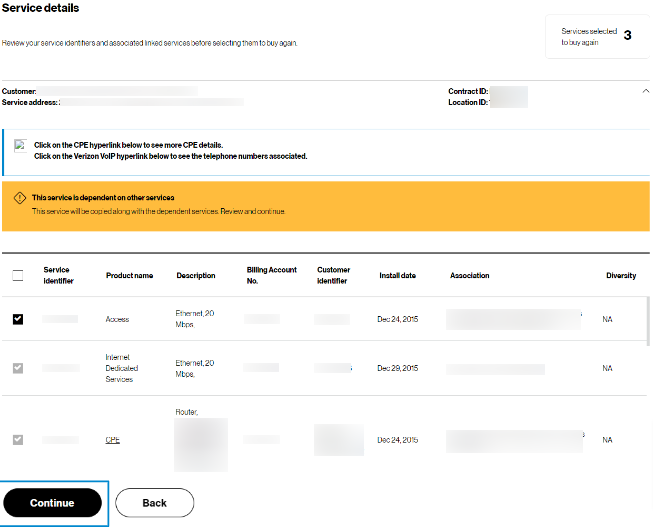
5. Review your service identifiers and associated linked services before selecting them to buy again.
Select continue to review existing configuration details.
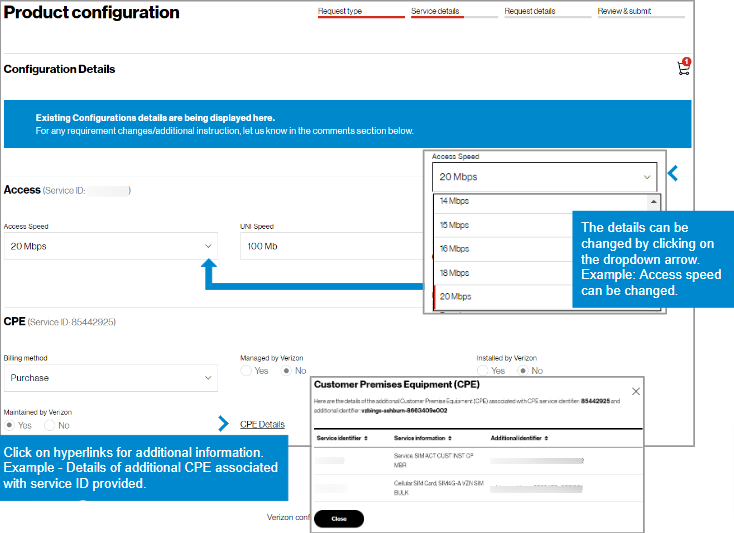
6. For configuration details, scroll down the page to confirm details for accuracy. Any field that has a drop down arrow can be changed.
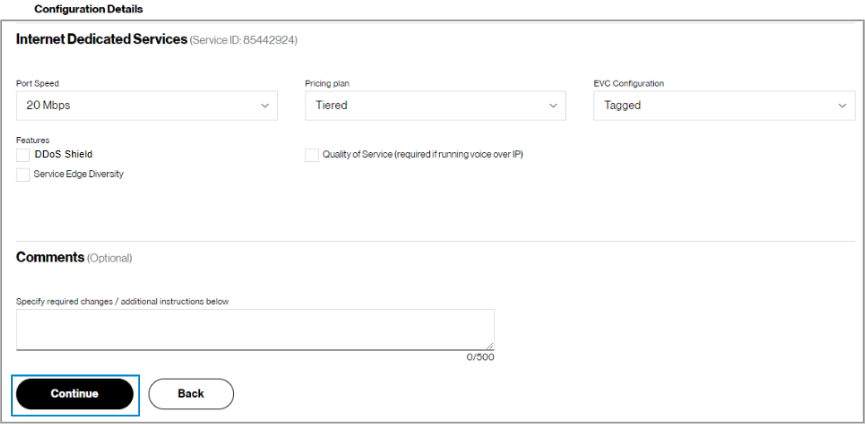
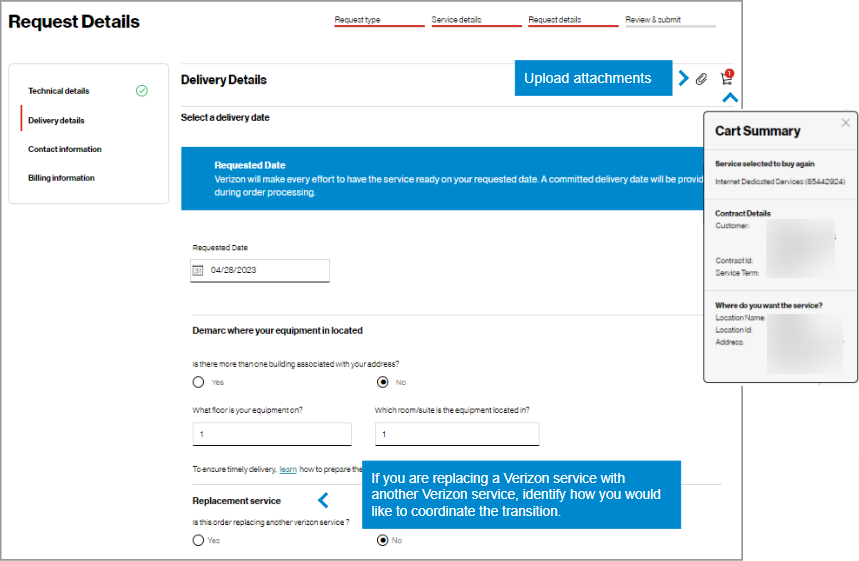
7. At the end of the configuration details, specify required changes and additional instructions in the comments section.
Click continue to proceed to the contract details and new service location.
Request details

8. Select your Contract ID and input the address for which you want new service (image 1). If you only have one Contract ID, it will pre-populate.
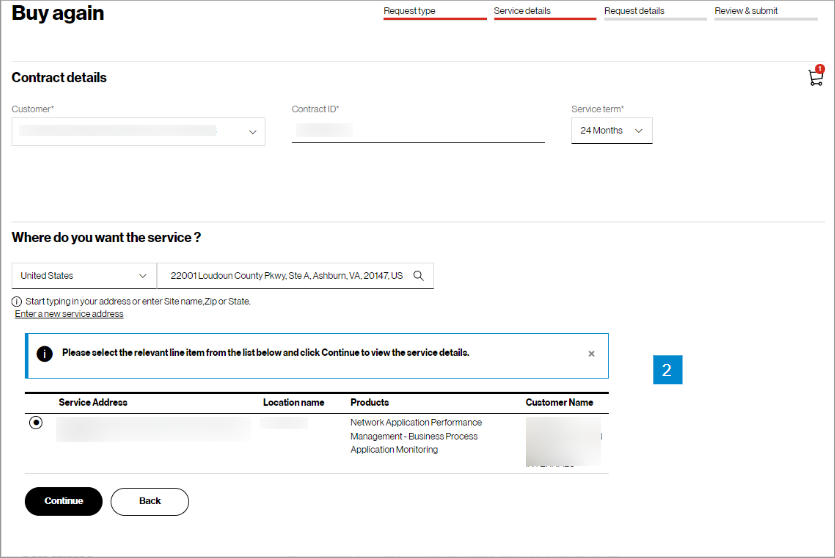
9. When you enter your address, the system may or may not find your address. If it finds the address, click on it to select it and it will appear as (image 2).
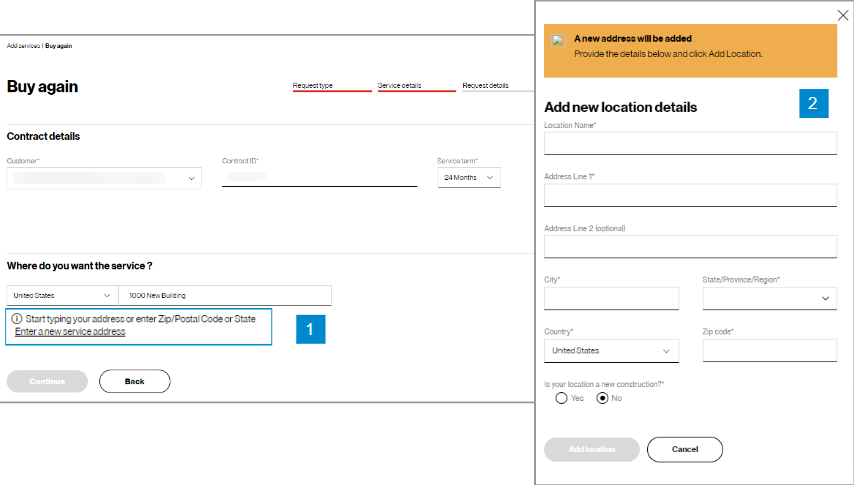
10. If the address is not found, click on the Enter a new service address link, below the address field (image 1).
11. In the Add new location pop-up (image 2), manually add your custom “Location name” and address for this order request.
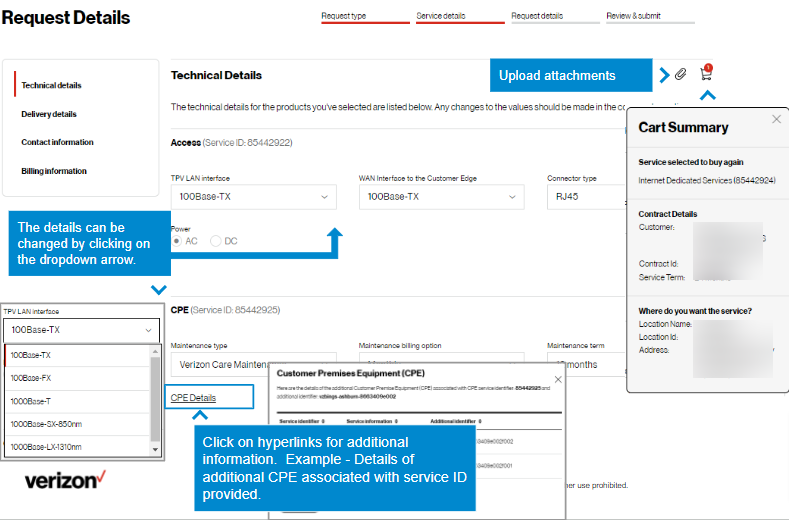
12. The technical details for the products you've selected are listed below. You may edit the fields as necessary. Click on the paperclip next to the shopping cart to upload any relevant documents.
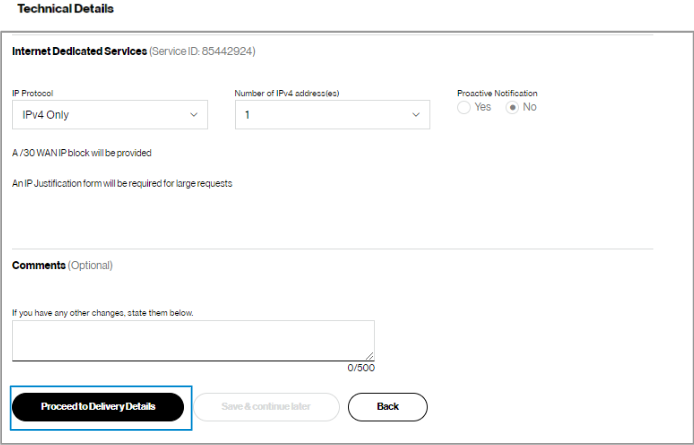
13. At the end of the technical details, enter any additional changes you have in the comments box. Click Proceed to Delivery Details.
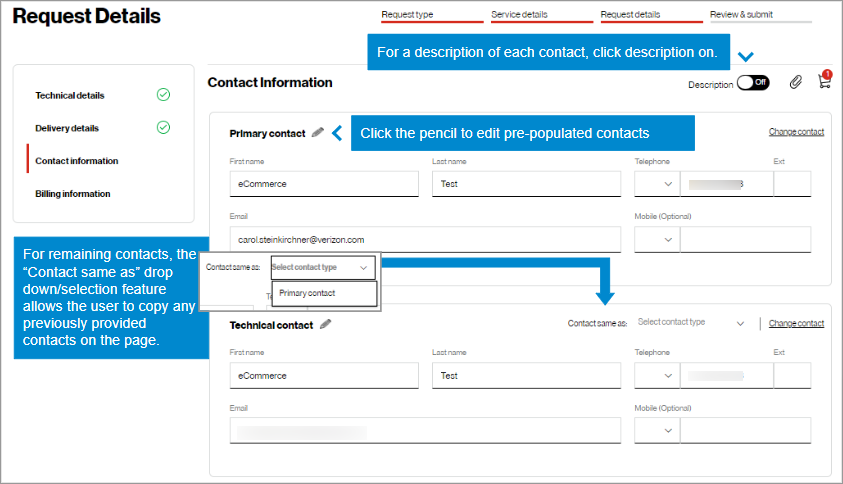
16. Enter contact information and click proceed to billing information. Most contact fields are required to be filled in. If a field is optional, it will be noted.
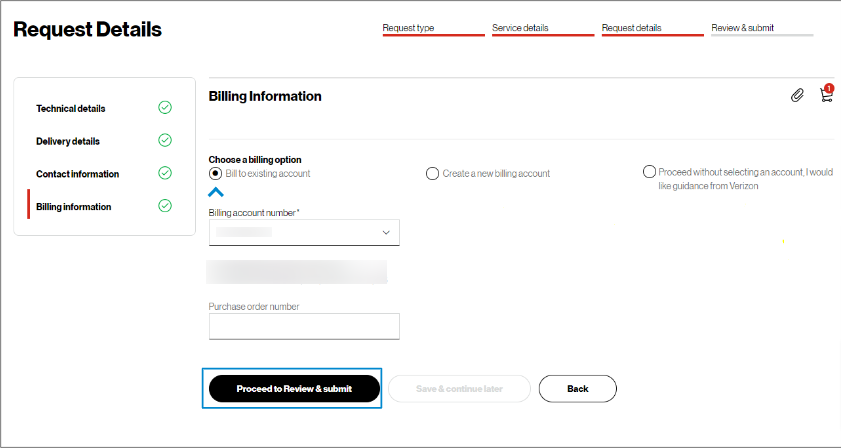
17. You may choose to bill to an existing account, create a new billing account, or proceed without selecting an account and getting guidance from Verizon.
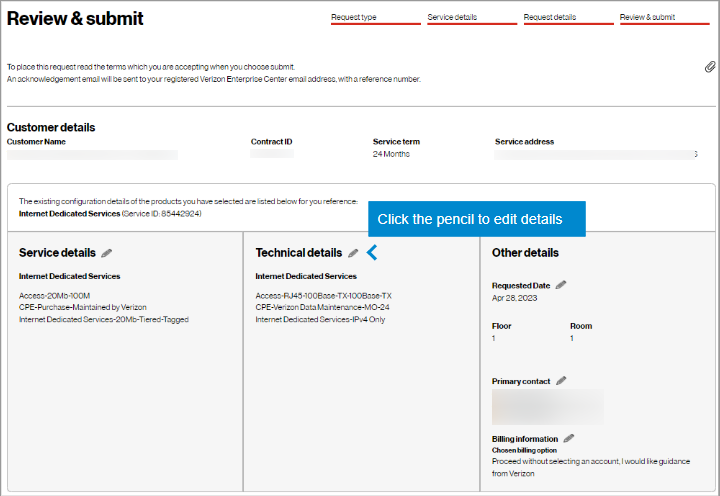
18. In the Review & submit step, scroll down the page to review all you information. Click on the pencil icon to edit a field.

19. At the bottom of the Review & submit page, click on Submit to place your order. Once submitted, you can track your order in Verizon Enterprise Center by hovering over Orders > Pending Orders.
Track the request
21. Track orders online by hovering over Orders and click on View all under Status.
View the quote
22. You can view your quote online by hovering over Orders and clicking on All quotes under Digital quotes. You can click on the Request ID to view the quote. While your quote is in progress, there are status phrases to direct your actions online, as shown below under
Status. Once the quote becomes an order, the status changes to ‘Order initiated” and you can click on it to view your order status.
Note: Click here to view guide for Check your order status,
Click here to view guide for View and accept your online quote.

23. The quote displays as a digitized version of the PDF file. To accept the quote, select Accept quote. This alerts the representative who prepared the quote that you have accepted the pricing and they can proceed to prepare the contracting portion, as required. To request a change to the quote such as a new speed or feature, select Request changes and briefly describe the change. This alerts the representative who prepared the quote to make the change and send an updated quote, accessible via a new email and online by hovering over Orders and clicking on All quotes under Digital quotes.
Tips and troubleshooting
Topic | Tip |
Logging in or Accessing the tool | User IDs will need a password change if you have not logged in for 90 days. A new User ID is needed if not logged in for a year. |
Finding the service identifier | If you have access to a Verizon invoice, the Service Identifier and Location ID are listed. Otherwise, you may search a few different ways for the Service Identifier while online. In Verizon Enterprise Center, hover over Service and click View Inventory under Manage service. In this section, the map can be very helpful to find the service. The link View Inventory has a search at the top and filter icons on the left.
Remember! You can change the search parameter by clicking on the Service Identifier dropdown.
|
Other ways to locate the service you want to copy |
If not finding service, try searching by service ID, circuit ID, telephone number, service address, location name, or location ID. Click on the caret to the left of the search field to change the way you search. |
Tracking the order | Once an order is submitted you will receive onscreen confirmation and email confirmation with a tracking number that starts with SR. Search on that number in Verizon Enterprise Center by hovering over Orders, clicking Status and clicking on Pending Orders to track your order. If your order status list is empty, you may try to change the filter in the upper left of the table, or click on the funnel icon. You may also change the sequence of the columns and add new columns using the gear icon. |
Prevent your session from timing out |
|
General | When the tool is acting strange, sometimes it is a signal to clear your browsing history, or a refresh of the page. Your session may have timed out and you need to log in again.
Opening a new Chrome window in ‘incognito mode’ is one method of getting a clean session each time. |
Support | For help with navigating an online tool, or to report an error message, contact Verizon Enterprise Center support via Support / Contact us. |
For Verizon VoIP service, you can add a new location to your Verizon VoIP network. Examples of when you might want to add a new location include:
- A brand new office is opening in the same city or another city,
- You want to add Verizon VoIP service to a location that has other Verizon services, but not Verizon VoIP
Add Location orders have varying target delivery dates, depending on whether any numbers will be ported with the order, whether a new enterprise trunk needs to be created, or any account issues that may exist.
- Add location, with no ported numbers: Target 1 business day
- Add location, with ported numbers: Target 17 business days
- Add location, with questions/errors: Target 2 – 10+ business days
Orders with special requirements or requiring more attention may take longer, depending on the requirements.
Ordering Eligibility
Online automated ordering for Verizon VoIP is available to customers with:
- U.S.-based Current Platform contract
- VoIP with Trunk Service Optimization (TSO)
- U.S. service addresses
Online ordering for locations outside the U.S. is available, however this type of order is not automated. An account representative will contact you with a price quote after you submit an order for a location which is outside the 48 contiguous states in the U.S.
Getting started
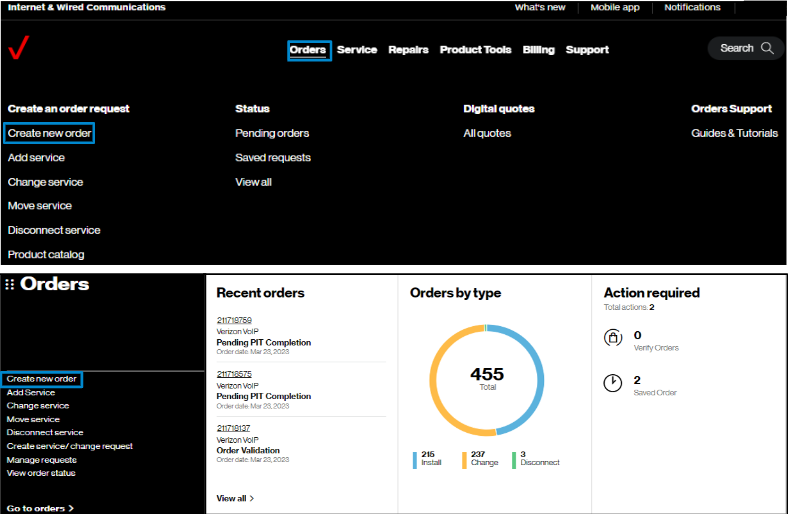
2. Hover on Orders and click on Create new order under Create an order request.. On the Verizon Enterprise Center home page, you can also click on Create new order in the Orders pod for the same option to create an order.
Add location
4. Your order has four steps: Check availability, Configure & pricing, Checkout, and Review & submit.
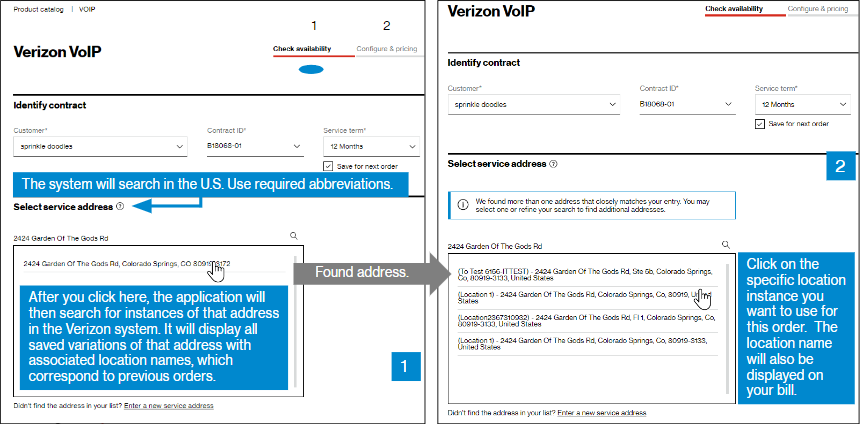
In the Check availability step, select your Customer Contracting Legal Entity (CLE), your contract, contract service term, and input the address for which you want new Verizon VoIP service (image 1). If you only have one CLE, it will pre-populate.
When you enter your address, the system may or may not find it, if it does, simply click on it to select it (image 2).
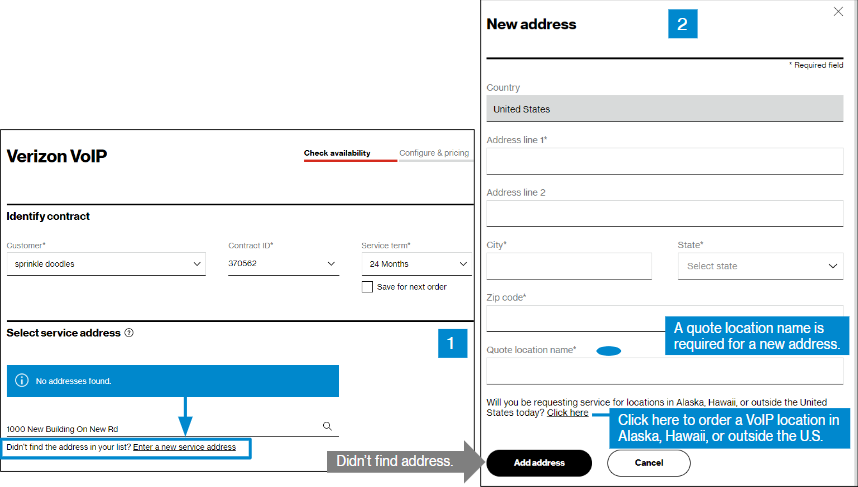
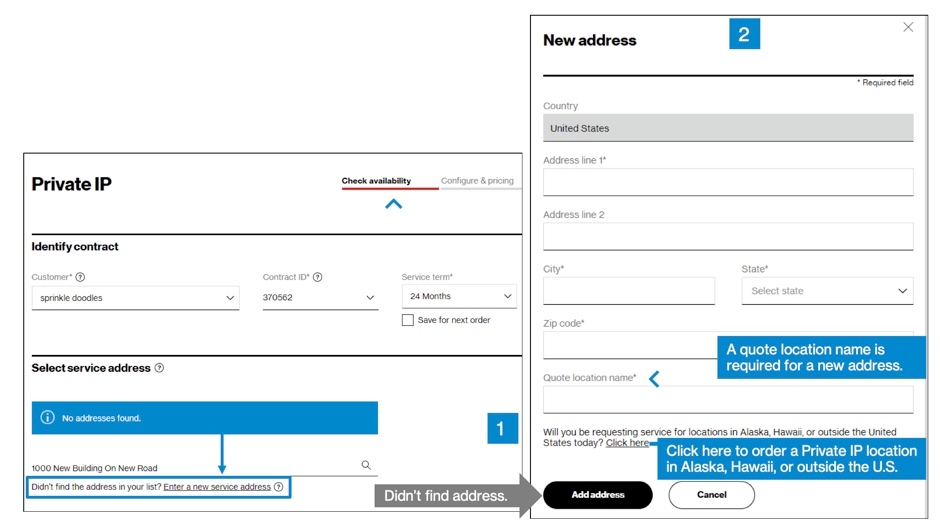
5. If the address is not found, click on the Enter a new service address link, below the address field (image 1).
6. In the New address pop-up (image 2), manually add your address. You must give your address a quote location name for this order.
If you want to order a VoIP location in Alaska, Hawaii, or outside the U.S, click on the link towards the bottom of this page. Orders for locations in Alaska, Hawaii, or outside the U.S. will not automated or have pricing shown online—your account representative will contact you with a price quote.

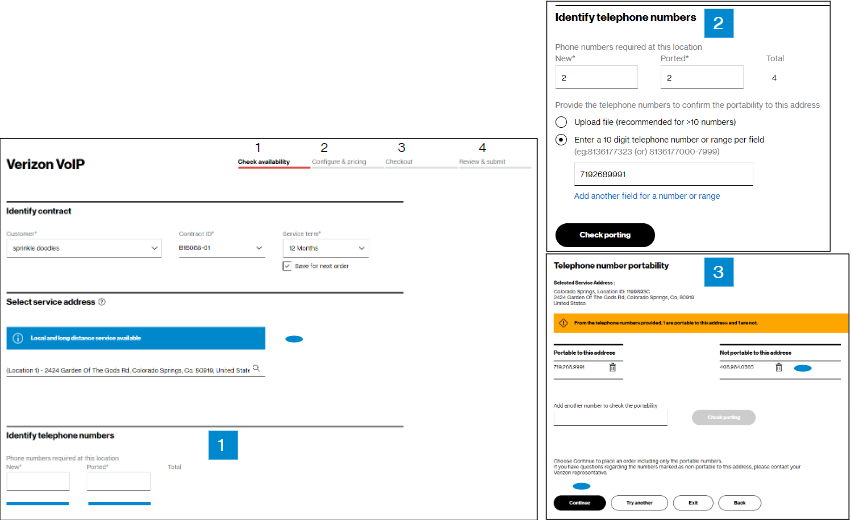
7. Next, you will input information on telephone numbers for this location.Step 1. Input the quantity of telephone numbers--new numbers and numbers to port. Enter a zero if not porting any numbers. Step 2. Specify the numbers to port, and check portability of those numbers.Step 3. The system will display whether all or some numbers are portable to the new location. To delete numbers that are not portable, use the delete icon. Click Continue to proceed.
Configure & Pricing
8. Next, you will complete configuration for this location.
Step 1. Select your VoIP enterprise.
Step 2. Confirm details on whether you want local and long distance calls or only long distance calls, and other basic configuration choices. All fields will be defaulted per the enterprise ID selected, except the Verizon VoIP enterprise name, and Name for this location fields. The name you choose for the location must be unique, or your order will experience errors. Click on the View names already on this network link to view names already used in your network. If you are adding a location level network, you will also be asked for the number of concurrent calls and the feature package. Once you’ve made your selections, click Continue to go to the Configure & Pricing step.
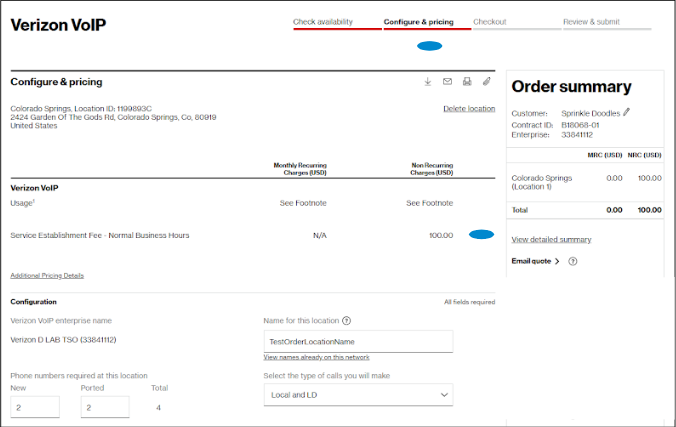
9. In the Configure & pricing step, you can view your pricing and you must complete additional configuration requirements. Your contractual pricing is provided for the location you are ordering, as well as any other line items that changed with this transaction. Pricing information is at the top of the page, including any discounts and promotions on your contract, if present. Scroll down the page to the Trunk Information section, which is visible in the next figure.
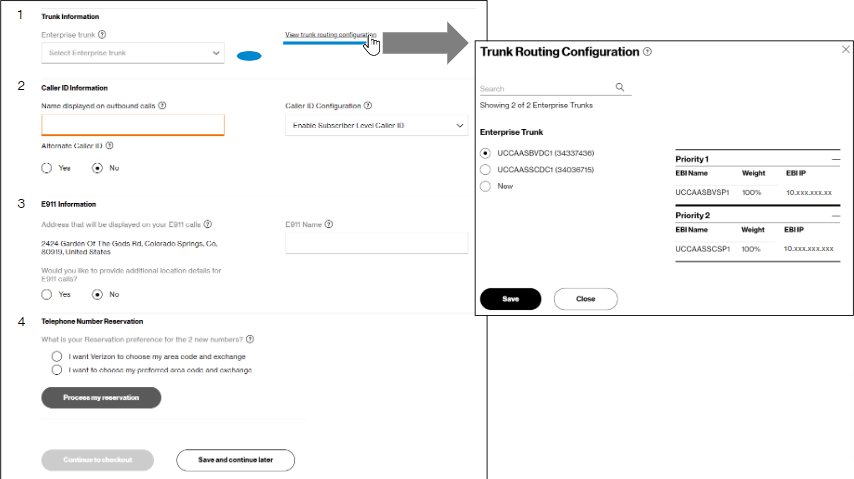
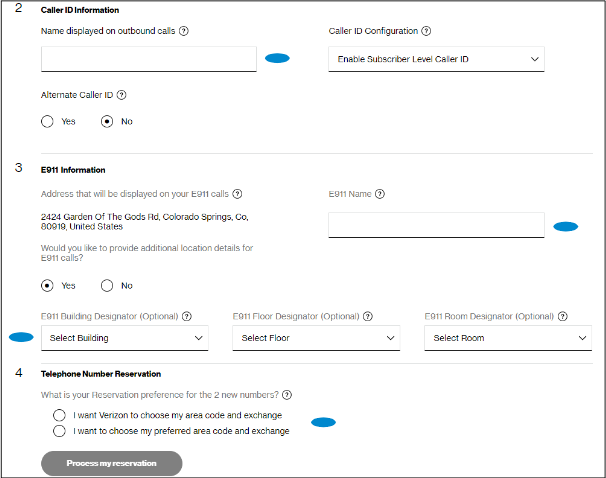
11. After selecting your enterprise trunk, input the name you want displayed on outbound calls and outgoing 911 emergency calls. You can also provide additional location details for 911 calls, if you choose.These names can be updated later using the Integrated Administrative Console (IAC) tool. The Telephone Number Reservation step is detailed in the next figure
Reservation
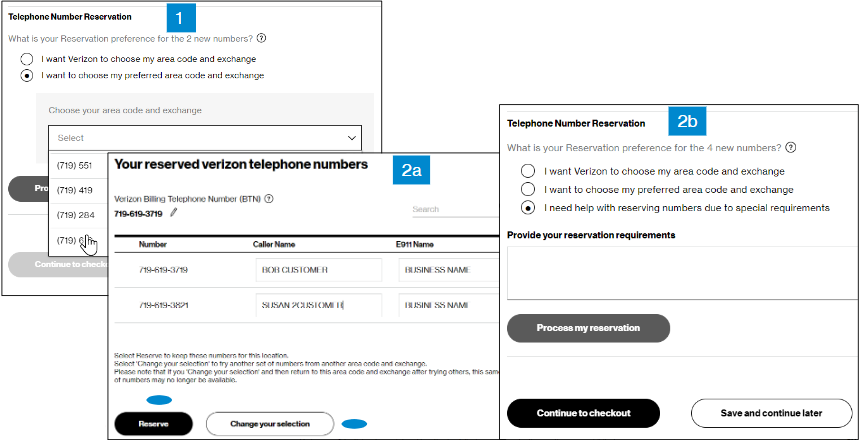
12. Under Telephone Number Reservation, the system will find telephone numbers for you.
Step 1. Have Verizon choose your area code and exchange, or choose the area code and exchange yourself, and click Process my reservation.
Step 2a.You may either click on Reserve to accept the numbers shown or click on Change your selection to try again. You may edit the caller/E911 names here, or you can customize them later in the Integrated Administrative Console (IAC) tool. Click Save edit or Close to proceed. If you have special requirements for your numbers, choose Change your selection and go to step 2b.
Step 2b. Select I need help with reserving numbers due to special requirements, put your requirements in the comment field, and click Continue to checkout. This help option does not display unless you click Change your selection after choosing one of the first two options.
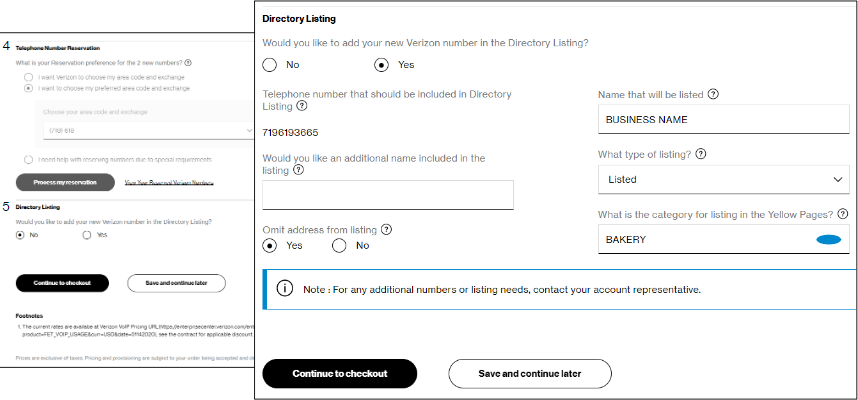
13. The fifth item in the Configure & pricing step is Directory Listing. This option does not display until after you complete telephone number reservation. If you want to list your business in the Yellow Pages, select Yes for Directory Listing and input the Yellow Pages category under which you want your business listed. Click or hover on any help icons if you want more information about a field.
Checkout
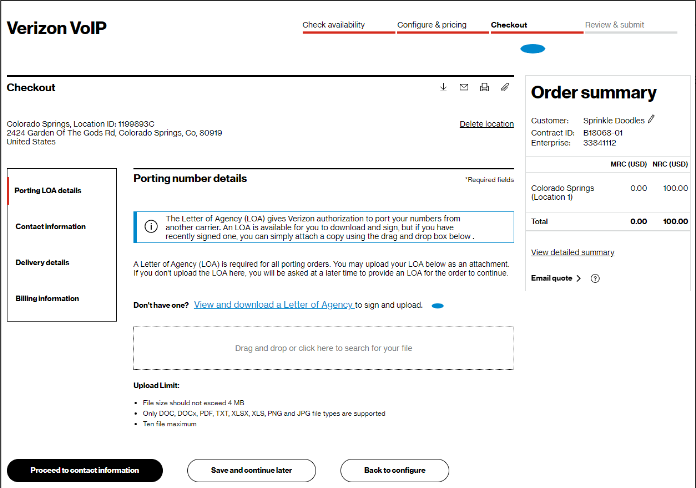
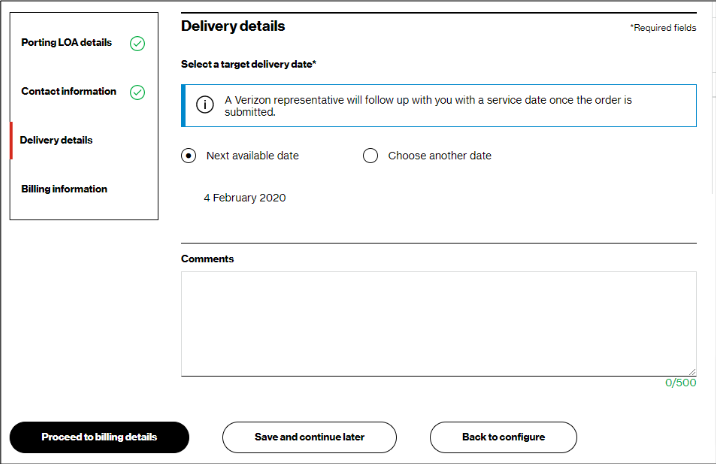
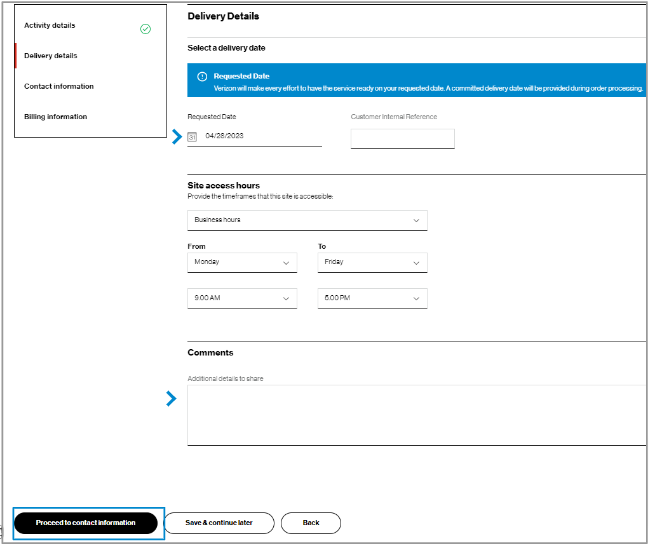
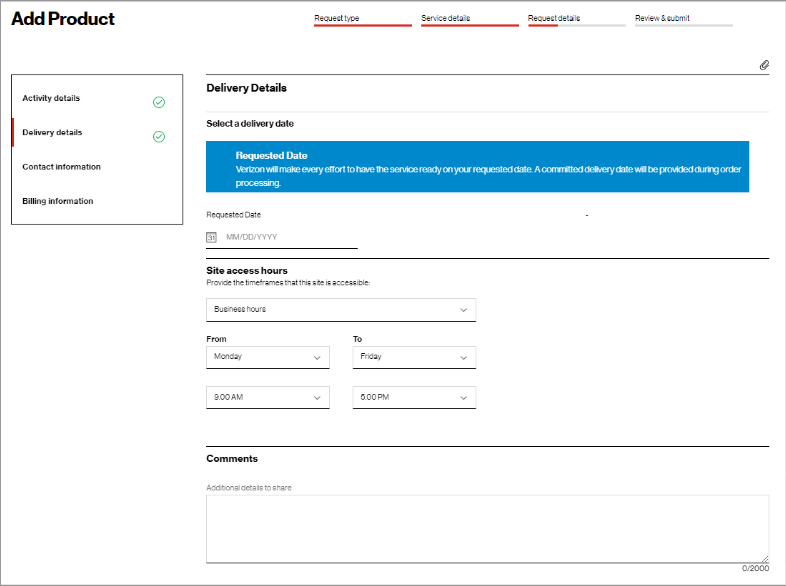
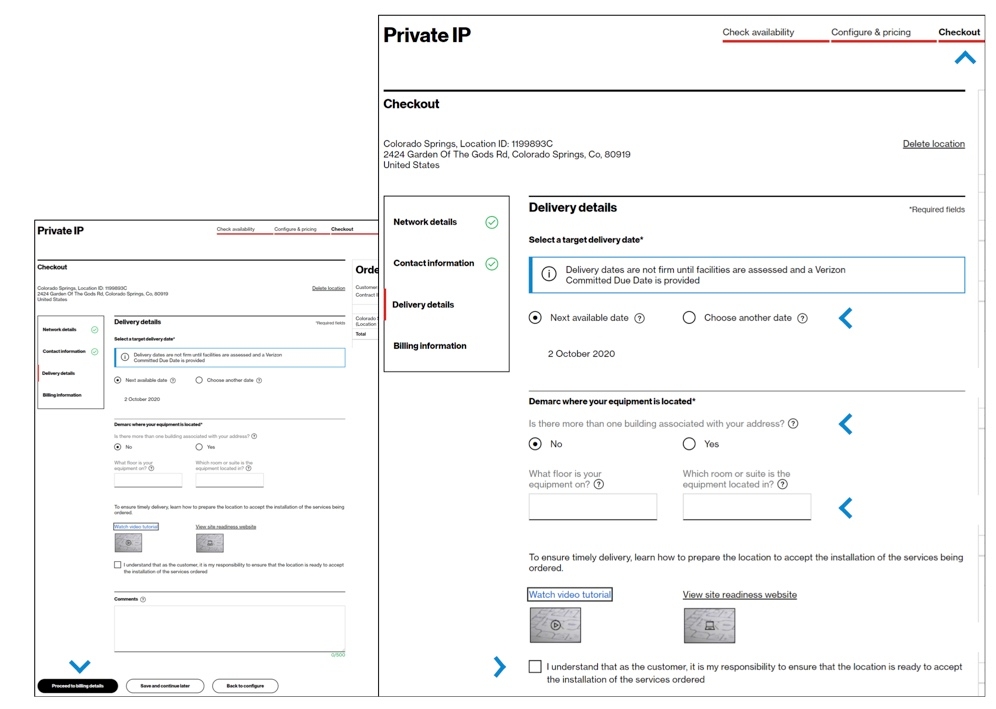
16. In the Checkout – Delivery details step, you can view the order target delivery date, and click Proceed to billing details. The target delivery date is an estimated date, as each order has unique circumstances.
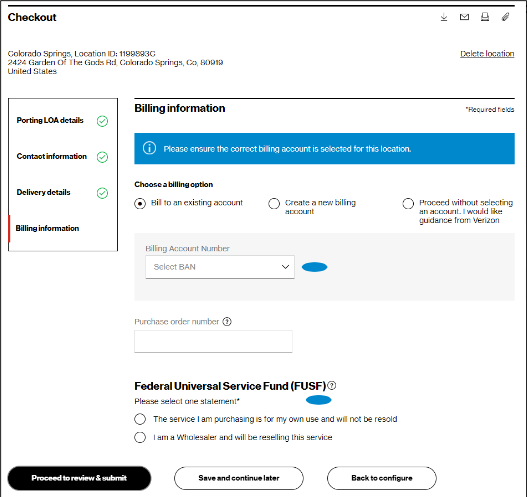
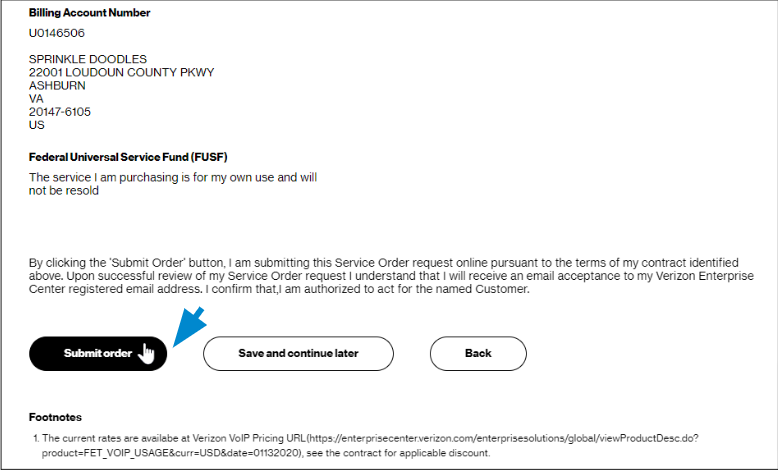
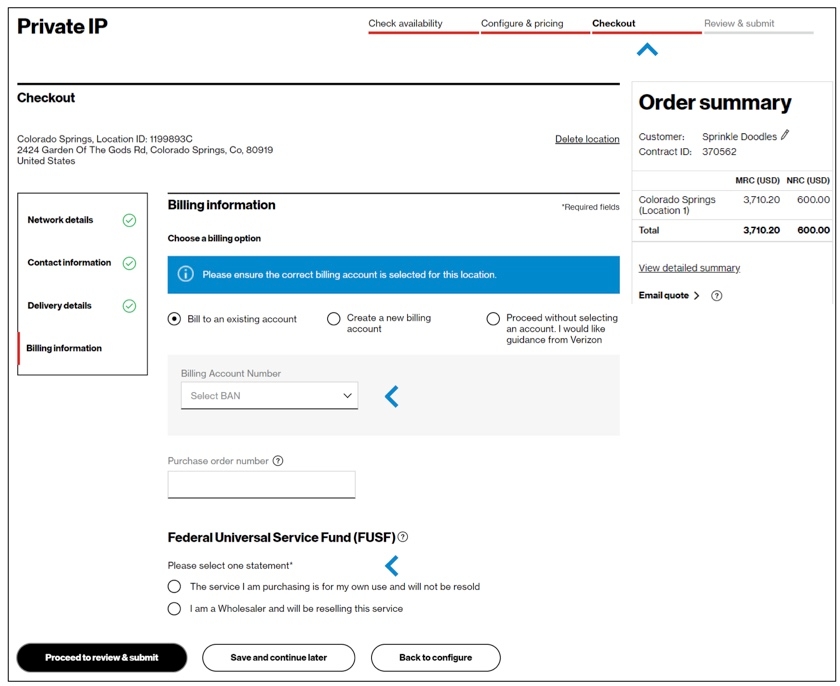
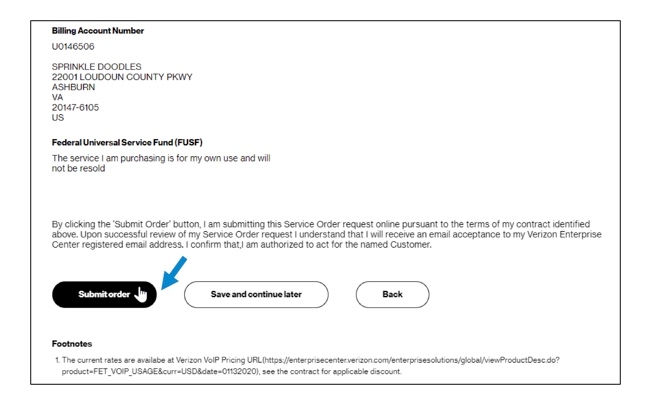
17. In the Checkout – Billing information step, you must specify your Billing Account Number (BAN). You can bill to an existing account, create a new BAN, or proceed without selecting a BAN. You must also complete the required Federal Universal Service Fund Statement about whether you are purchasing the service for your own use or for resale. After making your selections, click Proceed to review & submit.
Review and submit
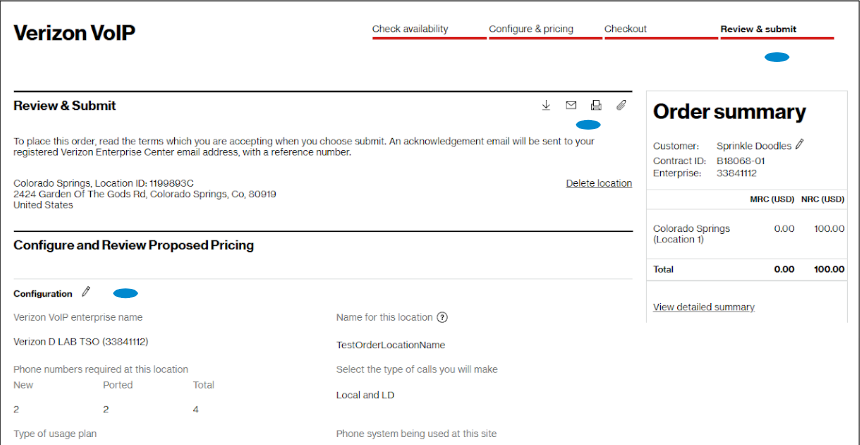
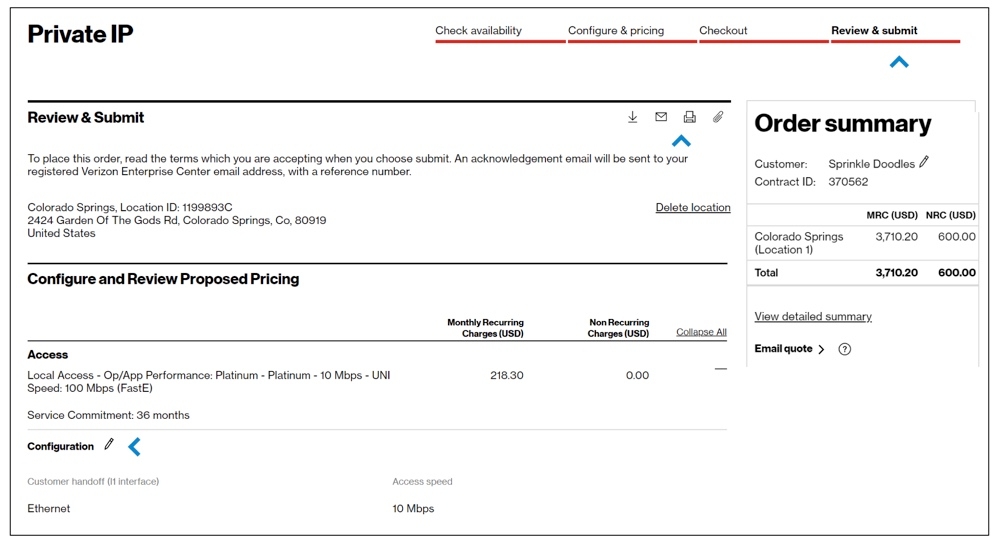
18. In the Review & submit step, scroll down the page to review all your information. Click on the pencil icon to edit a field. At the top of the page, there are icons to download, email, and print the completed order. When you submit the order, you will receive an email with a PDF of your order information, but you can also download the PDF from this page.
Review and submit
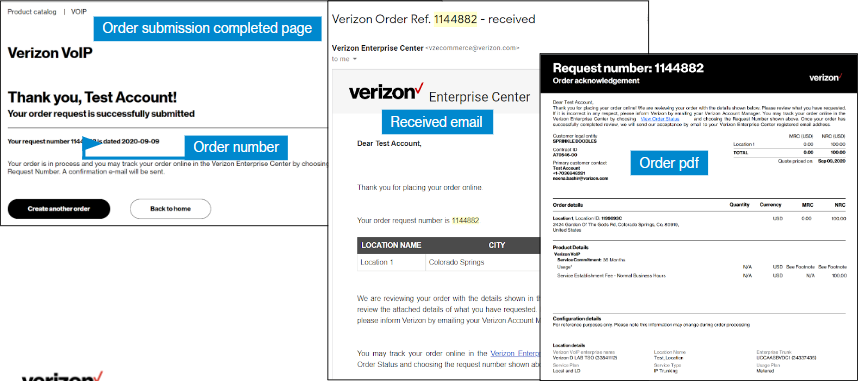
20. After you click Submit, you will see a message that gives you your order number, and you will receive an email confirming your order that includes a pdf file of your order details. If your account team needs to take action on the order, you will receive an email that says your order is pending. When your order has reached order request stage and been accepted, you will receive an email saying it has been accepted. If your order does not have porting, you will also receive an email to schedule service activation and testing with an activation engineer. Verizon strongly encourages testing.
If you opt not to self-schedule, service will be activated 6 calendar days after the date
Example subject line of emails:
Verizon Order Ref. 1144882 - received the activation email, and billing will begin.
Verizon Order Ref. 1144882 - pending
Verizon Order Ref. 1144882 - accepted
Order Request #20123456 is Ready for Activation for Service Order 20654321 500 Main St, Anytown, VA, US; Store 11
You can add a new location to your Verizon Private IP network. Examples of when you might want to add a new location include:
- A brand new office is opening.
- You want to add Verizon Private IP service to a location that has other Verizon services, but not Verizon Private IP.
US Locations only
At present, the online automated ordering system only lets you order new Verizon Private IP locations for U.S. service addresses.
Online ordering for locations outside the U.S. is available, however this type of order is not automated. An account representative will contact you with a price quote after you submit an order for a location which is outside the 48 contiguous states in the U.S.
Getting started
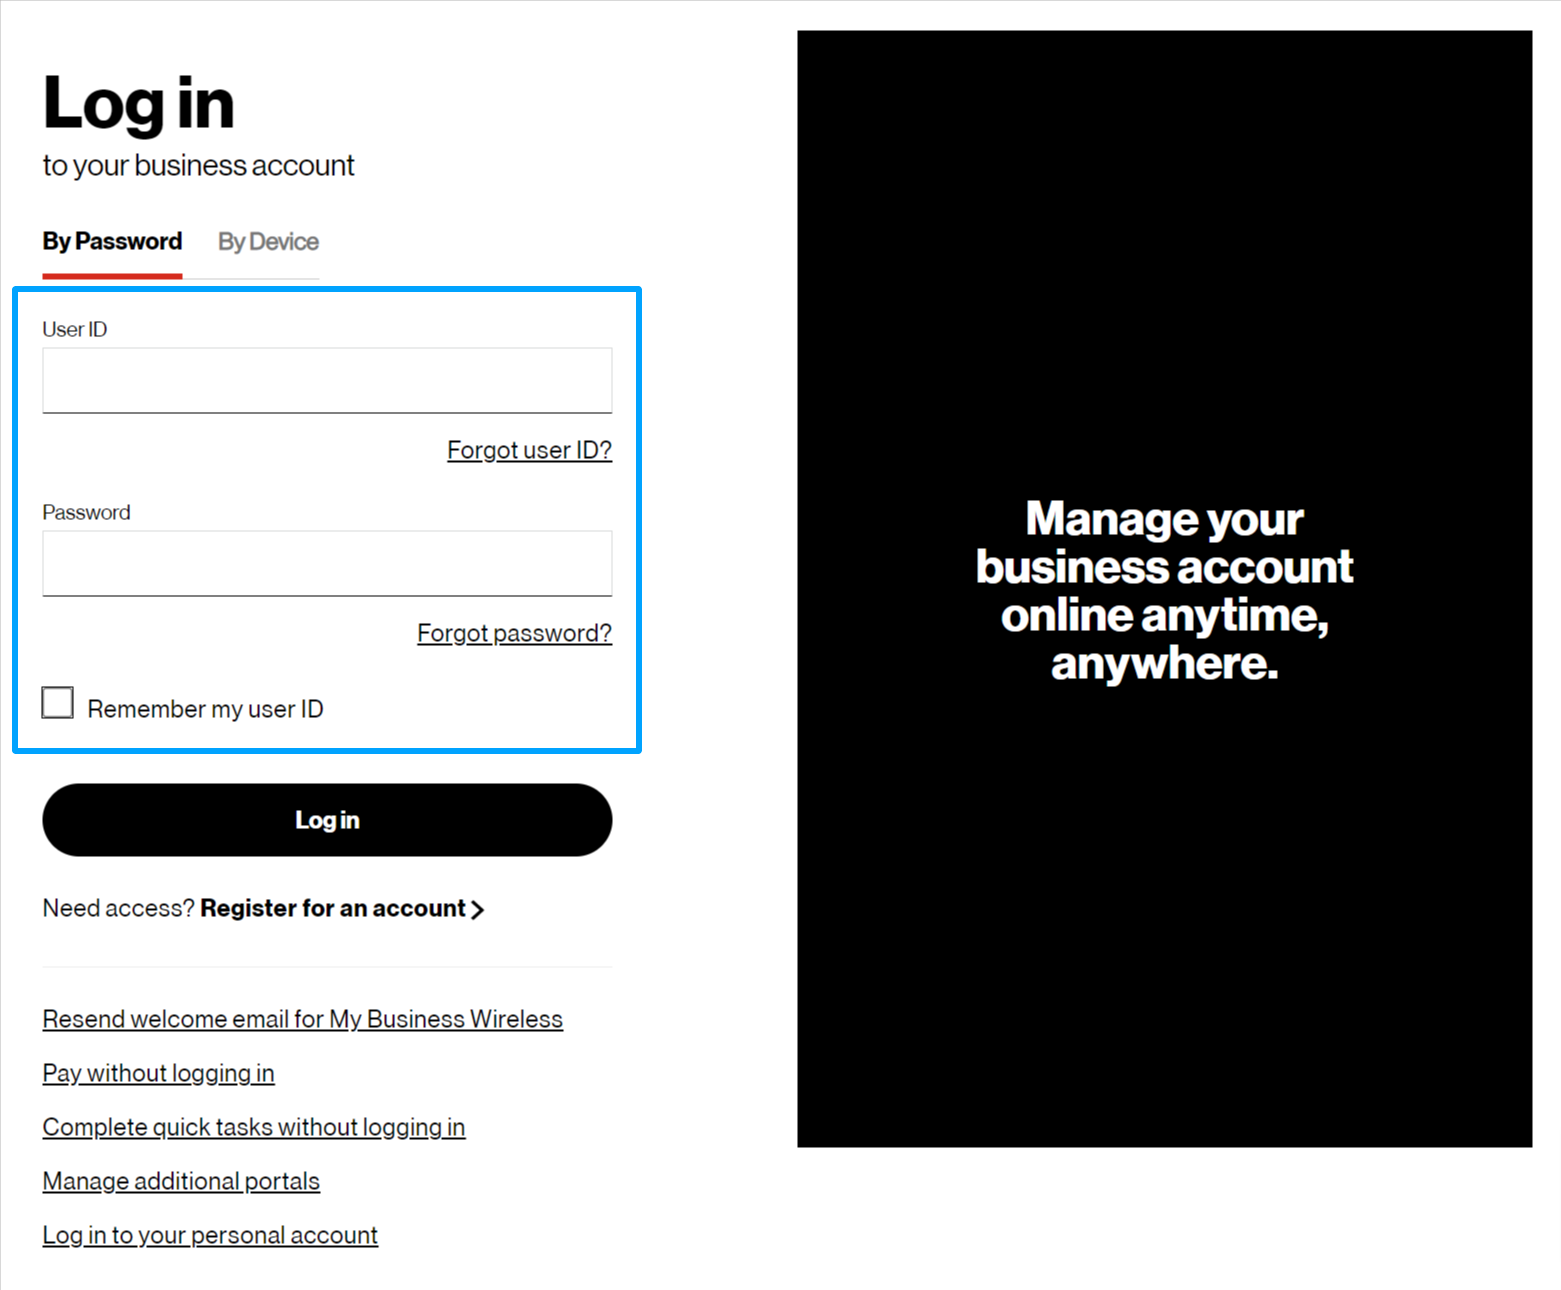
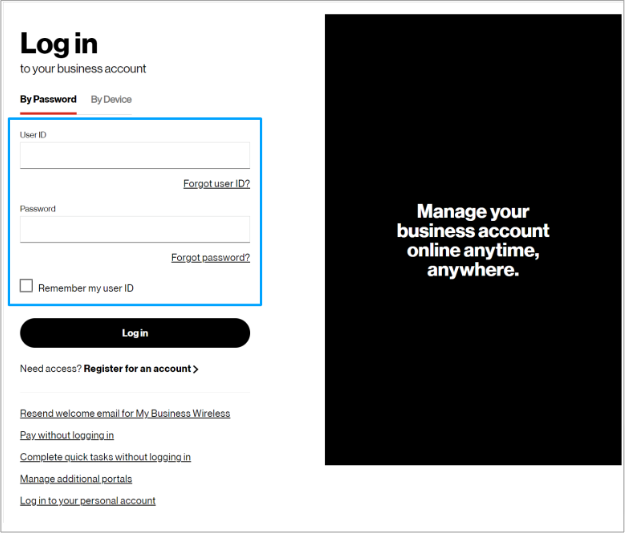
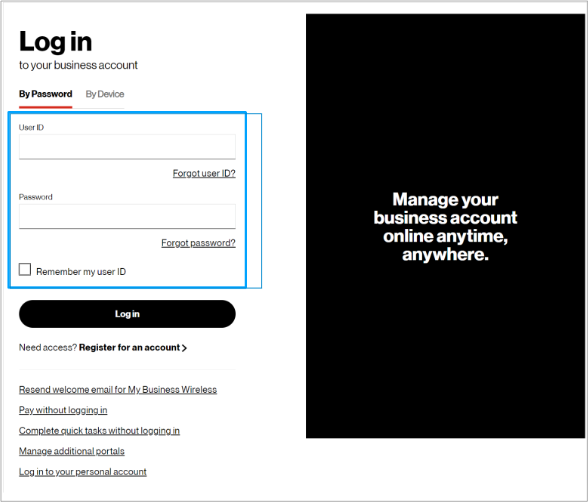
1. Log into the Verizon Enterprise Center with your user ID and password.
Create order
2. Hover on Orders and click on Create new order under Create an order request.. On the Verizon Enterprise Center home page, you can also click on Create new order in the Orders pod for the same option to create an order.
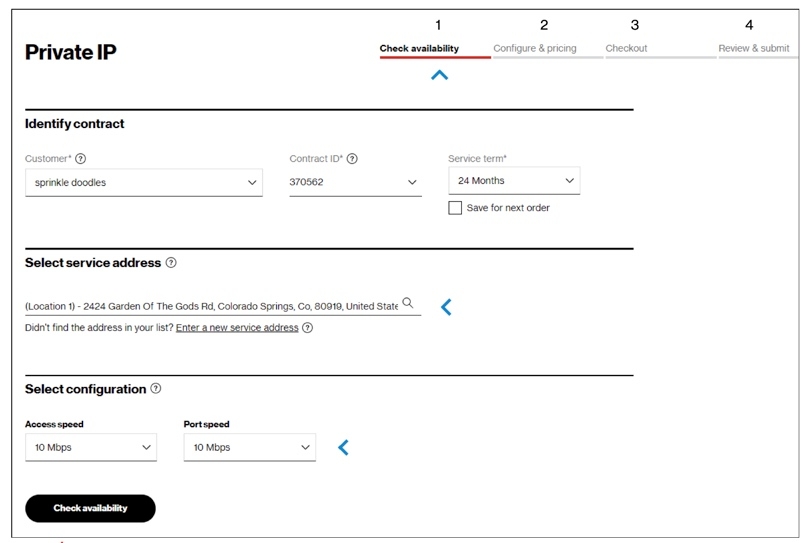
4. Your order has four steps: Check availability, Configure & pricing, Checkout, and Review & submit.
In the Check availability step, select your Customer Contracting Legal Entity (CLE), your contract, contract service term, and input the address for which you want new Verizon Private IP service (image 1). If you only have one CLE, it will pre-populate.
When you enter your address, the system may find your address, or it may not. If it finds the address, click on it to select it (image 2).
5. If the address is not found, click on the Enter a new service address link below the address field (image 1).
6. In the New address pop-up (image 2), manually add your address. You must give your address a quote location name for this order.
If you want to order a Private IP location in Alaska, Hawaii, or outside the U.S, click on the link towards the bottom of this page. Orders for locations in Alaska, Hawaii, or outside the U.S. will not be automated or have pricing shown online—your account representative will contact you with a price quote.
Configure & pricing
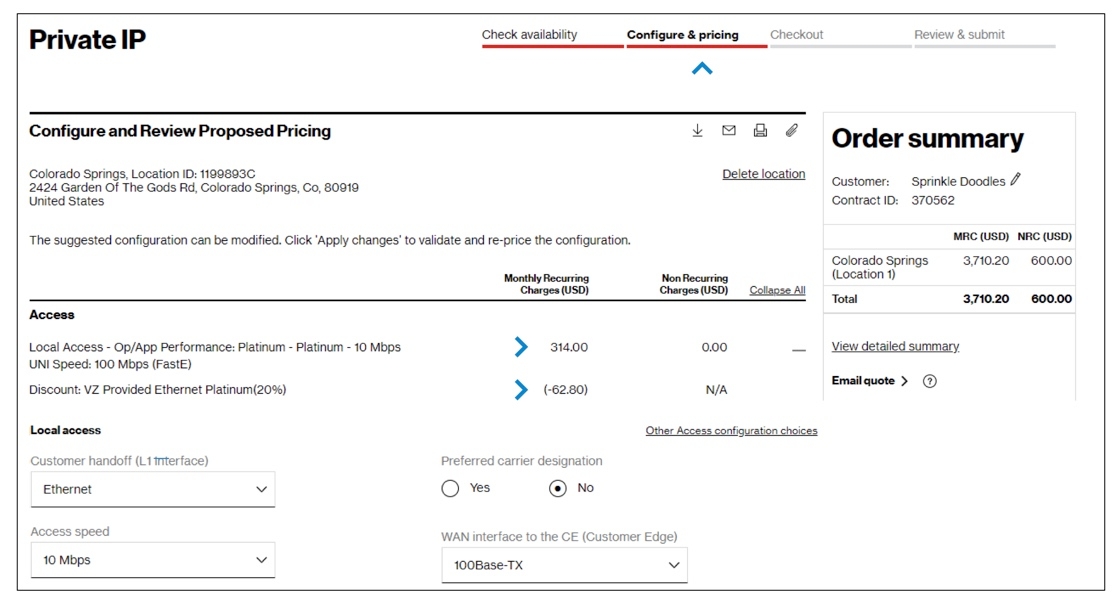
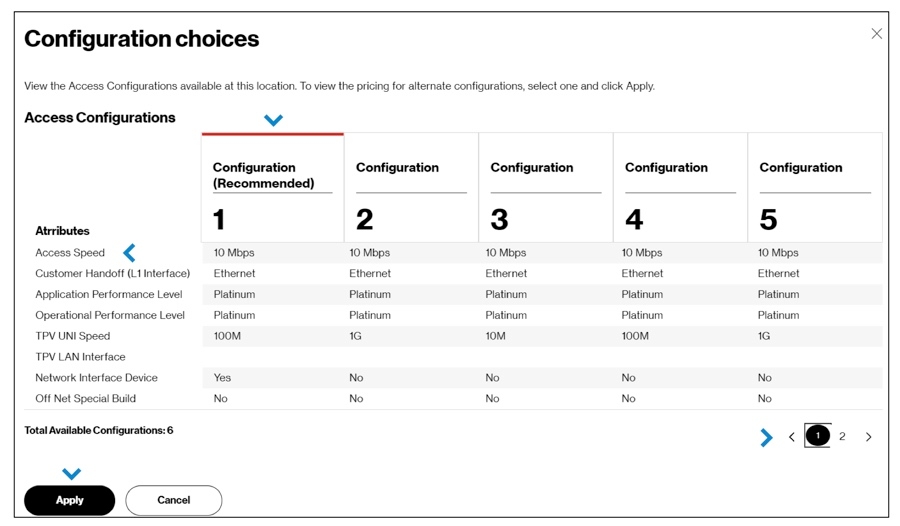
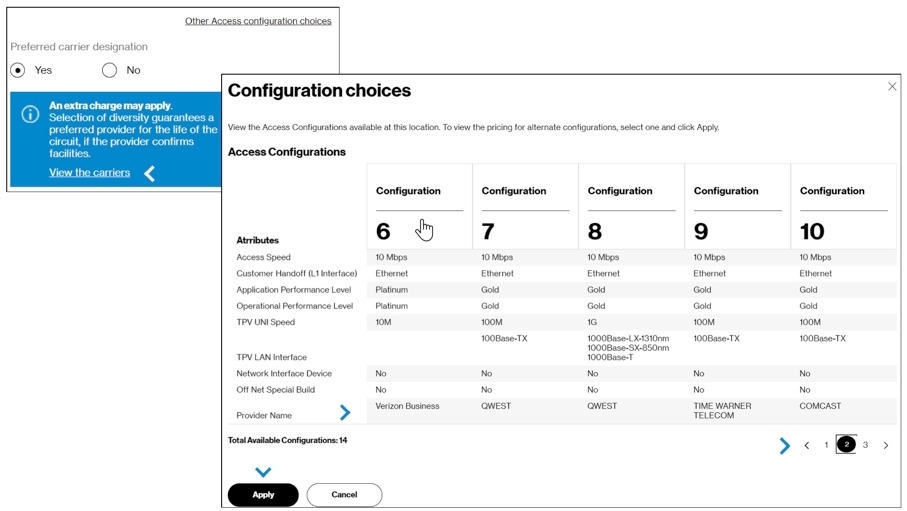
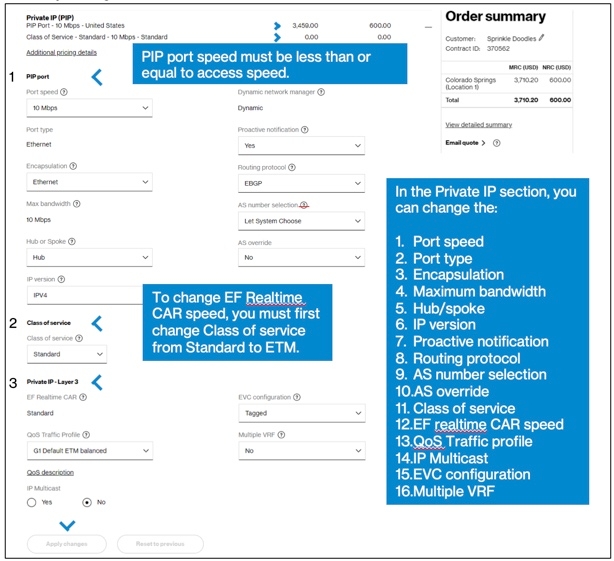
8. In the Configure & pricing step, you can view your pricing, and you must review additional configuration requirements. Your contractual pricing is provided for the configuration you are ordering, as well as any other line items that change with this transaction. Pricing information for the whole order is shown in the Order summary section, at the top right of the page.
This page will include the Access and Private IP configuration sections. You may also have a section for WAN Analysis Reporting, depending on your contract. Pricing for each part of your order is shown at the top of each section, including any discounts and promotions on your contract, if present.

WAN Analysis Reporting
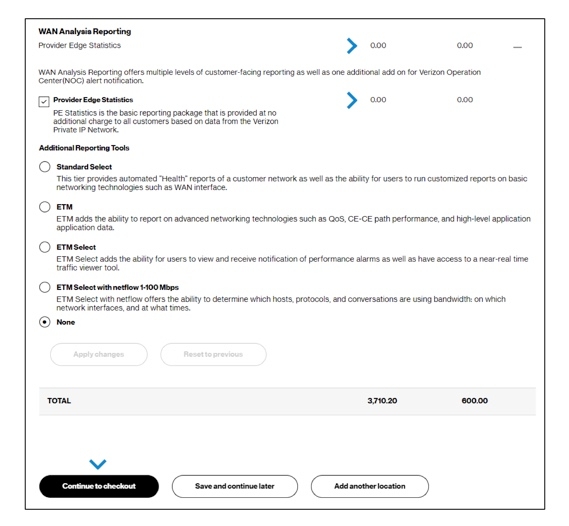
13. In the WAN Analysis Reporting section, a basic reporting package is included at no cost. You can also add reporting to provide information such as a traffic viewer tool, notification of alarms, or more detail about QoS technologies and bandwidth use. Click Apply changes if you make any changes to update the pricing, and then click Continue to Checkout.
14. Or, if you want to order for several locations, click Add another location to add a second location to the order.
You can have as many as ten locations on an order, which will appear as tabs at the top of this page. Once you’ve added all the locations that you want, configured them, and saved any changes to configurations, click Continue to checkout.
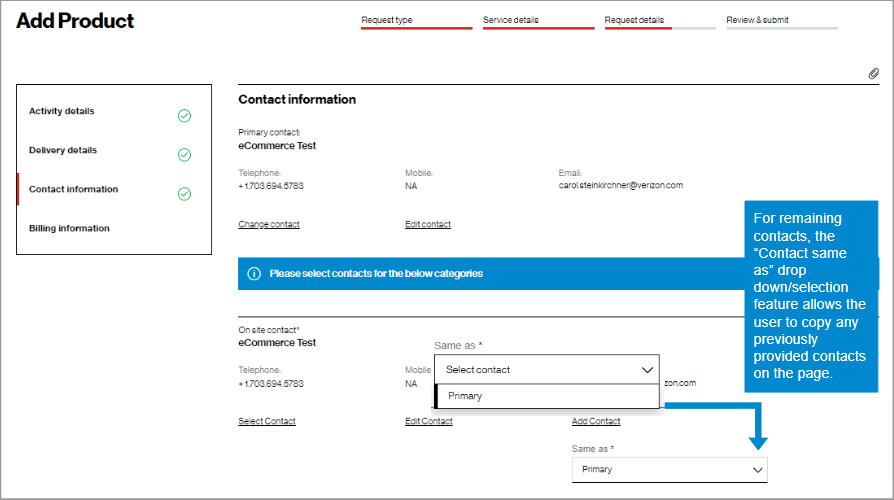
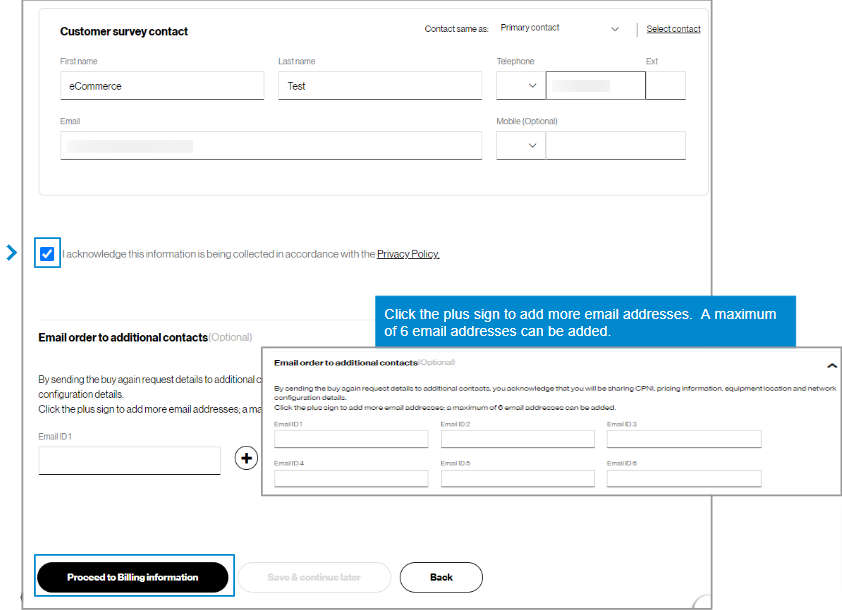
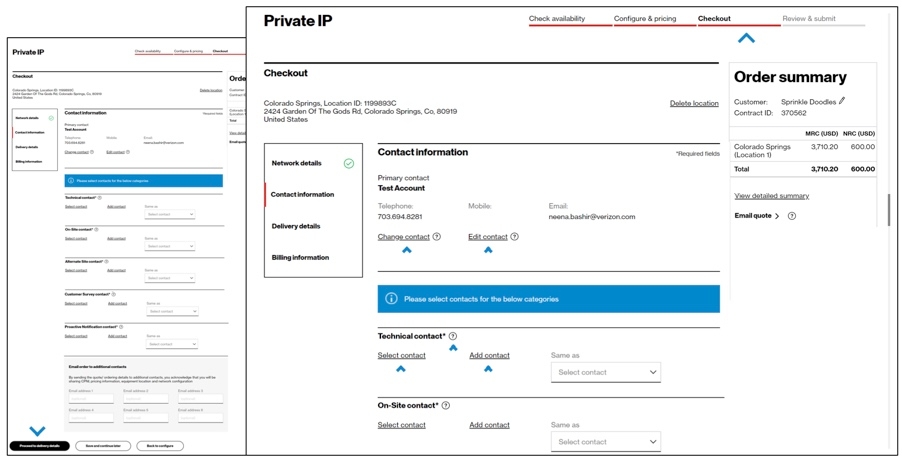
16. In the Checkout – Contact information step, you will select the contact for six required contact types: primary contact, technical contact, on-site contact, alternate site contact, customer survey contact, and proactive notification contact. You will be defaulted as the primary contact since you are placing the order. Scroll down the page to see all the contact types and information on the page. Click on the circled help icons for more information.
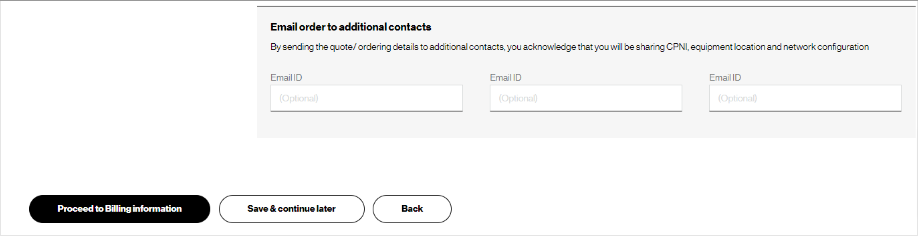
For contact types, you can choose the contacts to be the same as previous contacts using the drop-down menu, or specify another person as a contact, using the Select contact link. You also have the option to email the order to up to six other contacts, if you like. When you have completed all six required contact fields, click on Proceed to delivery details.
Review & submit
18. In the Checkout – Billing information step, you must select your billing account number (BAN). You can bill to an existing account, create a new BAN, or proceed without selecting a BAN. You must also complete the required Federal Universal Service Funds statement about whether you are purchasing the service for your own use or for resale. After making your selections, click Proceed to review & submit.
19. In the Review & submit step, scroll down the page to review all your information. Click on the pencil icon to edit a field. At the top of the page, there are icons to download, email, and print the completed order. When you submit the order, you will receive an email with a PDF of your order information, but you can also download the PDF from this page.
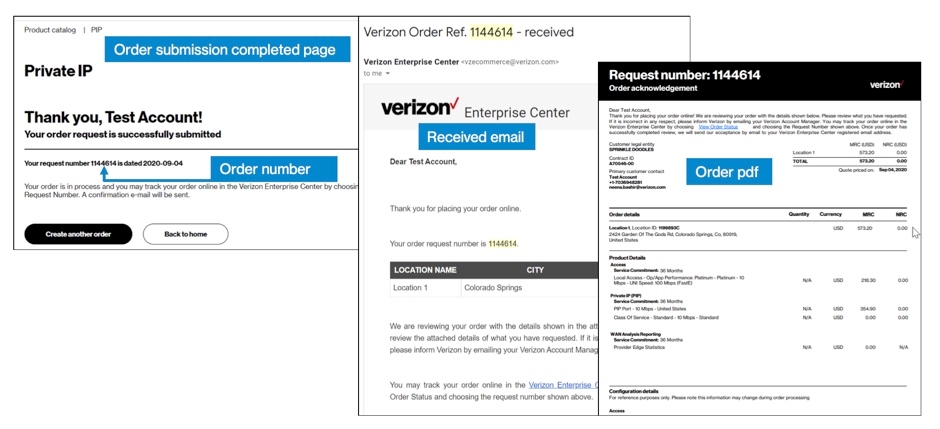
21. After you click Submit, you will see a message that gives you your order number, and you will receive an email confirming your order that includes a pdf file of your order details. If your account team needs to take action on the order, you will receive an email that says your order is pending. When your order has reached order request stage and been accepted, you will receive an email saying it has been accepted.
Example subject line of emails:
Verizon Order Ref. 1144614 -received
Verizon Order Ref. 1144614 -pending
Verizon Order Ref. 1144614 -accepted